使用PyTorch实现GoogleNet(Inception)并训练Fashion-MNIST
GoogleNet(又称Inception v1)是2014年ILSVRC冠军模型,其核心创新是Inception模块,通过并行多尺度卷积提升特征提取能力。本文将展示如何用PyTorch实现GoogleNet,并在Fashion-MNIST数据集上进行训练。
1. 环境准备
import torch
from torch import nn
from torch.nn import functional as F
from d2l import torch as d2l
2. Inception模块实现
Inception模块包含4条并行路径,分别使用不同尺寸的卷积核和池化操作:
class Inception(nn.Module):
    def __init__(self, in_channels, c1, c2, c3, c4, **kwargs):
        super().__init__(**kwargs)
        # 路径1:1x1卷积
        self.p1_1 = nn.Conv2d(in_channels, c1, kernel_size=1)
        # 路径2:1x1卷积 + 3x3卷积
        self.p2_1 = nn.Conv2d(in_channels, c2[0], kernel_size=1)
        self.p2_2 = nn.Conv2d(c2[0], c2[1], kernel_size=3, padding=1)
        # 路径3:1x1卷积 + 5x5卷积
        self.p3_1 = nn.Conv2d(in_channels, c3[0], kernel_size=1)
        self.p3_2 = nn.Conv2d(c3[0], c3[1], kernel_size=5, padding=2)
        # 路径4:3x3最大池化 + 1x1卷积
        self.p4_1 = nn.MaxPool2d(kernel_size=3, stride=1, padding=1)
        self.p4_2 = nn.Conv2d(in_channels, c4, kernel_size=1)

    def forward(self, x):
        p1 = F.relu(self.p1_1(x))
        p2 = F.relu(self.p2_2(F.relu(self.p2_1(x))))
        p3 = F.relu(self.p3_2(F.relu(self.p3_1(x))))
        p4 = F.relu(self.p4_2(self.p4_1(x)))
        return torch.cat((p1, p2, p3, p4), dim=1)  # 通道维度拼接
3. 构建GoogleNet网络
# 第一模块
b1 = nn.Sequential(
    nn.Conv2d(1, 64, kernel_size=7, stride=2, padding=3),
    nn.ReLU(),
    nn.MaxPool2d(kernel_size=3, stride=2, padding=1)
)

# 第二模块
b2 = nn.Sequential(
    nn.Conv2d(64, 64, kernel_size=1),
    nn.ReLU(),
    nn.Conv2d(64, 192, kernel_size=3, padding=1),
    nn.ReLU(),
    nn.MaxPool2d(kernel_size=3, stride=2, padding=1)
)

# 第三模块(含两个Inception)
b3 = nn.Sequential(
    Inception(192, 64, (96, 128), (16, 32), 32),
    Inception(256, 128, (128, 192), (32, 96), 64),
    nn.MaxPool2d(kernel_size=3, stride=2, padding=1)
)

# 第四模块(含五个Inception)
b4 = nn.Sequential(
    Inception(480, 192, (96, 208), (16, 48), 64),
    Inception(512, 160, (112, 224), (24, 64), 64),
    Inception(512, 128, (128, 256), (24, 64), 64),
    Inception(512, 112, (144, 288), (32, 64), 64),
    Inception(528, 256, (160, 320), (32, 128), 128),
    nn.MaxPool2d(kernel_size=3, stride=2, padding=1)
)

# 第五模块
b5 = nn.Sequential(
    Inception(832, 256, (160, 320), (32, 128), 128),
    Inception(832, 384, (192, 384), (48, 128), 128),
    nn.AdaptiveAvgPool2d((1,1)),
    nn.Flatten()
)

# 组合成完整网络
net = nn.Sequential(b1, b2, b3, b4, b5, nn.Linear(1024, 10))
4. 网络结构验证
X = torch.rand(size=(1, 1, 96, 96))
for layer in net:
    X = layer(X)
    print(layer.__class__.__name__, 'output shape:\t', X.shape)
输出结果:
Sequential output shape:   torch.Size([1, 64, 24, 24])
Sequential output shape:   torch.Size([1, 192, 12, 12])
Sequential output shape:   torch.Size([1, 480, 6, 6])
Sequential output shape:   torch.Size([1, 832, 3, 3])
Sequential output shape:   torch.Size([1, 1024])
Linear output shape:       torch.Size([1, 10])
5. 训练与评估
lr, num_epochs, batch_size = 0.1, 10, 512
train_iter, test_iter = d2l.load_data_fashion_mnist(batch_size, resize=96)
d2l.train_ch6(net, train_iter, test_iter, num_epochs, lr, d2l.try_gpu())
训练结果:
loss 0.464, train acc 0.824, test acc 0.795
431.9 examples/sec on cuda:0
6. 结果分析
-
训练曲线:
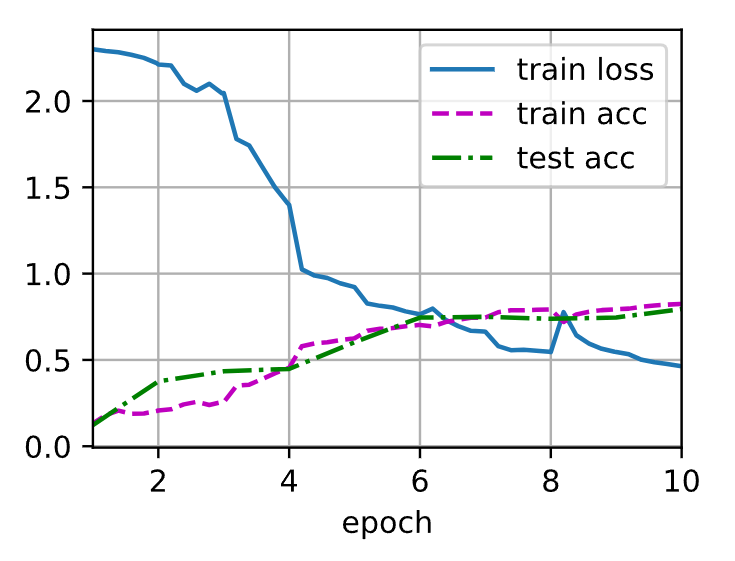
图中显示:-
训练损失稳步下降
-
训练准确率(紫色虚线)最终达到82.4%
-
测试准确率(绿色点线)达到79.5%,表明模型具有较好的泛化能力
-
-
性能指标:
-
训练速度:431.9样本/秒(使用GPU加速)
-
过拟合控制:测试准确率与训练准确率差距较小(约3%)
-
7. 完整代码说明
-
数据预处理:将Fashion-MNIST图像从28x28放大到96x96,以适应GoogleNet的输入尺寸
-
模型特点:
-
使用9个Inception模块构建深层网络
-
通过1x1卷积降低通道数(减少计算量)
-
自适应平均池化替代全连接层(减少参数)
-
-
训练技巧:
-
使用较大的批量大小(512)加速训练
-
学习率设为0.1(配合Adam优化器)
-
8. 改进建议
-
尝试添加Dropout层减少过拟合
-
使用学习率衰减策略(如Cosine退火)
-
替换为更大的数据集(如ImageNet)以发挥模型潜力
代码依赖:
-
Python 3.8+
-
PyTorch 1.12+
-
d2l库(可通过
pip install d2l安装)
将代码复制到Jupyter Notebook或Python脚本中即可运行。建议使用GPU环境加速训练。