RK3568使用gpio子系统完成led驱动程序编写
文章目录
- 一、设备树修改
- 二、led驱动程序编写
- **1️⃣ `led_driver.c`(LED 设备驱动)**
- **📌 关键部分解析**
- **1. 设备节点创建**
- **2. GPIO 资源获取**
- **3. 读/写操作**
- **2️⃣ `led_test.c`(用户态测试程序)**
- **📌 关键部分解析**
- **1. 打开 LED 设备**
- **2. 解析 `on/off` 命令**
- **3. 写入 LED 状态**
- **4. 关闭设备**
- **3️⃣ `Makefile`(编译内核模块)**
- **📌 关键部分解析**
- **1. `KERNELDIR`**
- **2. `obj-m := led_driver.o`**
- **3. `build` 目标**
- **4. `kernel_modules` 目标**
- **5. `clean` 目标**
- **4️⃣ 编译和运行**
- **🔹 1. 编译内核模块**
- **🔹 2. 加载驱动**
- **🔹 3. 确认设备文件**
- **🔹 4. 运行测试程序**
- **🔹 5. 卸载驱动**
- **总结**
- **📌 1. `led_driver.c`**
- **📌 2. `led_test.c`**
- **📌 3. `Makefile`**
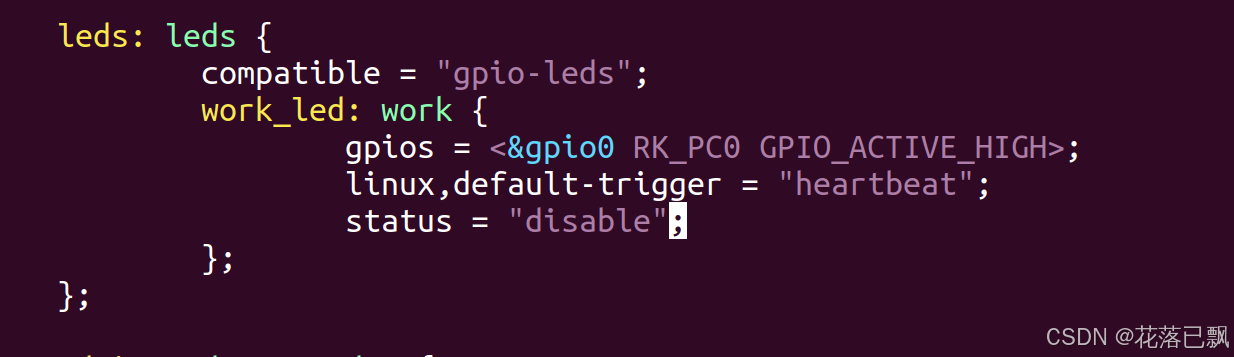
一、设备树修改
打开rk3568-evb.dtsi文件:
正点原子的RK3568中,LED灯被用于了心跳灯,所以在这里我们需要关闭这个心跳灯,使用status = "disable"即可关闭。
打开rk3568-atk-evb1-ddr4-v10.dtsi文件,在这个文件里面加入led灯的相关设备树:

二、led驱动程序编写
1️⃣ led_driver.c(LED 设备驱动)
这是一个 基于平台设备(platform_driver)的 LED 控制内核驱动,它的主要功能是:
- 从设备树获取 LED GPIO 引脚
- 设置 GPIO 为输出模式
- 通过
write接口 控制 LED 开关 - 通过
platform_driver注册驱动
📌 关键部分解析
1. 设备节点创建
device_create(led_class, NULL, MKDEV(major, 0), NULL, "alientekled");
- 这行代码会创建
/dev/alientekled设备文件,用户程序可以通过open("/dev/alientekled", O_RDWR)来访问 LED。
2. GPIO 资源获取
led_gpio = gpiod_get(&pdev->dev, NULL, 0);
- 从设备树 解析
alientek,led设备的 GPIO 引脚。 led_gpio指向该 GPIO 的控制结构体。
3. 读/写操作
led_write()char val; copy_from_user(&val, buf, 1); gpiod_set_value(led_gpio, val);- 读取用户传来的 1字节数据,然后调用
gpiod_set_value()控制 GPIO 输出高/低电平。
- 读取用户传来的 1字节数据,然后调用
2️⃣ led_test.c(用户态测试程序)
这个程序是 用户空间的 LED 控制程序,它:
- 通过 命令行参数 获取
/dev/xxx设备文件名 和on/off指令 - 通过
open()打开设备 - 通过
write()写入1或0来控制 LED
📌 关键部分解析
1. 打开 LED 设备
fd = open(argv[1], O_RDWR);
argv[1]是传入的设备文件名,例如/dev/alientekled- 如果
open()失败,会返回fd < 0,说明设备文件可能不存在。
2. 解析 on/off 命令
if (strcmp(argv[2], "on") == 0) {
    val = 1;
} else if (strcmp(argv[2], "off") == 0) {
    val = 0;
}
- 如果
argv[2]是on,val=1让 LED 亮 - 如果
argv[2]是off,val=0让 LED 灭
3. 写入 LED 状态
write(fd, &val, 1);
- 调用 驱动的
write()函数 - 传递
1或0,让 LED 亮灭
4. 关闭设备
close(fd);
- 释放设备文件
3️⃣ Makefile(编译内核模块)
KERNELDIR := /home/alientek//rk3568_linux_sdk/kernel/
CURRENT_PATH := $(shell pwd)
obj-m := led_driver.o

build: kernel_modules

kernel_modules:
	$(MAKE) -C $(KERNELDIR) M=$(CURRENT_PATH) modules

clean:
	$(MAKE) -C $(KERNELDIR) M=$(CURRENT_PATH) clean
📌 关键部分解析
1. KERNELDIR
KERNELDIR := /home/alientek//rk3568_linux_sdk/kernel/
- 指定 Linux 内核源码路径,用于交叉编译内核模块。
2. obj-m := led_driver.o
obj-m := led_driver.o
- 告诉内核:需要编译
led_driver.c成led_driver.ko(内核模块)。
3. build 目标
build: kernel_modules
make时,调用kernel_modules目标。
4. kernel_modules 目标
kernel_modules:
	$(MAKE) -C $(KERNELDIR) M=$(CURRENT_PATH) modules
$(MAKE) -C $(KERNELDIR) M=$(CURRENT_PATH) modules- 进入内核源码目录
$(KERNELDIR) - 使用当前目录的代码(
M=$(CURRENT_PATH))编译led_driver.ko
- 进入内核源码目录
5. clean 目标
clean:
	$(MAKE) -C $(KERNELDIR) M=$(CURRENT_PATH) clean
- 清理 编译过程中生成的
.o、.ko、.mod等文件。
4️⃣ 编译和运行
🔹 1. 编译内核模块
make
会生成:
led_driver.ko
🔹 2. 加载驱动
insmod led_driver.ko
🔹 3. 确认设备文件
ls /dev/alientekled
如果 /dev/alientekled 存在,则驱动正常。
🔹 4. 运行测试程序
./led_test /dev/alientekled on   # 打开LED
./led_test /dev/alientekled off  # 关闭LED
🔹 5. 卸载驱动
rmmod led_driver
总结
📌 1. led_driver.c
- 平台驱动 (
platform_driver),从 设备树 获取 GPIO 并控制 LED。 - 通过
write()接收用户指令,控制 GPIO 高/低电平。
#include <linux/module.h>
#include <linux/poll.h>

#include <linux/fs.h>
#include <linux/errno.h>
#include <linux/miscdevice.h>
#include <linux/kernel.h>
#include <linux/major.h>
#include <linux/mutex.h>
#include <linux/proc_fs.h>
#include <linux/seq_file.h>
#include <linux/stat.h>
#include <linux/init.h>
#include <linux/device.h>
#include <linux/tty.h>
#include <linux/kmod.h>
#include <linux/gfp.h>
#include <linux/gpio/consumer.h>
#include <linux/platform_device.h>
#include <linux/of_gpio.h>
#include <linux/of_irq.h>
#include <linux/interrupt.h>
#include <linux/irq.h>
#include <linux/slab.h>
#include <linux/fcntl.h>
#include <linux/timer.h>
#include <linux/workqueue.h>
#include <asm/current.h>
#include <linux/delay.h>
#include <linux/timex.h>


int major=0;
static struct class *led_class;
static struct gpio_desc *led_gpio;


static ssize_t led_read (struct file *file, char __user *buf, size_t size, loff_t *off)
{
	return 0;

}

static int led_open (struct inode *inode, struct file *file)
{
	printk("%s %s line %d\n", __FILE__, __FUNCTION__, __LINE__);
	return 0;
}

static ssize_t led_write (struct file *file, const char __user *buf, size_t size, loff_t *off)
{
	char val;
	int err;
	err = copy_from_user(&val, buf, 1);
	gpiod_set_value(led_gpio, val);
	printk("%s %s line %d  val:%d\n", __FILE__, __FUNCTION__, __LINE__,val);

	return 1;
}


static struct file_operations led_ops={
	.owner		= THIS_MODULE,
	.open		= led_open,
	.read		= led_read,
	.write		= led_write,
};


static int led_probe(struct platform_device *pdev)
{
	printk("%s %s line %d\n", __FILE__, __FUNCTION__, __LINE__);

	/*1.获取硬件信息*/
	led_gpio=gpiod_get(&pdev->dev, NULL, 0);
	if (IS_ERR(led_gpio)) {
		printk("%s %s line %d\n", __FILE__, __FUNCTION__, __LINE__);
	}

	/*将GPIO引脚设置为输出引脚*/
	gpiod_direction_output(led_gpio, 0);

	/*2.创建设备节点*/
	device_create(led_class,NULL, MKDEV(major, 0), NULL, "alientekled");


    return 0;

}

static int led_remove(struct platform_device *pdev)
{
	printk("%s %s line %d\n", __FILE__, __FUNCTION__, __LINE__);
	gpiod_put(led_gpio);
	return 0;
}

static const struct of_device_id my_led[] = {
    { .compatible = "alientek,led" },
    { },
};


static struct platform_driver led={
	.driver = {
		.name = "led",
		.of_match_table = my_led,
	},
	.probe = led_probe,
	.remove	= led_remove,
};


static int __init led_init(void)
{
	int err;
	printk("%s %s line %d\n", __FILE__, __FUNCTION__, __LINE__);
	/*确定主设备号*/
	major=register_chrdev(major, "myled", &led_ops);
	/*创建类*/
	led_class=class_create(THIS_MODULE, "led");
	if (IS_ERR(led_class)) {
		printk("%s %s line %d\n", __FILE__, __FUNCTION__, __LINE__);
		unregister_chrdev(major, "myled");
		return PTR_ERR(led_class);
	}
	err=platform_driver_register(&led);
	return 0;
}

static void __exit led_exit(void)
{
	printk("%s %s line %d\n", __FILE__, __FUNCTION__, __LINE__);
	device_destroy(led_class, MKDEV(major, 0));
	class_destroy(led_class);
	unregister_chrdev(major, "myled");
	platform_driver_unregister(&led);
}

module_init(led_init);
module_exit(led_exit);

MODULE_LICENSE("GPL");
📌 2. led_test.c
- 用户空间程序,通过
write()控制/dev/alientekled设备。 - 传入 “on” / “off” 控制 LED。
#include <stdio.h>
#include <sys/types.h>
#include <sys/stat.h>
#include <fcntl.h>
#include <unistd.h>
#include <string.h>


int main(int argc,char **argv)
{
	int fd;
	char val;


	if(argc != 3)
	{
		printf("Usage:\n");
		printf("%s <dev> <on|off>\n",argv[0]);
	}

	fd = open(argv[1],O_RDWR);
	if(fd<0)
	{
		printf("can not open the file\n");
		return -1;
	}

	if(strcmp(argv[2],"on") == 0)
	{
		val = 1;
	}
	else if(strcmp(argv[2],"off") == 0)
	{
		val = 0;
	}
	write(fd,&val,1);

	close(fd);

	return 0;
}
📌 3. Makefile
- 使用
make交叉编译 LED 内核驱动。 - 生成
led_driver.ko并安装到内核。
这样,你的 LED 驱动 + 用户态控制程序 就完整了 🎉!
KERNELDIR := /home/alientek//rk3568_linux_sdk/kernel/
CURRENT_PATH := $(shell pwd)
obj-m := led_driver.o

build: kernel_modules

kernel_modules:
	$(MAKE) -C $(KERNELDIR) M=$(CURRENT_PATH) modules
clean:
	$(MAKE) -C $(KERNELDIR) M=$(CURRENT_PATH) clean