SpringBoot教程(三十四)| SpringBoot集成本地缓存Caffeine
SpringBoot教程(三十四)| SpringBoot集成本地缓存Caffeine
- 一、引言:Caffeine是什么?
- 二、Caffeine核心特性快速了解
- 2.1 先进的淘汰算法
- 2.2 灵活的过期与刷新策略
- 2.3 多样化缓存加载方式
- 2.4 轻量与可观测性
- 三、Caffeine与Guava Cache对比
- 四、Spring Boot集成Caffeine(方式一:注解式)(推荐)
- 核心注解参数及场景简述
- 通用核心参数(3个注解共通)
- 1. @Cacheable → 仅用于 查询操作
- 2. @CachePut → 用于 新增/更新操作
- 3. @CacheEvict → 用于 删除操作
- 步骤1:引入依赖
- 步骤2:配置数据库与缓存
- 步骤3:配置Caffeine缓存管理器(三种场景,按需选择配置)
- 1. 全局策略:所有缓存共用同一套配置(全部遵守相同规则)
- 2. 指定缓存列表:多个缓存共用同一策略(明确范围,规则相同)
- 3. 独立策略:每个缓存使用不同规则(各自配置过期时间、容量等)
- 步骤4:创建实体类与Mapper
- 步骤5:业务层实现(缓存注解)
- 步骤6:控制器与启动类配置
- 步骤7:查看缓存数据的控制层
- 步骤8:测试验证
- 五、Spring Boot集成Caffeine(方式二:直接使用Caffeine API)
- 步骤1:调整依赖(移除缓存抽象)
- 步骤2:配置Caffeine缓存实例
- 步骤3:业务层实现(手动操作缓存)
- 步骤4:控制器与测试
- 步骤5:查看缓存数据的控制层
- 步骤6:测试验证
- 总结
一、引言:Caffeine是什么?
Caffeine是一款基于Java的高性能本地缓存库,由Guava Cache核心作者Ben Manes开发,定位为“Guava Cache的继任者”。它通过优化的缓存淘汰算法和轻量级架构,实现了高命中率和低延迟,能有效减少数据库访问压力、提升系统响应速度。
作为内存级缓存方案,Caffeine适用于热点数据临时存储场景(如商品详情、用户会话、配置参数),核心优势在于:高命中率、轻量级无依赖、灵活的缓存策略,可无缝集成到Spring Boot项目中,是本地缓存的优选方案。
二、Caffeine核心特性快速了解
Caffeine的强大源于其精心设计的特性,适配主流Java环境,关键特性如下:
2.1 先进的淘汰算法
基于“Window TinyLFU”算法,结合LFU(频率优先)和LRU(时效性优先)的优势,相比传统LRU算法命中率提升10%-20%,能精准保留热点数据,避免缓存颠簸。
2.2 灵活的过期与刷新策略
- 写入后过期(
expireAfterWrite):数据写入后指定时间失效,适合订单、验证码等时效性强的场景。 - 访问后过期(
expireAfterAccess):数据最后一次访问后指定时间失效,适合历史记录等低频访问场景。 - 自定义过期:通过
expireAfter结合函数式编程实现复杂过期逻辑,适配灵活业务需求。 - 定时刷新(
refreshAfterWrite):数据写入后指定时间自动刷新,刷新时不阻塞旧值读取,有效避免缓存雪崩。
2.3 多样化缓存加载方式
- 同步加载:通过
CacheLoader在缓存未命中时自动加载数据,简化代码编写。 - 异步加载:通过
AsyncCache返回CompletableFuture,实现非阻塞加载,适配高并发场景。 - 批量加载:支持一次性加载多个键值对,减少数据库IO次数,提升加载效率。
2.4 轻量与可观测性
- 无额外依赖:仅依赖核心Java类库,体积小巧(约100KB),部署无负担。
- 缓存统计:通过
recordStats()开启统计,可获取命中率、加载时间、淘汰次数等指标,便于性能监控。
三、Caffeine与Guava Cache对比
Caffeine作为Guava Cache的升级替代方案,两者API相似但核心能力差异显著,具体对比如下:
| 对比维度 | Caffeine | Guava Cache |
|---|---|---|
| 淘汰算法 | Window TinyLFU(高命中率) | LRU(命中率较低) |
| 性能(吞吐量) | 更高(并发优化,比Guava快10%-20%) | 中等(并发性能受限) |
| 过期/刷新策略 | 支持写入/访问/自定义过期+定时刷新 | 仅支持写入/访问过期(无刷新机制) |
| 异步支持 | 原生支持AsyncCache,返回CompletableFuture | 无原生异步,需手动结合线程池实现 |
| 维护状态 | 活跃更新(稳定版本持续迭代) | 停止更新(最后版本28.2,2020年停止维护) |
选型建议:
- 新项目优先选择Caffeine,性能、功能及维护性更优;
- 老项目若已使用Guava Cache且无性能问题可维持,需优化时迁移成本低(API相似)。
四、Spring Boot集成Caffeine(方式一:注解式)(推荐)
基于Spring缓存抽象
依赖Spring缓存抽象层,通过@Cacheable等注解实现无侵入式缓存,代码简洁易维护,无需手动操作缓存API。
核心注解参数及场景简述
通用核心参数(3个注解共通)
value/cacheNames(必选)- 含义:指定缓存名称(如"userCache"),决定操作哪个缓存。
- 示例:
@Cacheable("userCache")
key(常用)- 含义:自定义缓存键(默认用方法名+参数生成),用SpEL表达式(
#参数名)。 - 示例:
key = "#id"(用参数id当键)、key = "#user.id"(用对象属性当键)
- 含义:自定义缓存键(默认用方法名+参数生成),用SpEL表达式(
condition(可选)- 含义:缓存生效的条件(方法执行前判断),true才执行缓存。
- 示例:
condition = "#id > 0"(id为正数才缓存)
1. @Cacheable → 仅用于 查询操作
- 场景:查询数据(如根据ID查用户、查商品详情),目的是“第一次查库后缓存结果,后续查询直接返回缓存,减少数据库访问”。
- 核心逻辑:先查缓存 → 命中则返回缓存 → 未命中则执行方法(查库)→ 缓存结果。
- 特有注解:
unless(常用):不缓存的条件(方法执行后判断),true则不缓存。- 示例:
unless = "#result == null"(结果为null不缓存)
- 示例:
sync(可选,默认值是 false):开启同步(防止缓存击穿),多线程并发时仅一个线程查库。- 示例:
sync = true
- 示例:
- 场景示例:
// 查询用户:首次查库,后续查缓存
@Cacheable(value = "userCache", key = "#id", unless = "#result == null")
public User getUserById(Long id) {return userMapper.selectById(id); // 仅首次执行
}
2. @CachePut → 用于 新增/更新操作
- 场景:新增数据(如注册用户)或更新数据(如修改用户信息),目的是“操作后将新数据存入缓存,确保缓存与数据库一致”。
- 核心逻辑:必执行方法(新增/更新数据库)→ 将返回的新数据存入缓存(覆盖旧值)。
- 场景示例:
// 新增用户:存库后,将新用户存入缓存
@CachePut(value = "userCache", key = "#user.id")
public User addUser(User user) {userMapper.insert(user); // 执行新增return user; // 新增的用户存入缓存
}// 更新用户:更新库后,用新结果覆盖缓存
@CachePut(value = "userCache", key = "#user.id")
public User updateUser(User user) {userMapper.updateById(user); // 执行更新return user; // 更新后的用户覆盖缓存
}
3. @CacheEvict → 用于 删除操作
- 场景:删除数据(如删除用户、批量删除商品),目的是“删除后清除对应缓存,避免缓存残留旧数据(脏数据)”。
- 核心逻辑:执行方法(删除数据库数据)→ 清除缓存(或清空整个缓存)。
- 特有注解:
allEntries(常用):是否删除缓存中所有数据(默认只删当前key)。- 示例:
allEntries = true(清空整个缓存)
- 示例:
beforeInvocation(可选,默认false):删除时机(false=方法执行后删,true=方法执行前删)。- 示例:
beforeInvocation = true(方法执行前先删缓存)
- 示例:
- 场景示例:
// 删除单个用户:删库后,清除该用户的缓存
@CacheEvict(value = "userCache", key = "#id")
public void deleteUser(Long id) {userMapper.deleteById(id); // 执行删除
}// 批量删除用户:删库后,清空整个用户缓存
@CacheEvict(value = "userCache", allEntries = true)
public void deleteAllUser() {userMapper.deleteAll(); // 执行批量删除
}
步骤1:引入依赖
在pom.xml中添加依赖,确保版本兼容,配置Maven编译插件保证编译规范:
核心依赖:如下
<!-- Spring缓存抽象 -->
<dependency><groupId>org.springframework.boot</groupId><artifactId>spring-boot-starter-cache</artifactId>
</dependency>
<!-- Caffeine缓存实现-->
<dependency><groupId>com.github.ben-manes.caffeine</groupId><artifactId>caffeine</artifactId><version>2.9.3</version><!-- jdk1.8兼容版本为2.9.3-->
</dependency>
测试依赖:如下
<!-- MyBatis-Plus Starter -->
<dependency><groupId>com.baomidou</groupId><artifactId>mybatis-plus-boot-starter</artifactId><version>3.5.7</version>
</dependency>
<!-- MySQL驱动 -->
<dependency><groupId>mysql</groupId><artifactId>mysql-connector-java</artifactId><scope>runtime</scope>
</dependency>
<!-- Spring Web(用于测试接口) -->
<dependency><groupId>org.springframework.boot</groupId><artifactId>spring-boot-starter-web</artifactId>
</dependency>
步骤2:配置数据库与缓存
创建application.yml配置文件,配置MySQL连接、MyBatis-Plus和缓存参数:
spring:# MySQL配置(需提前创建数据库:caffeine_demo)datasource:driver-class-name: com.mysql.cj.jdbc.Driverurl: jdbc:mysql://localhost:3306/caffeine_demo?useUnicode=true&characterEncoding=utf8&serverTimezone=UTC&useSSL=falseusername: root  # 替换为你的MySQL用户名password: root  # 替换为你的MySQL密码# MyBatis-Plus配置
mybatis-plus:mapper-locations: classpath:mapper/*.xml  # Mapper XML路径(注解方式可省略)type-aliases-package: com.example.caffeine.entity  # 实体类包路径configuration:log-impl: org.apache.ibatis.logging.stdout.StdOutImpl  # 打印SQL(调试用)map-underscore-to-camel-case: true  # 下划线转驼峰
步骤3:配置Caffeine缓存管理器(三种场景,按需选择配置)
测试案例里面用的是第二种
1. 全局策略:所有缓存共用同一套配置(全部遵守相同规则)
适用场景:所有缓存(如用户、商品、订单)的过期时间、容量等策略完全一致。
配置类如下:
import com.github.benmanes.caffeine.cache.Caffeine;
import org.springframework.cache.CacheManager;
import org.springframework.cache.caffeine.CaffeineCacheManager;
import org.springframework.context.annotation.Bean;
import org.springframework.context.annotation.Configuration;
import java.util.concurrent.TimeUnit;@Configuration
public class GlobalCacheConfig {/*** 全局缓存管理器:所有缓存共用同一策略* 不指定 cacheNames,自动管理所有缓存名称(如 userCache、productCache 等)*/@Beanpublic CacheManager cacheManager() {// 全局统一策略:写入后10分钟过期,最大容量2000条Caffeine<Object, Object> caffeine = Caffeine.newBuilder().maximumSize(2000)  // 所有缓存最大共2000条.expireAfterWrite(10, TimeUnit.MINUTES)  // 所有缓存写入后10分钟过期.removalListener((key, value, cause) -> {System.out.println("缓存[" + key + "]被删除,原因:" + cause);});CaffeineCacheManager cacheManager = new CaffeineCacheManager();cacheManager.setCaffeine(caffeine);// 不设置 cacheNames,允许自动管理所有缓存名称(用户、商品等缓存都用此策略)return cacheManager;}
}
使用示例(Service 层):
import org.springframework.cache.annotation.Cacheable;
import org.springframework.stereotype.Service;@Service
public class MultiService {// 使用缓存名称 userCache,自动应用全局策略(10分钟过期)@Cacheable(value = "userCache", key = "#id")public User getUser(Long id) {return userMapper.selectById(id); // 数据库查询}// 使用缓存名称 productCache,同样应用全局策略(10分钟过期)@Cacheable(value = "productCache", key = "#id")public Product getProduct(Long id) {return productMapper.selectById(id); // 数据库查询}
}
2. 指定缓存列表:多个缓存共用同一策略(明确范围,规则相同)
适用场景:仅指定的部分缓存(如 userCache、productCache)共用同一策略,其他缓存使用默认策略(或不启用)。
配置类如下:
import com.github.benmanes.caffeine.cache.Caffeine;
import org.springframework.cache.CacheManager;
import org.springframework.cache.caffeine.CaffeineCacheManager;
import org.springframework.context.annotation.Bean;
import org.springframework.context.annotation.Configuration;
import java.util.Arrays;
import java.util.concurrent.TimeUnit;@Configuration
public class SamePolicyCacheConfig {/*** 指定缓存列表共用同一策略* 仅对 userCache、productCache 生效,其他缓存不适用*/@Beanpublic CacheManager cacheManager() {// 共用策略:写入后5分钟过期,最大容量1000条Caffeine<Object, Object> caffeine = Caffeine.newBuilder().maximumSize(1000).expireAfterWrite(5, TimeUnit.MINUTES).removalListener((key, value, cause) -> {System.out.println("缓存[" + key + "]被删除,原因:" + cause);});CaffeineCacheManager cacheManager = new CaffeineCacheManager();cacheManager.setCaffeine(caffeine);// 明确指定缓存名称列表,仅这些缓存应用此策略cacheManager.setCacheNames(Arrays.asList("userCache", "productCache"));return cacheManager;}
}
使用示例(Service 层):
import org.springframework.cache.annotation.Cacheable;
import org.springframework.stereotype.Service;@Service
public class MultiService {// 使用缓存名称 userCache,自动应用全局策略(10分钟过期)@Cacheable(value = "userCache", key = "#id")public User getUser(Long id) {return userMapper.selectById(id); // 数据库查询}// 使用缓存名称 productCache,同样应用全局策略(10分钟过期)@Cacheable(value = "productCache", key = "#id")public Product getProduct(Long id) {return productMapper.selectById(id); // 数据库查询}
}
3. 独立策略:每个缓存使用不同规则(各自配置过期时间、容量等)
适用场景:不同缓存需要差异化策略(如用户缓存 10 分钟,商品缓存 30 分钟,订单缓存 1 小时)。
实现方式:自定义 CacheManager 管理多策略缓存
通过 CaffeineCacheManager 的扩展能力,为不同缓存名称配置独立的 Caffeine 策略,再结合注解使用。
配置类如下:
import com.github.benmanes.caffeine.cache.Caffeine;
import org.springframework.cache.Cache;
import org.springframework.cache.caffeine.CaffeineCache;
import org.springframework.cache.caffeine.CaffeineCacheManager;
import org.springframework.context.annotation.Bean;
import org.springframework.context.annotation.Configuration;
import java.util.concurrent.TimeUnit;@Configuration
public class MultiPolicyCacheConfig {/*** 自定义缓存管理器:为不同缓存名称配置独立策略*/@Beanpublic CaffeineCacheManager cacheManager() {// 创建一个基础的缓存管理器CaffeineCacheManager cacheManager = new CaffeineCacheManager() {// 重写getCache方法:当请求缓存时,返回对应策略的Cache实例@Overridepublic Cache getCache(String name) {// 根据缓存名称(name)返回不同策略的缓存switch (name) {case "userCache":// 用户缓存策略:10分钟过期,最大500条Caffeine<Object, Object> userCaffeine = Caffeine.newBuilder().maximumSize(500).expireAfterWrite(10, TimeUnit.MINUTES).removalListener((key, value, cause) -> System.out.println("userCache删除:" + key + ",原因:" + cause));return new CaffeineCache(name, userCaffeine.build());case "productCache":// 商品缓存策略:30分钟过期,最大1000条Caffeine<Object, Object> productCaffeine = Caffeine.newBuilder().maximumSize(1000).expireAfterWrite(30, TimeUnit.MINUTES);return new CaffeineCache(name, productCaffeine.build());case "orderCache":// 订单缓存策略:1小时过期,最大2000条Caffeine<Object, Object> orderCaffeine = Caffeine.newBuilder().maximumSize(2000).expireAfterWrite(1, TimeUnit.HOURS);return new CaffeineCache(name, orderCaffeine.build());default:// 默认策略:无过期时间,最大100条(应对未定义的缓存名称)Caffeine<Object, Object> defaultCaffeine = Caffeine.newBuilder().maximumSize(100);return new CaffeineCache(name, defaultCaffeine.build());}}};return cacheManager;}
}
使用示例(Service 层):
import org.springframework.cache.annotation.Cacheable;
import org.springframework.stereotype.Service;@Service
public class MultiPolicyService {// 使用 userCache 策略(10分钟过期)@Cacheable(value = "userCache", key = "#id")public User getUser(Long id) {System.out.println("查询用户数据库:id=" + id);return userMapper.selectById(id);}// 使用 productCache 策略(30分钟过期)@Cacheable(value = "productCache", key = "#id")public Product getProduct(Long id) {System.out.println("查询商品数据库:id=" + id);return productMapper.selectById(id);}// 使用 orderCache 策略(1小时过期)@Cacheable(value = "orderCache", key = "#id")public Order getOrder(Long id) {System.out.println("查询订单数据库:id=" + id);return orderMapper.selectById(id);}
}
步骤4:创建实体类与Mapper
(1)定义数据库实体类:
package com.example.springbootcaffeinedemo.entity;
import com.baomidou.mybatisplus.annotation.IdType;
import com.baomidou.mybatisplus.annotation.TableId;
import com.baomidou.mybatisplus.annotation.TableName;@TableName("user")  // 对应数据库表名
public class User {@TableId(type = IdType.AUTO)  // MySQL自增主键private Long id;private String username;private Integer age;// 无参构造(MyBatis-Plus反射需要)public User() {}// 有参构造(用于测试)public User(String username, Integer age) {this.username = username;this.age = age;}// getter/setterpublic Long getId() { return id; }public void setId(Long id) { this.id = id; }public String getUsername() { return username; }public void setUsername(String username) { this.username = username; }public Integer getAge() { return age; }public void setAge(Integer age) { this.age = age; }
}
(2)定义Mapper:
package com.example.springbootcaffeinedemo.mapper;
import com.baomidou.mybatisplus.core.mapper.BaseMapper;
import org.apache.ibatis.annotations.Mapper;
import com.example.springbootcaffeinedemo.entity.User;@Mapper  // 标记为MyBatis Mapper
public interface UserMapper extends BaseMapper<User> {// 无需编写实现,MyBatis-Plus自动生成CRUD方法
}
步骤5:业务层实现(缓存注解)
在Service层使用Spring缓存注解,实现无侵入式缓存:
package com.example.springbootcaffeinedemo.service;import com.example.springbootcaffeinedemo.entity.User;
import com.example.springbootcaffeinedemo.mapper.UserMapper;
import org.springframework.cache.annotation.CacheEvict;
import org.springframework.cache.annotation.Cacheable;
import org.springframework.stereotype.Service;
import javax.annotation.Resource;@Service
public class UserService {@Resourceprivate UserMapper userMapper;/*** 查询用户:先查缓存,未命中则查数据库* @Cacheable:value指定缓存名称,key指定缓存键(SpEL表达式)*/@Cacheable(value = "userCache", key = "#id", unless = "#result == null")public User getUserById(Long id) {System.out.println("=== 从MySQL查询用户(缓存未命中)===");User user = userMapper.selectById(id);if (user == null) {throw new RuntimeException("用户不存在,id=" + id);}return user;}/*** 删除用户:删除数据库后清除缓存*/@CacheEvict(value = "userCache", key = "#id")public void deleteUser(Long id) {userMapper.deleteById(id);System.out.println("=== 删除用户并清除缓存 ===");}
}
步骤6:控制器与启动类配置
(1)控制层类,如下:
package com.example.springbootcaffeinedemo.controller;// 控制器:UserController.java
import com.example.springbootcaffeinedemo.entity.User;
import com.example.springbootcaffeinedemo.mapper.UserMapper;
import com.example.springbootcaffeinedemo.service.UserService;
import org.springframework.web.bind.annotation.*;
import javax.annotation.Resource;@RestController
@RequestMapping("/users")
public class UserController {@Resourceprivate UserService userService;@Resourceprivate UserMapper userMapper;/*** 新增用户(用于初始化测试数据)*/@PostMappingpublic User addUser(@RequestBody User user) {userMapper.insert(user);return user;}/*** 查询用户(触发缓存)*/@GetMapping("/{id}")public User getUser(@PathVariable Long id) {System.out.println("开始查询用户:"+id);return userService.getUserById(id);}/*** 删除用户(触发缓存清除)*/@DeleteMapping("/{id}")public String deleteUser(@PathVariable Long id) {userService.deleteUser(id);return "删除成功";}
}
(2)启动类,开启注释
@SpringBootApplication
@EnableCaching  // 开启Spring缓存
@MapperScan("com.example.springbootcaffeinedemo.mapper")  // 扫描MyBatis Mapper接口
public class SpringbootCaffeineDemoApplication {public static void main(String[] args) {SpringApplication.run(SpringbootCaffeineDemoApplication.class, args);}}
步骤7:查看缓存数据的控制层
仅限于本地测试看使用,正式环境不要建议提供出去
package com.example.springbootcaffeinedemo.controller;import com.github.benmanes.caffeine.cache.Cache;
import org.springframework.cache.CacheManager;
import org.springframework.web.bind.annotation.GetMapping;
import org.springframework.web.bind.annotation.PathVariable;
import org.springframework.web.bind.annotation.RequestMapping;
import org.springframework.web.bind.annotation.RestController;
import javax.annotation.Resource;
import java.util.HashMap;
import java.util.Map;@RestController
@RequestMapping("/cache")
public class CacheViewController {@Resourceprivate CacheManager cacheManager;/*** 查看 userCache 缓存中的所有数据(适配 Caffeine 2.9.3)*/@GetMapping("/userCache/data")public Map<Object, Object> getUserCacheData() {// 1. 获取 Spring 管理的缓存(名称为 userCache)org.springframework.cache.Cache springCache = cacheManager.getCache("userCache");if (springCache == null) {return new HashMap<>(); // 缓存不存在时返回空}// 2. 转换为 Caffeine 原生的 Cache 对象(2.9.3 版本兼容)Cache<Object, Object> caffeineCache = (Cache<Object, Object>) springCache.getNativeCache();// 3. 通过 asMap() 获取所有键值对(返回 ConcurrentMap 视图)Map<Object, Object> cacheData = new HashMap<>(caffeineCache.asMap());return cacheData;}/*** 查看缓存中是否存在指定键(示例:检查 id=1 的用户是否在缓存中)*/@GetMapping("/userCache/hasKey/{id}")public boolean hasKey(@PathVariable Long id) {org.springframework.cache.Cache springCache = cacheManager.getCache("userCache");if (springCache == null) {return false;}Cache<Object, Object> caffeineCache = (Cache<Object, Object>) springCache.getNativeCache();// 用 getIfPresent 检查键是否存在return caffeineCache.getIfPresent(id) != null;}
}
步骤8:测试验证
1.初始化数据库:登录MySQL客户端,执行创建数据库命令:
CREATE DATABASE IF NOT EXISTS caffeine_demo CHARACTER SET utf8mb4 COLLATE utf8mb4_unicode_ci;
2.启动应用
3.新增测试数据:用Postman调用POST /users接口,请求体:
{"username":"zhangsan","age":25}

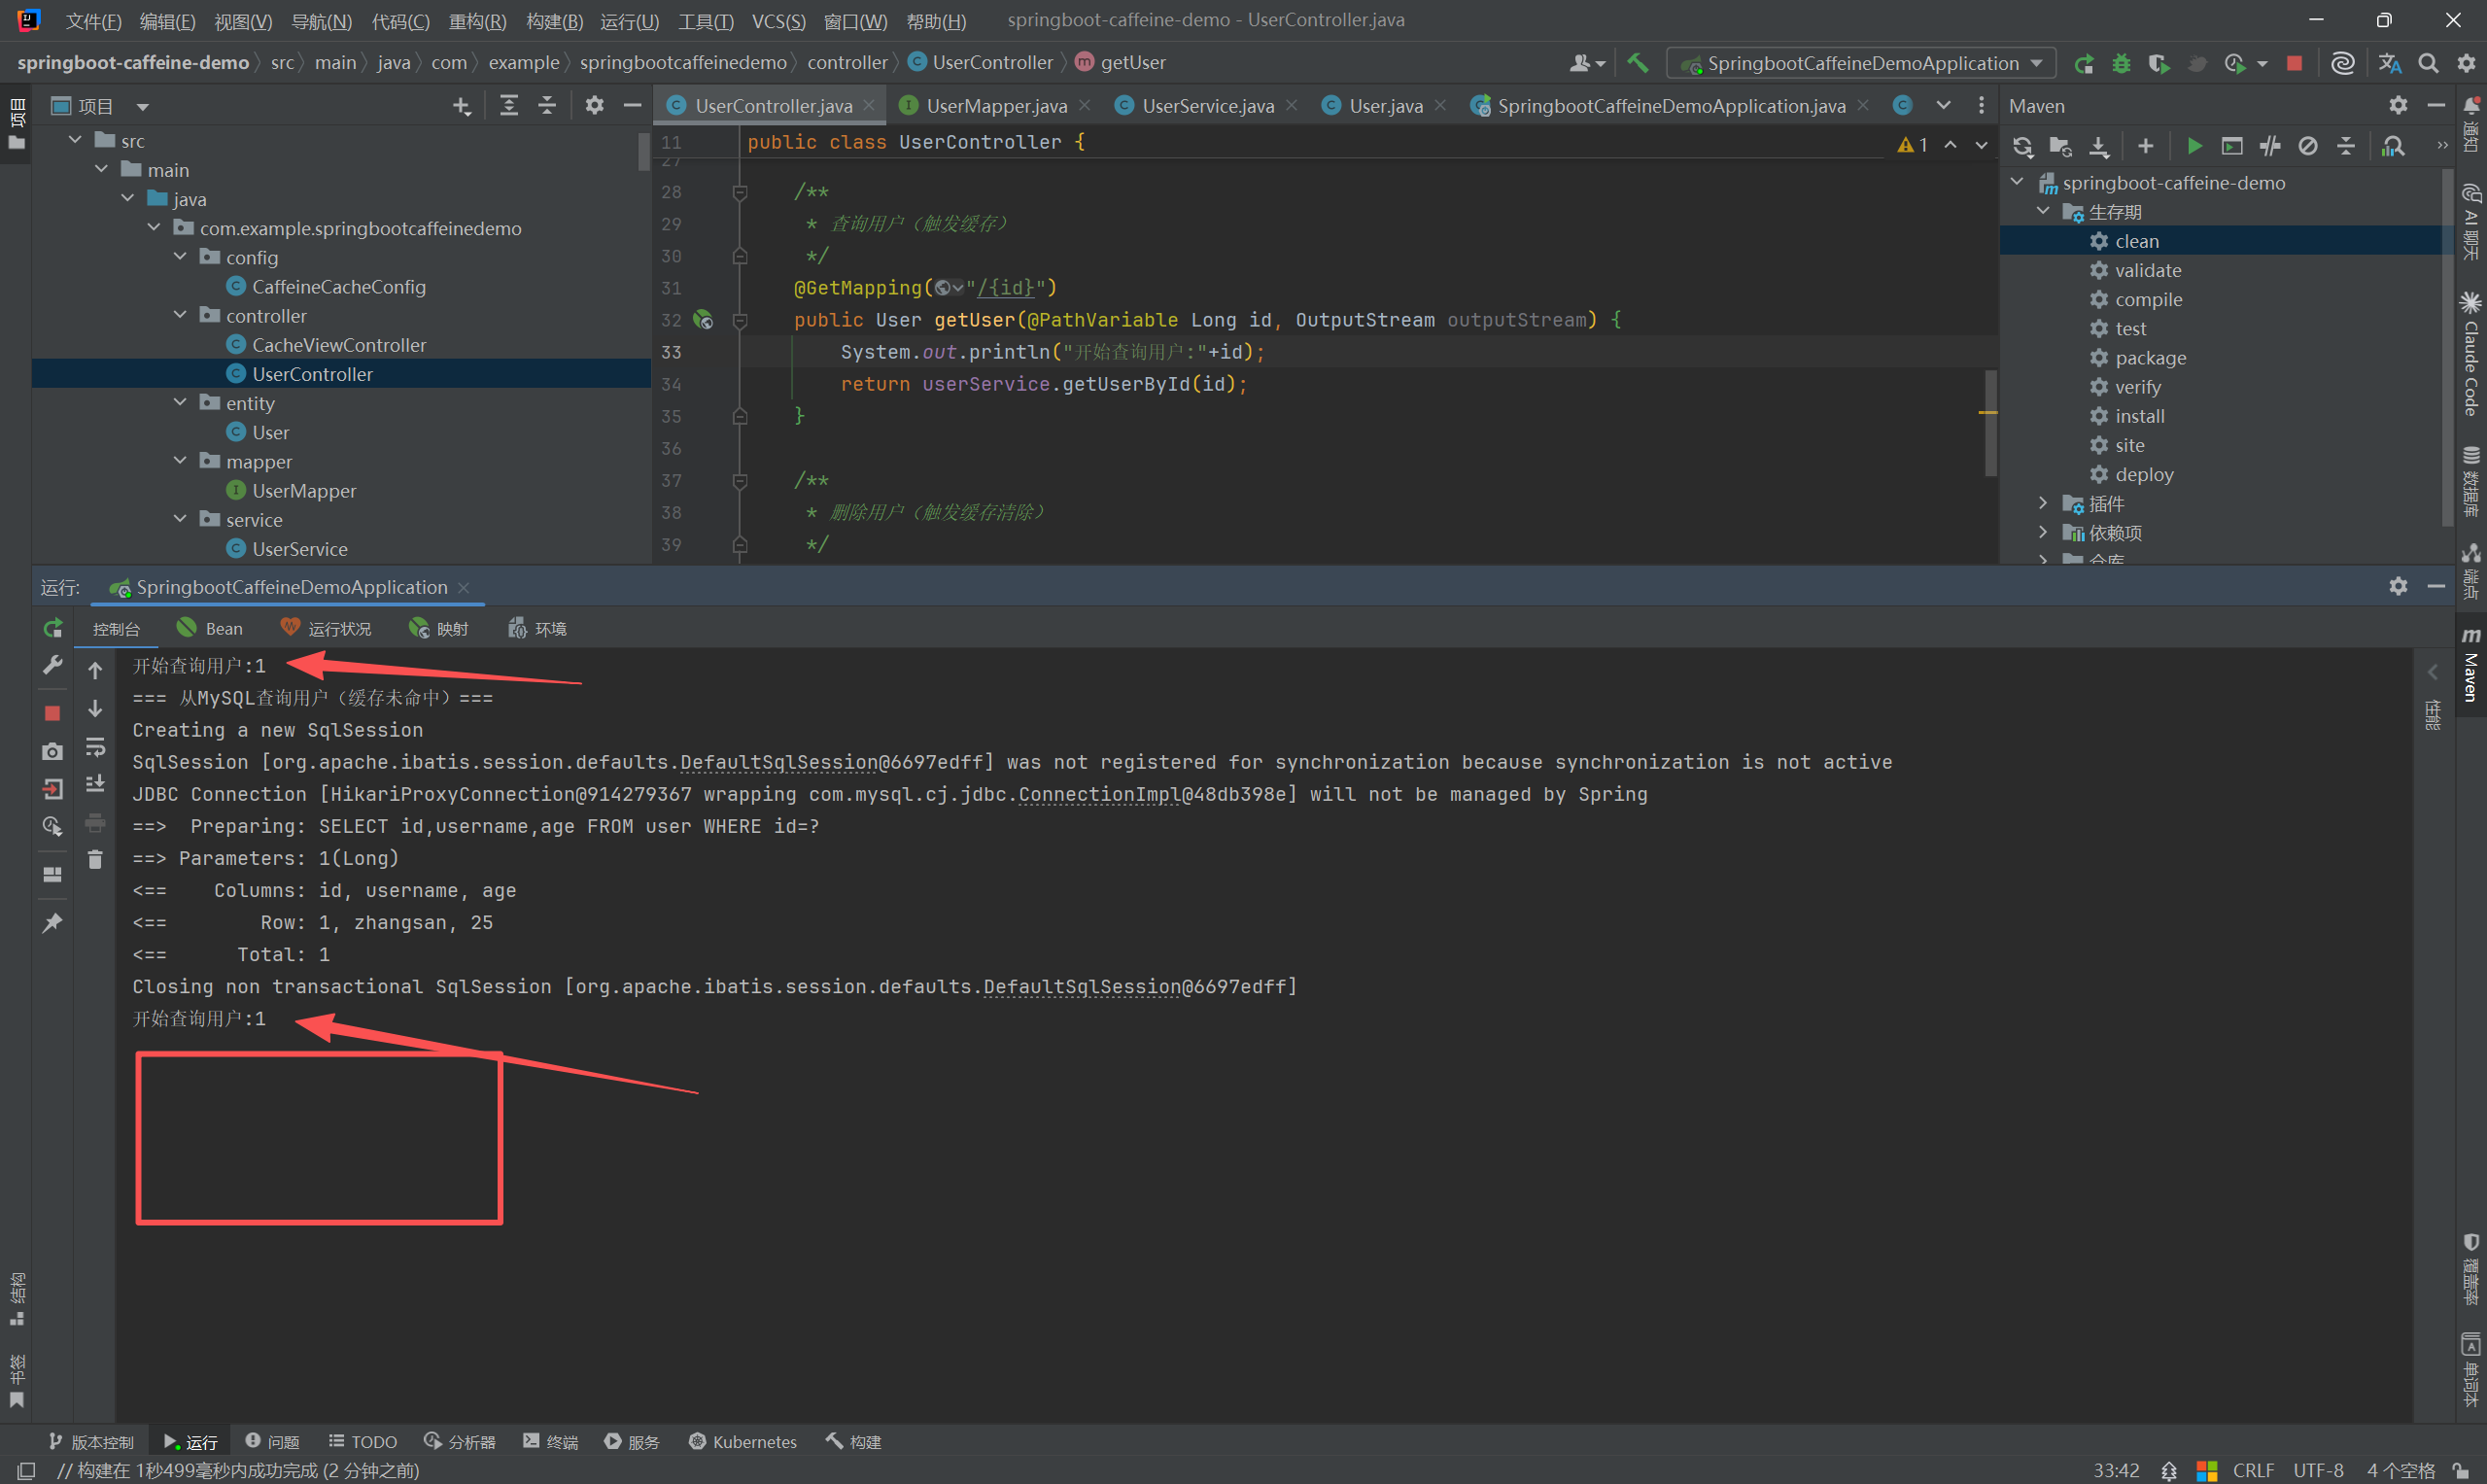
4.验证缓存命中:
- 首次调用
GET /users/1:控制台打印“从MySQL查询用户”和SQL语句(缓存未命中)。
- 再次调用
GET /users/1:控制台无数据库相关输出(缓存命中)。
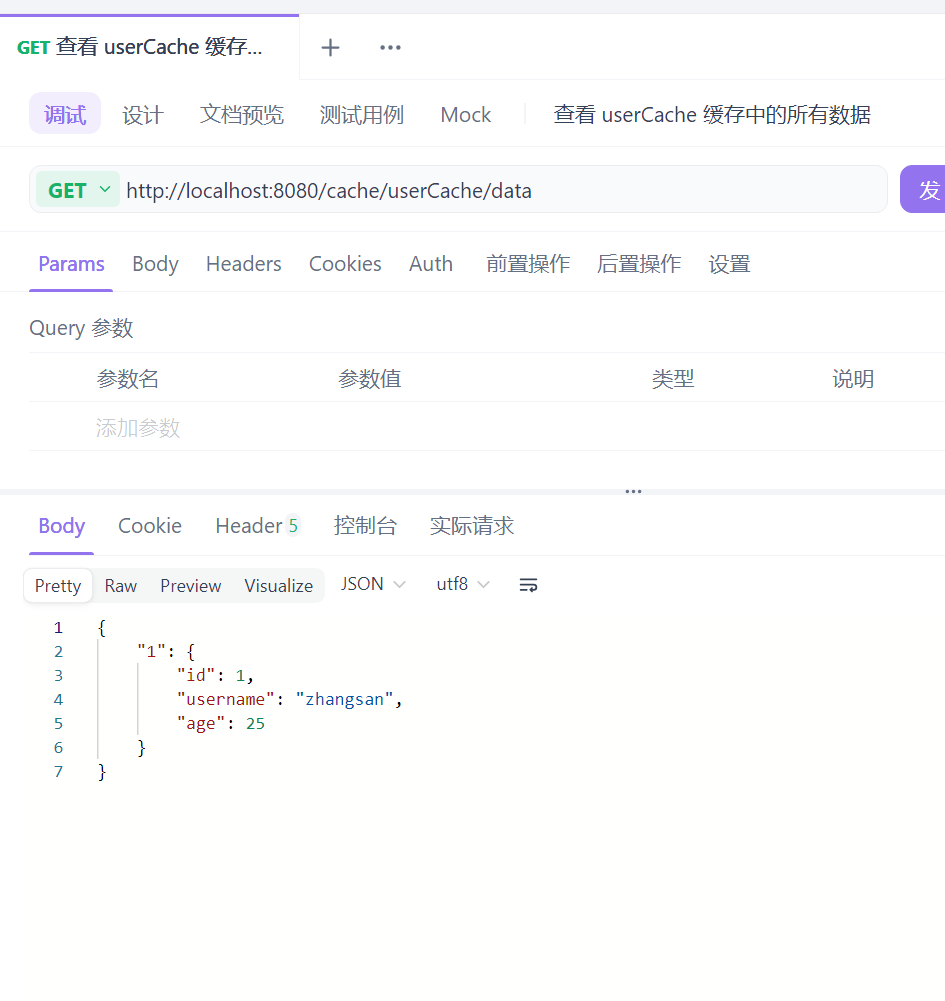
- 调用
GET /cache/userCache/data看看缓存里面有不有

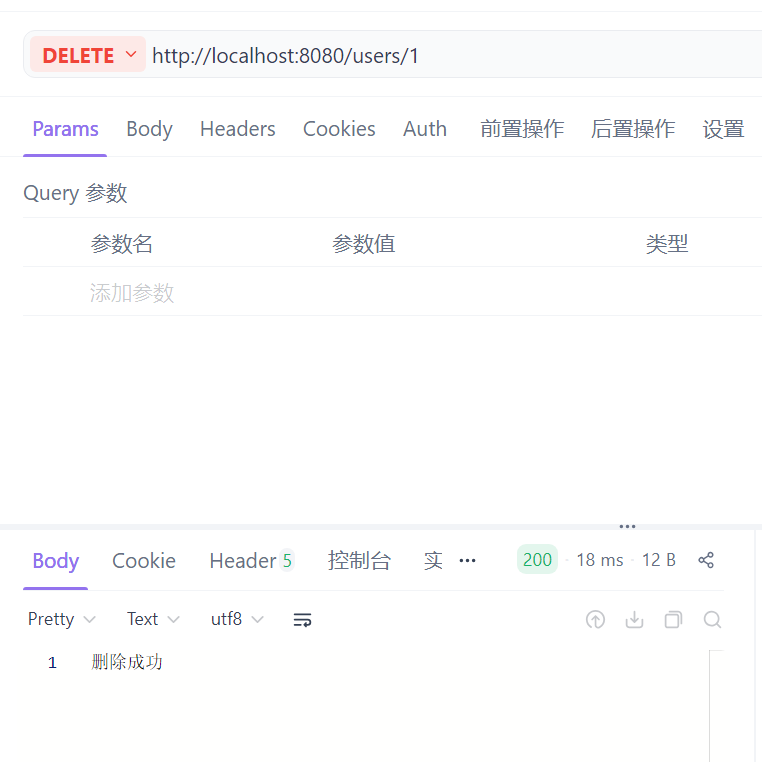
5.验证缓存清除:
- 调用
DELETE /users/1:控制台打印“删除用户并清除缓存”。
五、Spring Boot集成Caffeine(方式二:直接使用Caffeine API)
不依赖Spring缓存抽象,直接通过Caffeine API手动操作缓存,灵活度高,适合复杂缓存场景。
步骤1:调整依赖(移除缓存抽象)
删除spring-boot-starter-cache依赖,仅保留核心依赖:
核心依赖:如下
<!-- Caffeine缓存实现-->
<dependency><groupId>com.github.ben-manes.caffeine</groupId><artifactId>caffeine</artifactId><version>2.9.3</version><!-- jdk1.8兼容版本为2.9.3-->
</dependency>
测试依赖:如下
<!-- MyBatis-Plus Starter -->
<dependency><groupId>com.baomidou</groupId><artifactId>mybatis-plus-boot-starter</artifactId><version>3.5.7</version>
</dependency>
<!-- MySQL驱动 -->
<dependency><groupId>mysql</groupId><artifactId>mysql-connector-java</artifactId><scope>runtime</scope>
</dependency>
<!-- Spring Web(用于测试接口) -->
<dependency><groupId>org.springframework.boot</groupId><artifactId>spring-boot-starter-web</artifactId>
</dependency>
步骤2:配置Caffeine缓存实例
创建配置类,定义Cache实例并注入Spring容器:
import com.github.benmanes.caffeine.cache.Cache;
import com.github.benmanes.caffeine.cache.Caffeine;
import org.springframework.context.annotation.Bean;
import org.springframework.context.annotation.Configuration;
import javax.annotation.Resource;
import java.util.concurrent.TimeUnit;@Configuration
public class CaffeineDirectConfig {@Resourceprivate UserMapper userMapper;/*** 定义User缓存实例*/@Beanpublic Cache<Long, User> userCache() {return Caffeine.newBuilder().maximumSize(500)  // 最大缓存条目数.expireAfterAccess(10, TimeUnit.MINUTES)  // 访问后10分钟过期// 缓存未命中时自动加载.build(id -> {User user = userMapper.selectById(id);if (user == null) {throw new RuntimeException("用户不存在,id=" + id);}return user;});}
}
步骤3:业务层实现(手动操作缓存)
在Service中注入Cache实例,通过API手动控制缓存:
import com.github.benmanes.caffeine.cache.Cache;
import org.springframework.stereotype.Service;
import javax.annotation.Resource;@Service
public class UserDirectService {@Resourceprivate UserMapper userMapper;@Resourceprivate Cache<Long, User> userCache;/*** 查询用户:手动控制缓存*/public User getUserById(Long id) {// 方式1:使用CacheLoader自动加载(推荐)return userCache.get(id);// 方式2:手动检查缓存(适合复杂逻辑)/*User user = userCache.getIfPresent(id);if (user == null) {System.out.println("=== 从MySQL查询用户 ===");user = userMapper.selectById(id);if (user == null) {throw new RuntimeException("用户不存在");}userCache.put(id, user);  // 手动存入缓存}return user;*/}/*** 删除用户:手动清除缓存*/public void deleteUser(Long id) {userMapper.deleteById(id);userCache.invalidate(id);  // 清除指定缓存键}/*** 获取缓存统计信息*/public String getCacheStats() {com.github.benmanes.caffeine.cache.Stats stats = userCache.stats();return String.format("命中率: %.2f%%, 加载成功数: %d",stats.hitRate() * 100,stats.loadSuccessCount());}
}
步骤4:控制器与测试
创建测试接口,调用编程式缓存逻辑:
import org.springframework.web.bind.annotation.*;
import javax.annotation.Resource;@RestController
@RequestMapping("/direct/users")
public class UserDirectController {@Resourceprivate UserDirectService userDirectService;@Resourceprivate UserMapper userMapper;// 新增用户(同方式一)@PostMappingpublic User addUser(@RequestBody User user) {userMapper.insert(user);return user;}// 查询用户(编程式缓存)@GetMapping("/{id}")public User getUser(@PathVariable Long id) {return userDirectService.getUserById(id);}// 获取缓存统计@GetMapping("/stats")public String getCacheStats() {return userDirectService.getCacheStats();}
}
步骤5:查看缓存数据的控制层
同方式一
步骤6:测试验证
测试步骤与方式一类似,新增用户后调用GET /direct/users/1验证缓存命中,调用GET /direct/users/stats查看命中率等统计信息。
总结
Spring Boot集成Caffeine的两种核心方式各有优势:
- 注解式集成:依赖Spring缓存抽象,通过
@Cacheable等注解实现无侵入式开发,适合简单缓存场景,代码简洁易维护,可无缝切换缓存实现。 - 编程式集成:直接使用Caffeine API,实现灵活缓存控制,适合复杂场景(如异步加载、自定义淘汰逻辑),性能更优。