鸿蒙PC生态三方软件移植:开发环境搭建及三方库移植指南
随着HarmonyOS(鸿蒙操作系统)在智能终端领域的快速发展,其独特的分布式能力和跨设备协同体验已获得广泛认可。2023年鸿蒙正式进军PC领域,标志着其向全场景操作系统迈出了关键一步。然而,一个操作系统的成功离不开繁荣的软件生态——将Linux/macOS/Windows平台的海量开源软件移植到鸿蒙PC端,已成为生态建设的重要突破口。
本文旨在为开发者提供一套完整的鸿蒙PC开发环境搭建方案,通过WSL容器化编译、鸿蒙SDK工具链集成、开源软件鸿蒙化改造等关键技术环节,降低软件移植门槛。无论您是个人开发者还是开源社区贡献者,均可借助本指南快速构建移植环境,共同推动鸿蒙生态的多元化发展。
环境搭建完整流程
Windows环境下
如果你是直接使用的linux系统,推荐Ubuntu22及以上系统。如果你使用的windows系统,推荐安装下面方法使用虚拟机或者WSL。使用VMWare方式安装虚拟机的方式就不介绍了,下面主推WSL的方式安装虚拟机。
虚拟机准备
下载wsl ubuntu 22.04
https://wslstorestorage.blob.core.windows.net/wslblob/Ubuntu2204-221101.AppxBundle
下载后双击安装进入wsl
windows下的WSL的安装使用,参加猫哥的博文:
《在 Windows 10 上安装和使用 WSL 2 安装 Ubuntu24详细指南》https://blog.csdn.net/yyz_1987/article/details/148545443
Windows虚拟机环境&&Linux(Ubuntu22.04)环境
修改镜像源
将ubuntu 22.04 的源改为如下地址,建议备份原始的sources.list
sudo cp /etc/apt/sources.list /etc/apt/sources.list.bak
sudo vim /etc/apt/sources.list
修改内容参考:
deb https://mirrors.aliyun.com/ubuntu/ jammy main restricted universe multiverse
deb-src https://mirrors.aliyun.com/ubuntu/ jammy main restricted universe multiversedeb https://mirrors.aliyun.com/ubuntu/ jammy-security main restricted universe multiverse
deb-src https://mirrors.aliyun.com/ubuntu/ jammy-security main restricted universe multiversedeb https://mirrors.aliyun.com/ubuntu/ jammy-updates main restricted universe multiverse
deb-src https://mirrors.aliyun.com/ubuntu/ jammy-updates main restricted universe multiverse# deb https://mirrors.aliyun.com/ubuntu/ jammy-proposed main restricted universe multiverse
# deb-src https://mirrors.aliyun.com/ubuntu/ jammy-proposed main restricted universe multiversedeb https://mirrors.aliyun.com/ubuntu/ jammy-backports main restricted universe multiverse
deb-src https://mirrors.aliyun.com/ubuntu/ jammy-backports main restricted universe multiverse
修改源后执行
sudo apt-get update
sudo apt-get upgrade
如果你使用的是ubuntu24系统,镜像的配置跟上述不一样了。
Ubuntu24及之后的系统,使用以下方式配置镜像源:
Ubuntu24.04的源地址配置文件发生改变。
不再使用以前的 sources.list 文件,该文件内容变成了一行注释:
Ubuntu sources have moved to /etc/apt/sources.list.d/ubuntu.sources
新的官方源配置放在了 /etc/apt/sources.list.d/ubuntu.sources,升级前的三方源被放在了 /etc/apt/sources.list.d/third-party.sources
ps:以下配置我以24.04版本为例子
1. 备份原文件
在修改之前,可以选择备份原文件:
sudo cp /etc/apt/sources.list.d/ubuntu.sources /etc/apt/sources.list.d/ubuntu.sources.backup
2. 更换镜像源
sudo vim /etc/apt/sources.list.d/ubuntu.sources
- 添加清华源配置
Types: deb
URIs: http://mirrors.tuna.tsinghua.edu.cn/ubuntu/
Suites: noble noble-updates noble-security
Components: main restricted universe multiverse
Signed-By: /usr/share/keyrings/ubuntu-archive-keyring.gpg
- 中科大源
Types: deb
URIs: http://mirrors.ustc.edu.cn/ubuntu/
Suites: noble noble-updates noble-security
Components: main restricted universe multiverse
Signed-By: /usr/share/keyrings/ubuntu-archive-keyring.gpg
- 阿里源
Types: deb
URIs: http://mirrors.aliyun.com/ubuntu/
Suites: noble noble-updates noble-security
Components: main restricted universe multiverse
Signed-By: /usr/share/keyrings/ubuntu-archive-keyring.gpg
- 网易源
Types: deb
URIs: http://mirrors.163.com/ubuntu/
Suites: noble noble-updates noble-security
Components: main restricted universe multiverse
Signed-By: /usr/share/keyrings/ubuntu-archive-keyring.gpg
ps:更换后效果的配置文件
3. 更新
sudo apt-get updatesudo apt-get upgrade -y
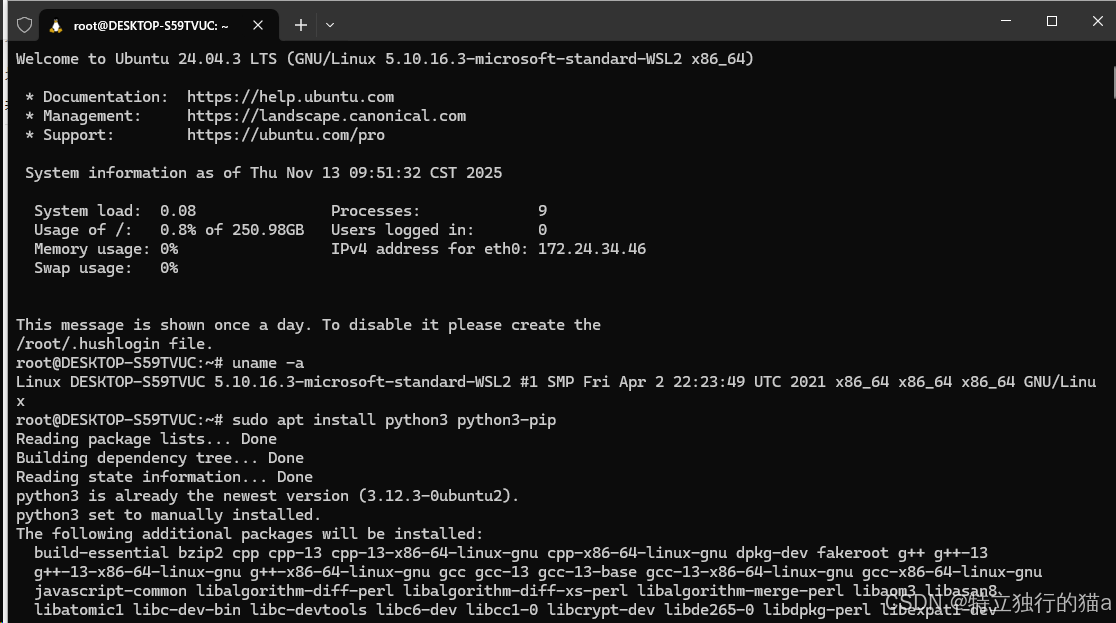
安装python
sudo apt install python3 python3-pip
sudo update-alternatives --install /usr/bin/python python /usr/bin/python3 1
SDK准备
cd ~
wget https://cidownload.openharmony.cn/version/Master_Version/ohos-sdk-full_ohos/20250819_020817/version-Master_Version-ohos-sdk-full_ohos-20250819_020817-ohos-sdk-full_ohos.tar.gz
tar -zvxf version-Master_Version-ohos-sdk-full_ohos-20250819_020817-ohos-sdk-full_ohos.tar.gzcd ~/ohos-sdk/linux
unzip native-linux-x64-6.0.0.46-Beta1.zip
unzip toolchains-linux-x64-6.0.0.46-Beta1.zip
其中native-linux-x64-6.0.0.46-Beta1.zip解压所在的父目录的全路径为 后续所需要的sdk路径,如:/home/goblinrs/ohos-sdk/linux
安装目录设定
sudo mkdir -p /data/service/hnp
sudo chmod 777  -R /data/service/hnp
下载构建脚手架
cd ~
git clone git@gitcode.com:OpenHarmonyPCDeveloper/build.git
本地下载代码(以tree举例,在脚手架工程中执行调试验证)
cd ~/build/code/
git clone git@gitcode.com:OpenHarmonyPCDeveloper/cmdtree.git -b master
修改本地代码
以tree的源码结构举例
.
├── CHANGES
├── INSTALL
├── LICENSE
├── Makefile
├── README
├── TODO
├── build_ohos.sh // 增加该文件
├── hnp.json // 增加该文件
├── color.c
├── doc
│   ├── global_info
│   ├── tree.1
│   └── xml.dtd
├── file.c
├── ...
└── xml.c
增加ohos_build.sh
每个部件的路径规则为:${HNP_PUBLIC_PATH}/<部件名称>.org/<部件名称>_<版本号>
如:${HNP_PUBLIC_PATH}/tree.org/tree_2.2.1
# ohos_build.shexport TREE_INSTALL_HNP_PATH=${HNP_PUBLIC_PATH}/tree.org/tree_2.2.1sys_perfix=${PREFIX}
export PREFIX=${TREE_INSTALL_HNP_PATH}
echo "${PREFIX}"make clean
make VERBOSE=1 perfix=${TREE_INSTALL_HNP_PATH}
make install perfix=${TREE_INSTALL_HNP_PATH}cp hnp.json ${TREE_INSTALL_HNP_PATH}/
pushd ${TREE_INSTALL_HNP_PATH}/../${HNP_TOOL} pack -i ${TREE_INSTALL_HNP_PATH} -o ${ARCHIVE_PATH}/tar -zvcf ${ARCHIVE_PATH}/ohos_tree_2.2.1.tar.gz tree_2.2.1/
popdexport PREFIX=${sys_perfix}
增加hnp.json
{"type":"hnp-config","name":"tree","version":"2.2.1","install":{}
}
对源码进行鸿蒙化适配
参考
https://gitcode.com/OpenHarmonyPCDeveloper/cmdtree/commit/6102f7c07aab5c007b8442ab2191204d6f16cef9?ref=master
https://gitcode.com/OpenHarmonyPCDeveloper/cmdtree/commit/6d989f7d77d3df36d53c1ca1b24fee3a1224e092?ref=master
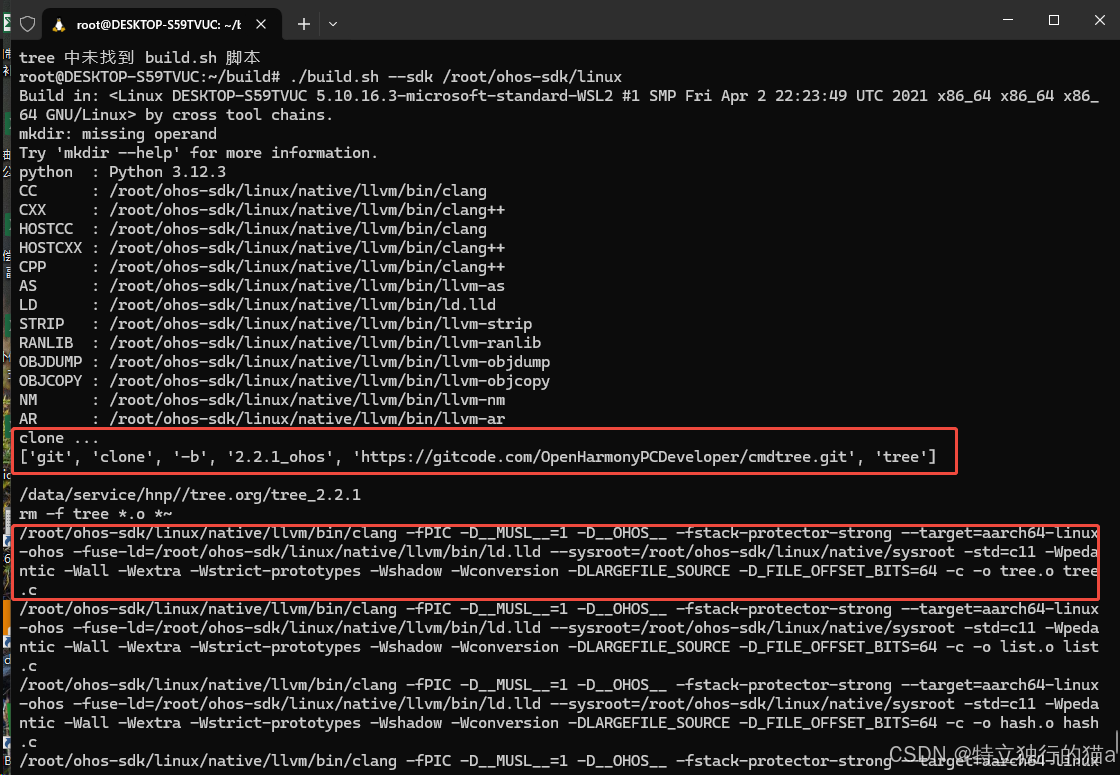
执行编译
cd  ~/build
./build.sh --sdk /home/goblinrs/ohos-sdk/linux
执行后的产物在~/build/output/下,可以用于创建发行版
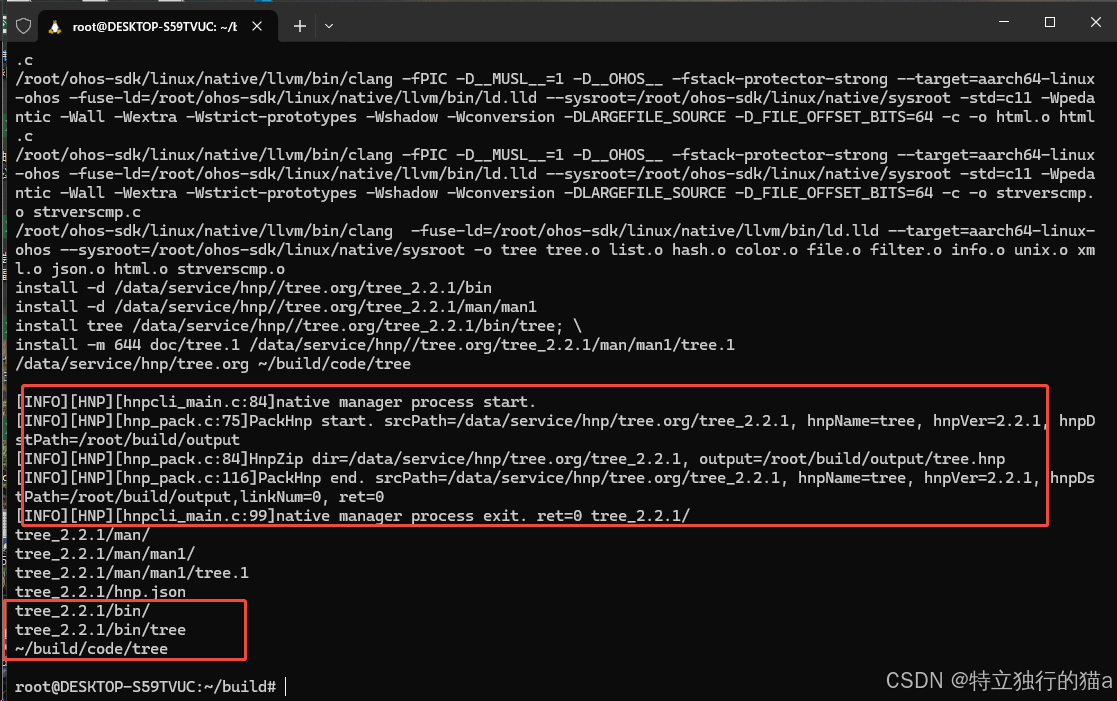
留意下上图中的hmpcli_main.c和hmp_pack.c这几个跟打包相关的c文件。想了解打包的秘密的,可以看文末的资源链接,有这部分的源码。
上述命令使用的build.sh脚本也不复杂,其实就是检查下环境、配置了下鸿蒙的工具链和输出路径。另外就是调用打包脚本完成元数据json文件和二进制文件的打包功能。
其中,如果是使用自动化的依赖方式,自动clone下来代码自动编译,则执行python build_dependency.py这个命令。后面可以看下build_dependency.py文件干了哪些事,其实就是执行git clone把代码自动拷贝下来。再执行构建脚本。
build.sh脚本内容如下:
#!/bin/bashSDK_PATH=""
while [[ $# -gt 0 ]]; docase "$1" in--sdk)SDK_PATH="$2"shift 2;;*)echo "Error: unknow param $1"echo "Usage: $0 --sdk <SDK path>"exit 1;;esac
doneif [ -z "$SDK_PATH" ]; thenecho "Error: SDK path must be specified with the \"--sdk\" option"echo "Usage: $0 --sdk <SDK path>"exit 1
fiif [ ! -d "$SDK_PATH" ]; thenecho "Error: SDK path is not exist or no permossion: [$SDK_PATH]"exit 2
fiexport OHOS_SDK="$SDK_PATH"
export HNP_PERFIX=BUILD_OS=$(uname)
case $BUILD_OS in'OpenHarmony')echo "Build in: <$(uname -a)> by local tool chains."export COMPILER_TOOLCHAIN=${OHOS_TOOL_CHAIN_PATH};;'HarmonyOS')echo "Build in: <$(uname -a)> by local tool chains."export COMPILER_TOOLCHAIN=${HMOS_TOOL_CHAIN_PATH}export HNP_PERFIX=${PWD}/hnp;;*)echo "Build in: <$(uname -a)> by cross tool chains."export COMPILER_TOOLCHAIN=${OHOS_SDK}/native/llvm/bin/;;
esacmkdir -p ${HNP_PERFIX}PYTHON=$(python --version)
echo "python  : $PYTHON"
if [ -z "$PYTHON" ]; thenecho "You need install python in your system"case "$BUILD_OS" inOpenHarmony|HarmonyOS)echo "${BUILD_OS} install by url://www.xxx.xxx.com";;Linux* )if command -v apt-get &> /dev/null; thenecho "1. sudo apt update"echo "2. sudo apt install python3 python3-pip"elif command -v yum &> /dev/null; thenecho "1. sudo yum install python3 python3-pip"elseecho "Please install python3 and pip using your system's package manager."fi;;Darwin*)echo "1. Use Homebrew: brew install python"echo "or"echo "2. Download by python org: https://www.python.org/downloads/macos/";;CYGWIN*|MINGW32*|MSYS*|MINGW*)echo "1. Download by python org: https://www.python.org/downloads/windows/"echo "2. Check the \"Add Python to PATH\" option during installation.";;*)echo "Unable to determine the appropriate Python installation method for your system.";;esacexit 1
fiexport CC=${COMPILER_TOOLCHAIN}clang             && echo "CC      : ${CC}"
export CXX=${COMPILER_TOOLCHAIN}clang++          && echo "CXX     : ${CXX}"
export HOSTCC=${CC}                              && echo "HOSTCC  : ${HOSTCC}"
export HOSTCXX=${CXX}                            && echo "HOSTCXX : ${HOSTCXX}"
export CPP=${CXX}                                && echo "CPP     : ${CPP}"
export AS=${COMPILER_TOOLCHAIN}llvm-as           && echo "AS      : ${AS}"
export LD=${COMPILER_TOOLCHAIN}ld.lld            && echo "LD      : ${LD}"
export STRIP=${COMPILER_TOOLCHAIN}llvm-strip     && echo "STRIP   : ${STRIP}"
export RANLIB=${COMPILER_TOOLCHAIN}llvm-ranlib   && echo "RANLIB  : ${RANLIB}"
export OBJDUMP=${COMPILER_TOOLCHAIN}llvm-objdump && echo "OBJDUMP : ${OBJDUMP}"
export OBJCOPY=${COMPILER_TOOLCHAIN}llvm-objcopy && echo "OBJCOPY : ${OBJCOPY}"
export NM=${COMPILER_TOOLCHAIN}llvm-nm           && echo "NM      : ${NM}"
export AR=${COMPILER_TOOLCHAIN}llvm-ar           && echo "AR      : ${AR}"export SYSROOT=${OHOS_SDK}/native/sysroot
export PKG_CONFIG_SYSROOT_DIR=${SYSROOT}/usr/lib/aarch64-linux-ohos
export PKG_CONFIG_PATH=${PKG_CONFIG_SYSROOT_DIR}
export PKG_CONFIG_EXECUTABLE=${PKG_CONFIG_SYSROOT_DIR}export HNP_TOOL=${OHOS_SDK}/toolchains/hnpcli
export CMAKE=${OHOS_SDK}/native/build-tools/cmake/bin/cmake
export TOOLCHAIN_FILE=${OHOS_SDK}/native/build/cmake/ohos.toolchain.cmakeexport WORK_ROOT=${PWD}
export ARCHIVE_PATH=${WORK_ROOT}/output
export COMM_DEP_PATH=${WORK_ROOT}/deps_installexport HNP_PUBLIC_PATH=${HNP_PERFIX}/data/service/hnp/
export MAKE_QUITE_PARAM=" -s "
export CONFIGURE_QUITE_PARAM=" --quiet "export TARGET_PLATFORM=aarch64-linux-ohosexport CFLAGS="-fPIC -D__MUSL__=1 -D__OHOS__ -fstack-protector-strong --target=${TARGET_PLATFORM} -fuse-ld=${LD} --sysroot=${SYSROOT}"
export CXXFLAGS="${CFLAGS} "
export LD_LIBRARY_PATH=${SYSROOT}/usr/lib:${LD_LIBRARY_PATH}
export LDFLAGS="${LDFLAGS} -fuse-ld=${LD} --target=${TARGET_PLATFORM} --sysroot=${SYSROOT}"
export HOST_TYPE="--host=aarch64-linux --build=aarch64-linux"mkdir -p ${HNP_PUBLIC_PATH}
mkdir -p ${ARCHIVE_PATH}mkdir codeBUILD_BY_DEPENDENCY="true"
SPECIFIC_DIR=""if [[ "${BUILD_BY_DEPENDENCY}" == "true" ]]; thenpython build_dependency.py
elsepushd code/${SPECIFIC_DIR}chmod +x build_ohos.sh && source build_ohos.shpopd
fi
build_dependency.py文件内容如下:
import json
import os
import subprocess
from pathlib import Path
from contextlib import contextmanagerdef load_repos(json_file):try:with open(json_file) as f:data = json.load(f)return data.get("dependency", [])except Exception as e:print(f"加载配置文件错误: {e}")return []@contextmanager
def temp_chdir(path):old_dir = os.getcwd()os.chdir(path)try:yieldfinally:os.chdir(old_dir)def run_bash_popen(script_path):process = subprocess.Popen(["bash", script_path],stdout=subprocess.PIPE,stderr=subprocess.PIPE,universal_newlines=True,)stdout, stderr = process.communicate()if process.returncode != 0 :print("ERROR:({})".format(process.returncode))print(stderr)return Falseprint(stdout)return Truedef git_clone(cmd):print(cmd)try:result = subprocess.run(cmd,check=True,stdout=subprocess.PIPE,stderr=subprocess.PIPE,text=True)print(result.stdout)return Trueexcept subprocess.CalledProcessError as e:print("ERROR:")print(e.stderr)return False, f"Error: {e.stderr}"except Exception as e:return False, f"System error: {str(e)}"def clone_repo(repo_info):print("clone ...")repo_dir = Path("code/{}".format(repo_info["name"]))if repo_dir.exists():print(f"仓库 {repo_info['name']} 已存在,跳过克隆")return Trueret = Falsecmd = ["git", "clone", "-b", repo_info["branch"], repo_info["url"], repo_info["name"]]with temp_chdir("code"):ret = git_clone(cmd)return retdef run_build_script(repo_name):build_script = Path("code/{}/build_ohos.sh".format(repo_name))if not build_script.exists():print(f"{repo_name} 中未找到 build.sh 脚本")return Falseret = Falsewith temp_chdir("code/{}".format(repo_name)):cmd = "./build_ohos.sh"ret = run_bash_popen(cmd)return ret    def main(json_file="dependency.json"):try:repos = load_repos(json_file)if not isinstance(repos, list):repos = [repos]  # 处理单个仓库的情况for repo in repos:if clone_repo(repo):run_build_script(repo["name"])except FileNotFoundError:print(f"错误: 未找到 {json_file} 文件")except json.JSONDecodeError:print(f"错误: {json_file} 不是有效的JSON文件")if __name__ == "__main__":main()
总的来说,撇开上面那些交叉编译,真正负责打包的就那个
export HNP_TOOL=${OHOS_SDK}/toolchains/hnpcli,其余前面的步骤,不就是如同编译linux下的二进制吗。
cp hnp.json ${TREE_INSTALL_HNP_PATH}/
pushd ${TREE_INSTALL_HNP_PATH}/../${HNP_TOOL} pack -i ${TREE_INSTALL_HNP_PATH} -o ${ARCHIVE_PATH}/tar -zvcf ${ARCHIVE_PATH}/ohos_tree_2.2.1.tar.gz tree_2.2.1/
popd
编译输出产物
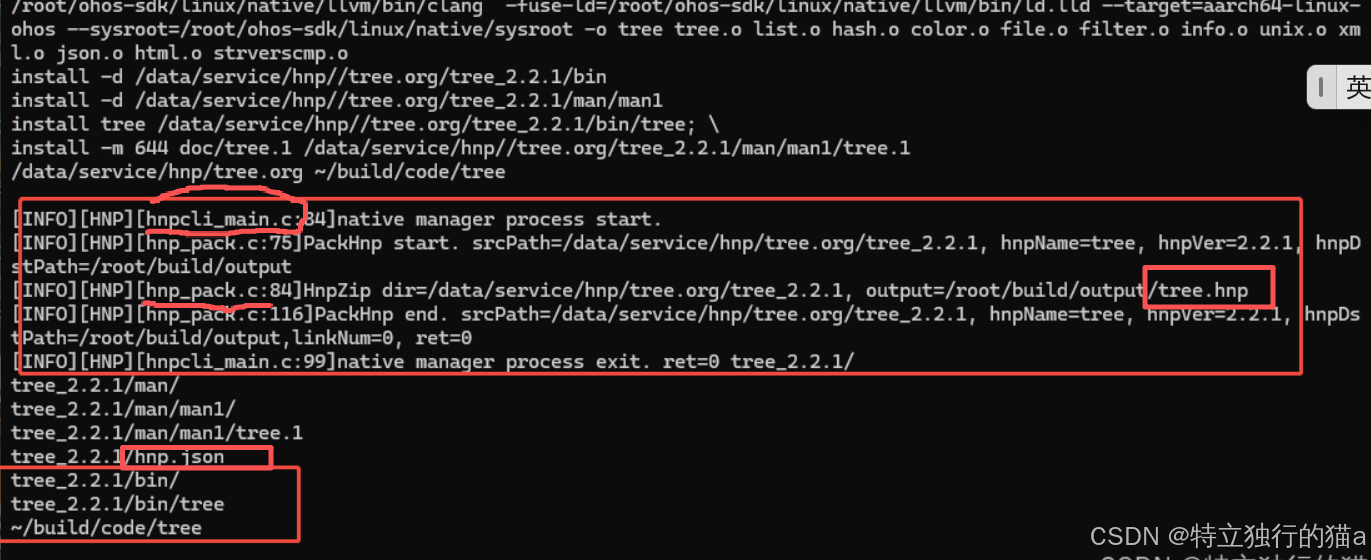
编译后的产物位于 ~/root/build/output/,可直接用于创建发行版。
如图,有个tree.hnp的文件,这是个压缩包。关于hnp的介绍,参见文末文档链接。
所有Native软件包都需要通过hnpcli工具打包成hnp(OpenHarmony Native Package)文件,通过hap打包工具将hnp包放入生产力应用中安装和运行,Native软件包以Hap形式进行分发使用。总共分为以下几步:
- 将Native软件包源文件打包成hnp包。
- 将hnp包打入hap包。
- 签名hap包。
本地代码提交
最后,本地代码提交,增加构建信息到本仓库的dependency.json文件中
{"name" : "tree","branch" : "2.2.1_ohos","url" : "git@gitcode.com:OpenHarmonyPCDeveloper/cmdtree.git"}
注意事项
示例中的脚本,默认使用了dependency.json中配置的一些库,有好几个,如果要编译其他库,改下这个里面的配置信息。
此外,想研究打包脚本的,可以看下这个文章:
https://gitcode.com/openharmony/startup_appspawn/blob/master/service/hnp/README_zh.md
https://gitcode.com/openharmony/startup_appspawn
总结:从代码移植到生态繁荣
通过本文的配置流程,开发者已获得以下关键能力:
-
跨平台编译能力
WSL环境提供类Linux编译体验,结合鸿蒙SDK工具链,可直接在Windows主机上生成鸿蒙PC兼容的二进制文件。 -
标准化移植框架
通过hnp.json配置文件和构建脚手架,实现从代码修改、依赖管理到软件包发布的自动化流程,显著提升移植效率。 -
社区协作基础
dependency.json的版本管理机制,使不同开发者的移植成果能够快速整合,形成可持续维护的开源软件仓库。
鸿蒙PC生态的建设需要每一个开发者的参与。您可以通过以下方式贡献力量:
- 将熟悉的开源软件进行鸿蒙兼容性适配
- 向OpenHarmonyPCDeveloper社区提交移植案例
- 参与鸿蒙系统级API的测试与优化
正如Linux通过开放协作成为服务器领域霸主,鸿蒙的开放性将成为其PC生态崛起的核心动力。期待您的代码成为鸿蒙生态大厦的重要基石!
附录
- 鸿蒙开发者社区:https://www.openharmony.cn/
- 鸿蒙PC技术白皮书:点击访问
- 技术咨询邮箱:534117529@qq.com
“独行快,众行远”——让开源精神与鸿蒙生态共同生长!
其他资源
https://gitcode.com/openharmony/startup_appspawn/blob/86a01ee8a05b07d90276277817c26c276398d3c3/service/hnp/hnp_main.c
https://gitcode.com/openharmony/startup_appspawn/blob/master/service/hnp/README_zh.md
https://gitcode.com/openharmony/startup_appspawn
https://gitcode.com/OpenHarmonyPCDeveloper
https://blog.csdn.net/qq_39132095/article/details/154796658?spm=1001.2014.3001.5501