Springboot 配置属性绑定
Springboot 配置属性绑定详解
- 配置属性绑定详解
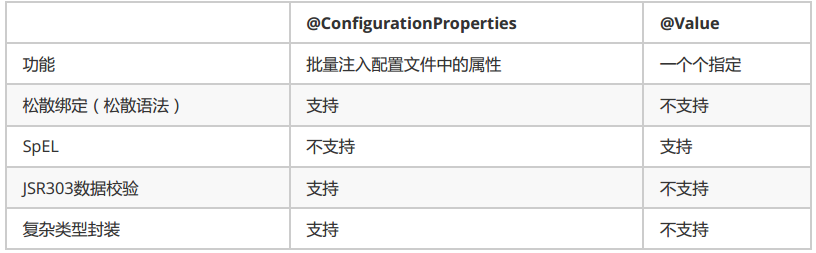
- @ConfigurationProperties
- @Value 属性注入
- @Validated 数据校验
- @Value获取值和@ConfigurationProperties获取值比较
- 加载指定的配置文件
配置属性绑定详解
@ConfigurationProperties
导入配置文件处理器,在配置文件进行数据绑定时就会有提示
<dependency><groupId>org.springframework.boot</groupId><artifactId>spring‐boot‐configuration‐processor</artifactId><optional>true</optional>
</dependency>
编写实体类,Person 和 Dog 的 JavaBean
package com.qcby.springboot.domain;import org.springframework.boot.context.properties.ConfigurationProperties;
import org.springframework.stereotype.Component;import java.util.Date;
import java.util.List;
import java.util.Map;@Component
@ConfigurationProperties(prefix = "person")
public class Person {private String lastName;private Integer age;private boolean boss;private Date birth;private Map<String,String> maps;private List<String> list;private Dog dog;public Person() {}public Person(String lastName, Integer age, boolean boss, Date birth, Map<String, String> maps, List<String> list, Dog dog) {this.lastName = lastName;this.age = age;this.boss = boss;this.birth = birth;this.maps = maps;this.list = list;this.dog = dog;}public String getLastName() {return lastName;}public void setLastName(String lastName) {this.lastName = lastName;}public Integer getAge() {return age;}public void setAge(Integer age) {this.age = age;}public boolean isBoss() {return boss;}public void setBoss(boolean boss) {this.boss = boss;}public Date getBirth() {return birth;}public void setBirth(Date birth) {this.birth = birth;}public Map<String, String> getMaps() {return maps;}public void setMaps(Map<String, String> maps) {this.maps = maps;}public List<String> getList() {return list;}public void setList(List<String> list) {this.list = list;}public Dog getDog() {return dog;}public void setDog(Dog dog) {this.dog = dog;}@Overridepublic String toString() {return "Person{" +"lastName='" + lastName + '\'' +", age=" + age +", boss=" + boss +", birth=" + birth +", maps=" + maps +", list=" + list +", dog=" + dog +'}';}
}
@ConfigurationProperties 注解用于告知 Spring Boot 将当前类的所有字段与配置文件中相关前缀对应的配置项进行批量绑定;
prefix = “person” 用于明确绑定配置文件中以 person 为前缀的所有子属性,与当前类字段进行一一映射;
关键前提是只有当当前组件是 Spring 容器中的 Bean(通过 @Component 注解注册),才能使用容器提供的@ConfigurationProperties属性绑定功能。
package com.qcby.springboot.domain;public class Dog {private String name;private Integer age;public Dog() {}public Dog(String name, Integer age) {this.name = name;this.age = age;}public String getName() {return name;}public void setName(String name) {this.name = name;}public Integer getAge() {return age;}public void setAge(Integer age) {this.age = age;}@Overridepublic String toString() {return "Dog{" +"name='" + name + '\'' +", age=" + age +'}';}
}
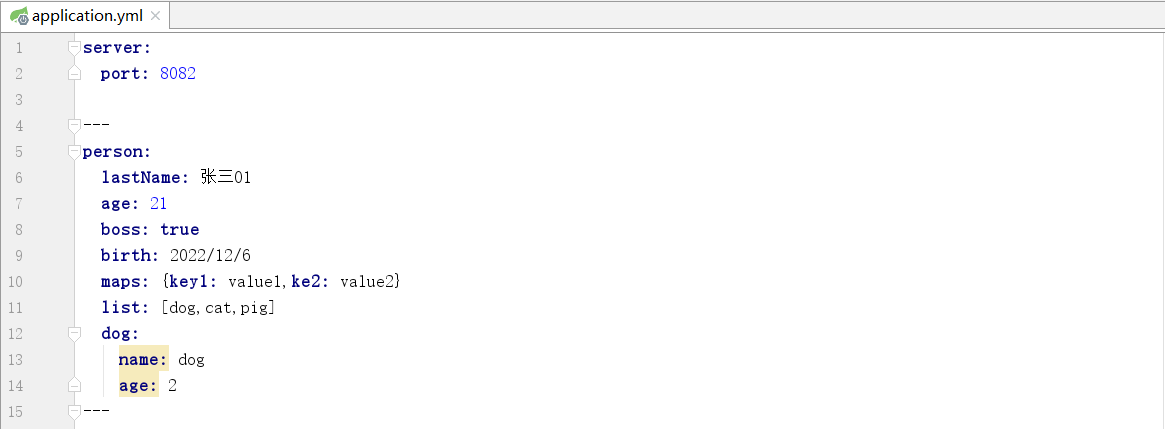
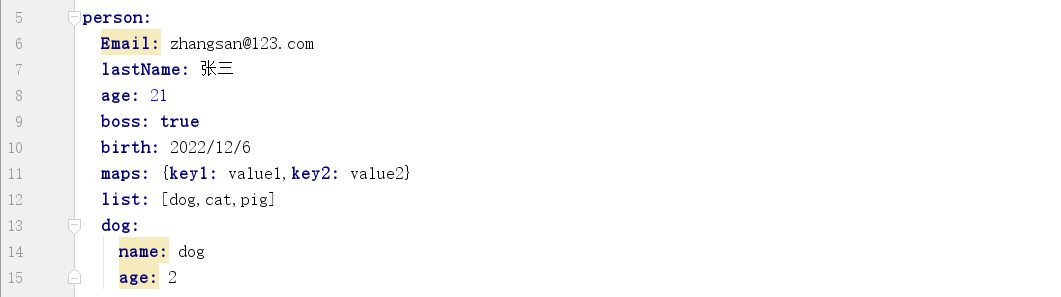
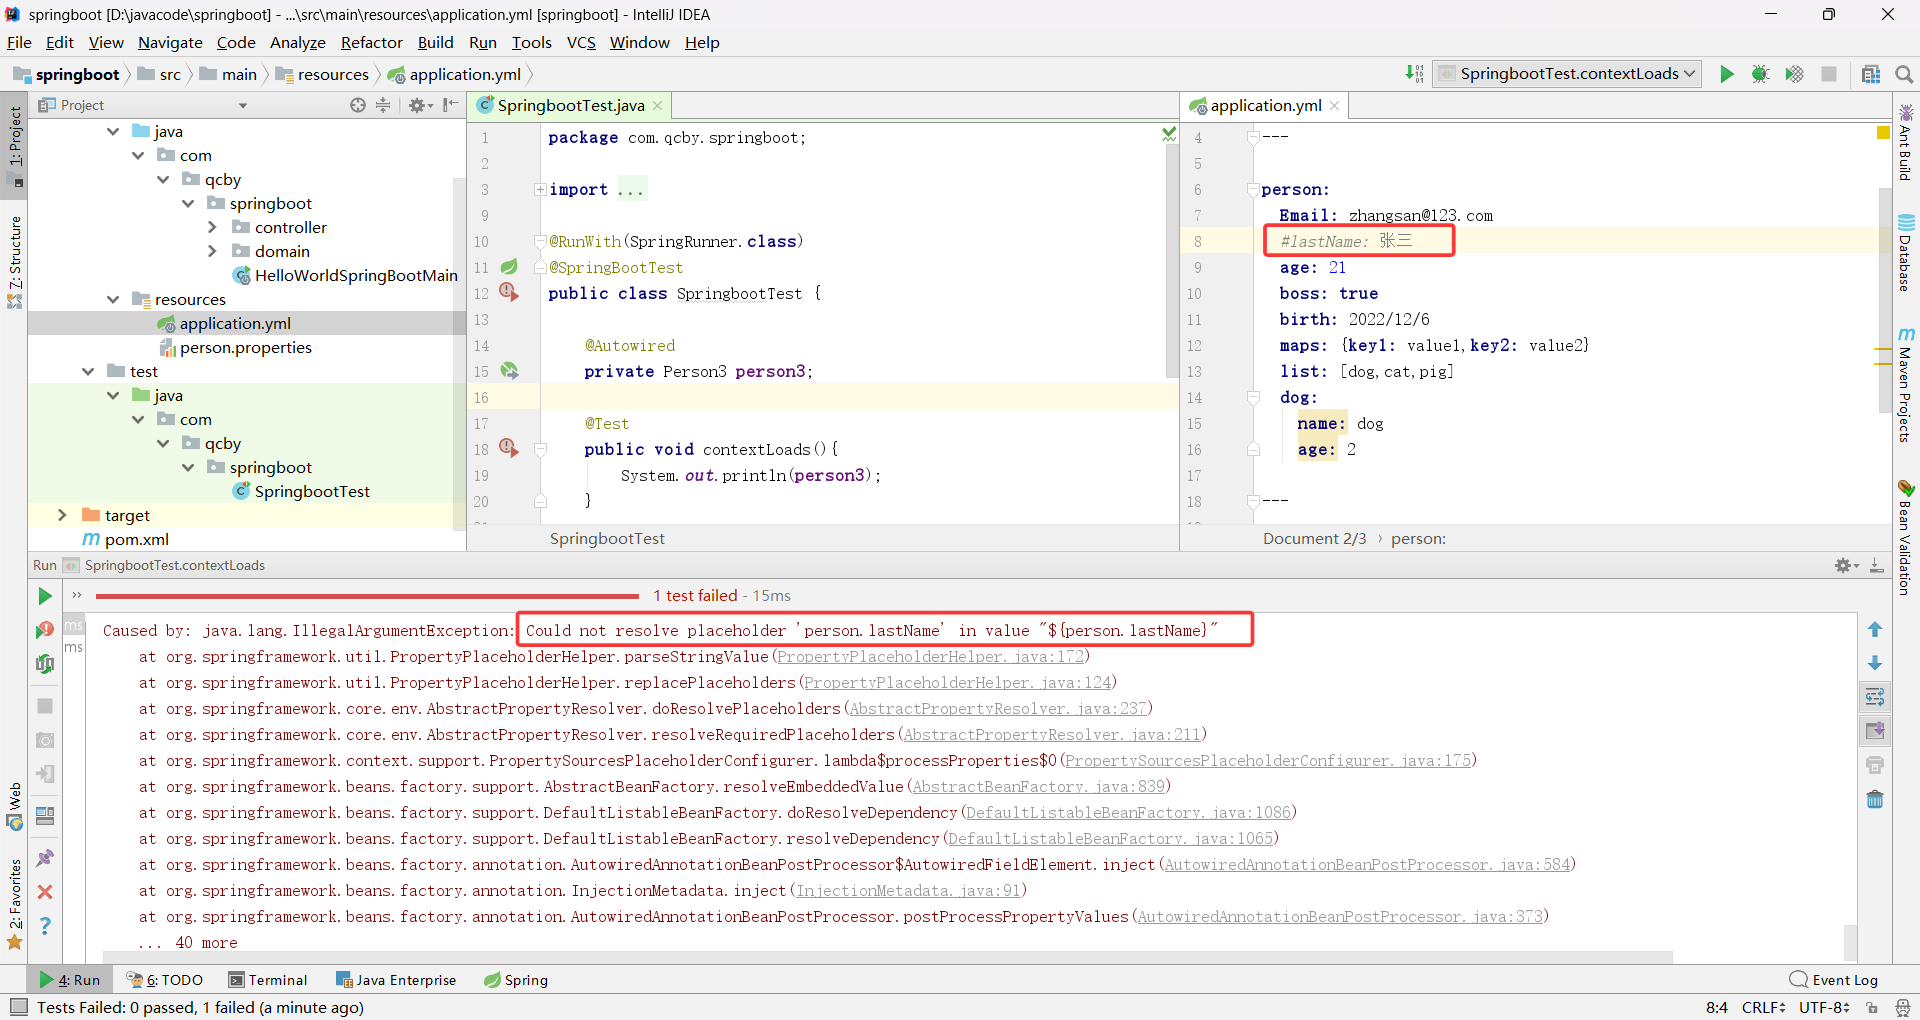
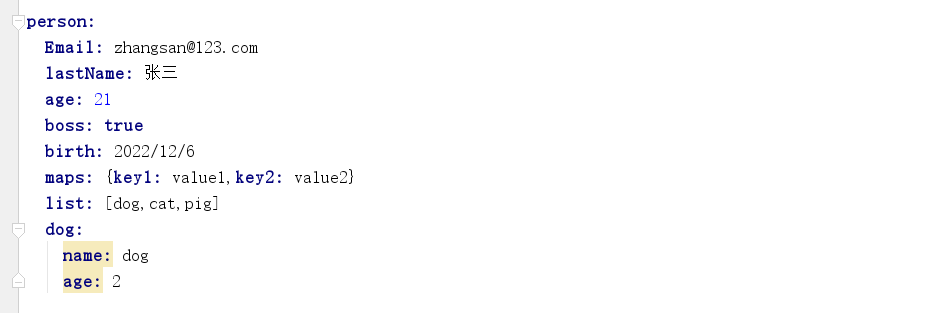
application.yml 是 Spring Boot 全局固定名称的配置文件(与 application.properties 功能一致),以数据为核心,语法简洁、层级清晰,比 JSON/XML 更适合作为配置文件。
关键语法规则
缩进控制层级:必须用空格(不能用 Tab),缩进量不固定,同一层级左对齐即可;
大小写敏感:属性名、值的大小写严格区分;
键值分隔:属性名和值之间用 : 分隔,且 : 后必须加空格;
YAML 核心值类型写法
- 字面量(数字、字符串、布尔)
字面量是最基础的配置值,直接对应 Java 中的基本类型
数字 / 布尔:直接写值,无需引号;
字符串:默认无引号,特殊字符(如 \n)会被当作普通字符;
双引号(“”):不转义特殊字符,按原含义生效;
单引号(‘’):转义特殊字符,特殊字符仅作为普通字符串; - 对象 / Map(键值对集合)
对应 Java 中的 Map 或自定义实体类;
嵌套式通过缩进表示层级,键值之间用 : 分隔(key: value);
行内式用 {key1: value1, key2: value2, …} 包裹,逗号分隔; - 数组 / List / Set
元素支持字面量、对象等任意类型;
缩进式元素前加 - (横杠 + 空格)开头表示列表项,缩进一致;
行内式用 [值1, 值2, …] 包裹,逗号分隔; - 占位符使用(动态赋值)
引用已配置的属性:${属性名};
生成随机值:${random.value}、${random.int}、${random.int(10)}、${random.int[1024,65536]};
默认值:${属性名:默认值}(属性不存在时用默认值)。
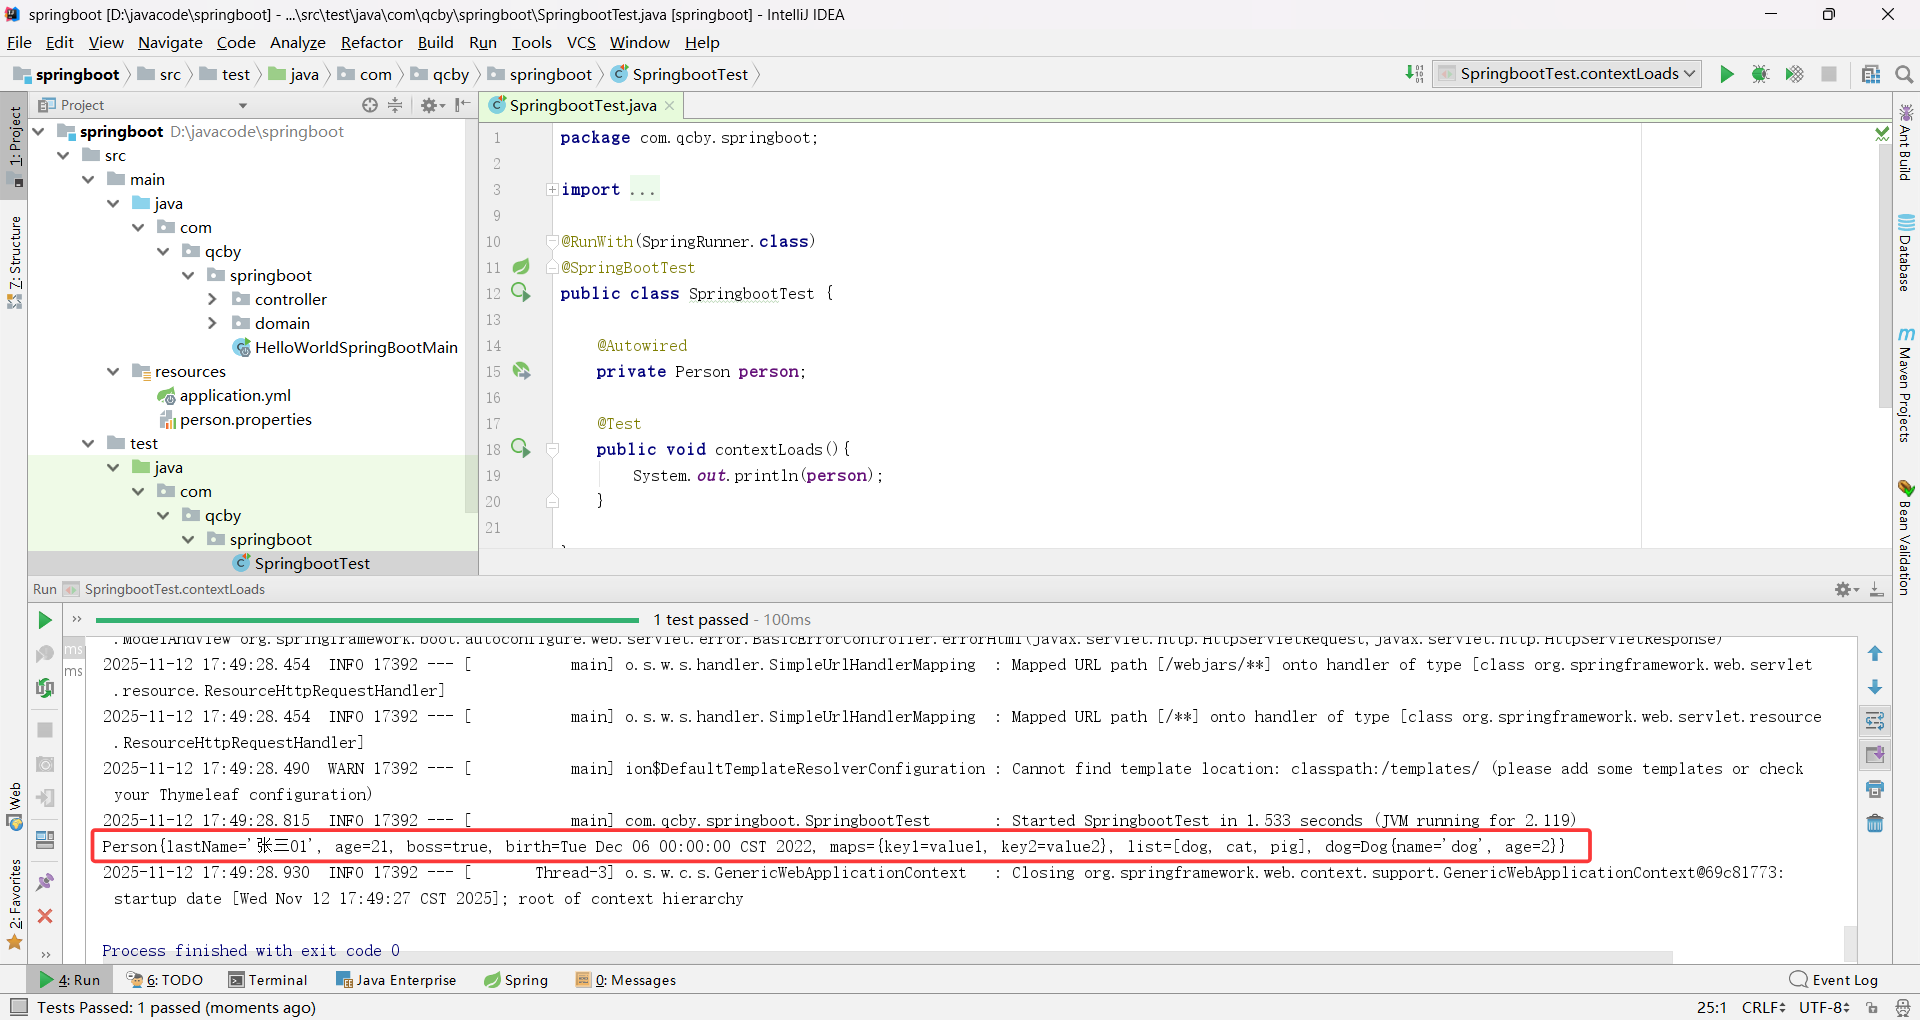
将配置文件中 person 前缀下的所有属性,自动映射到 Person 类的对应字段中,包括基本类型、日期、集合(List/Map)、嵌套对象等,最终通过容器 Bean 在项目中直接使用配置值。
需要注意的是测试单元的三级包与代码的三级包名称需要保持一致
package com.qcby.springboot;import com.qcby.springboot.domain.Person;
import org.junit.Test;
import org.junit.runner.RunWith;
import org.springframework.beans.factory.annotation.Autowired;
import org.springframework.boot.test.context.SpringBootTest;
import org.springframework.test.context.junit4.SpringRunner;@RunWith(SpringRunner.class)
@SpringBootTest
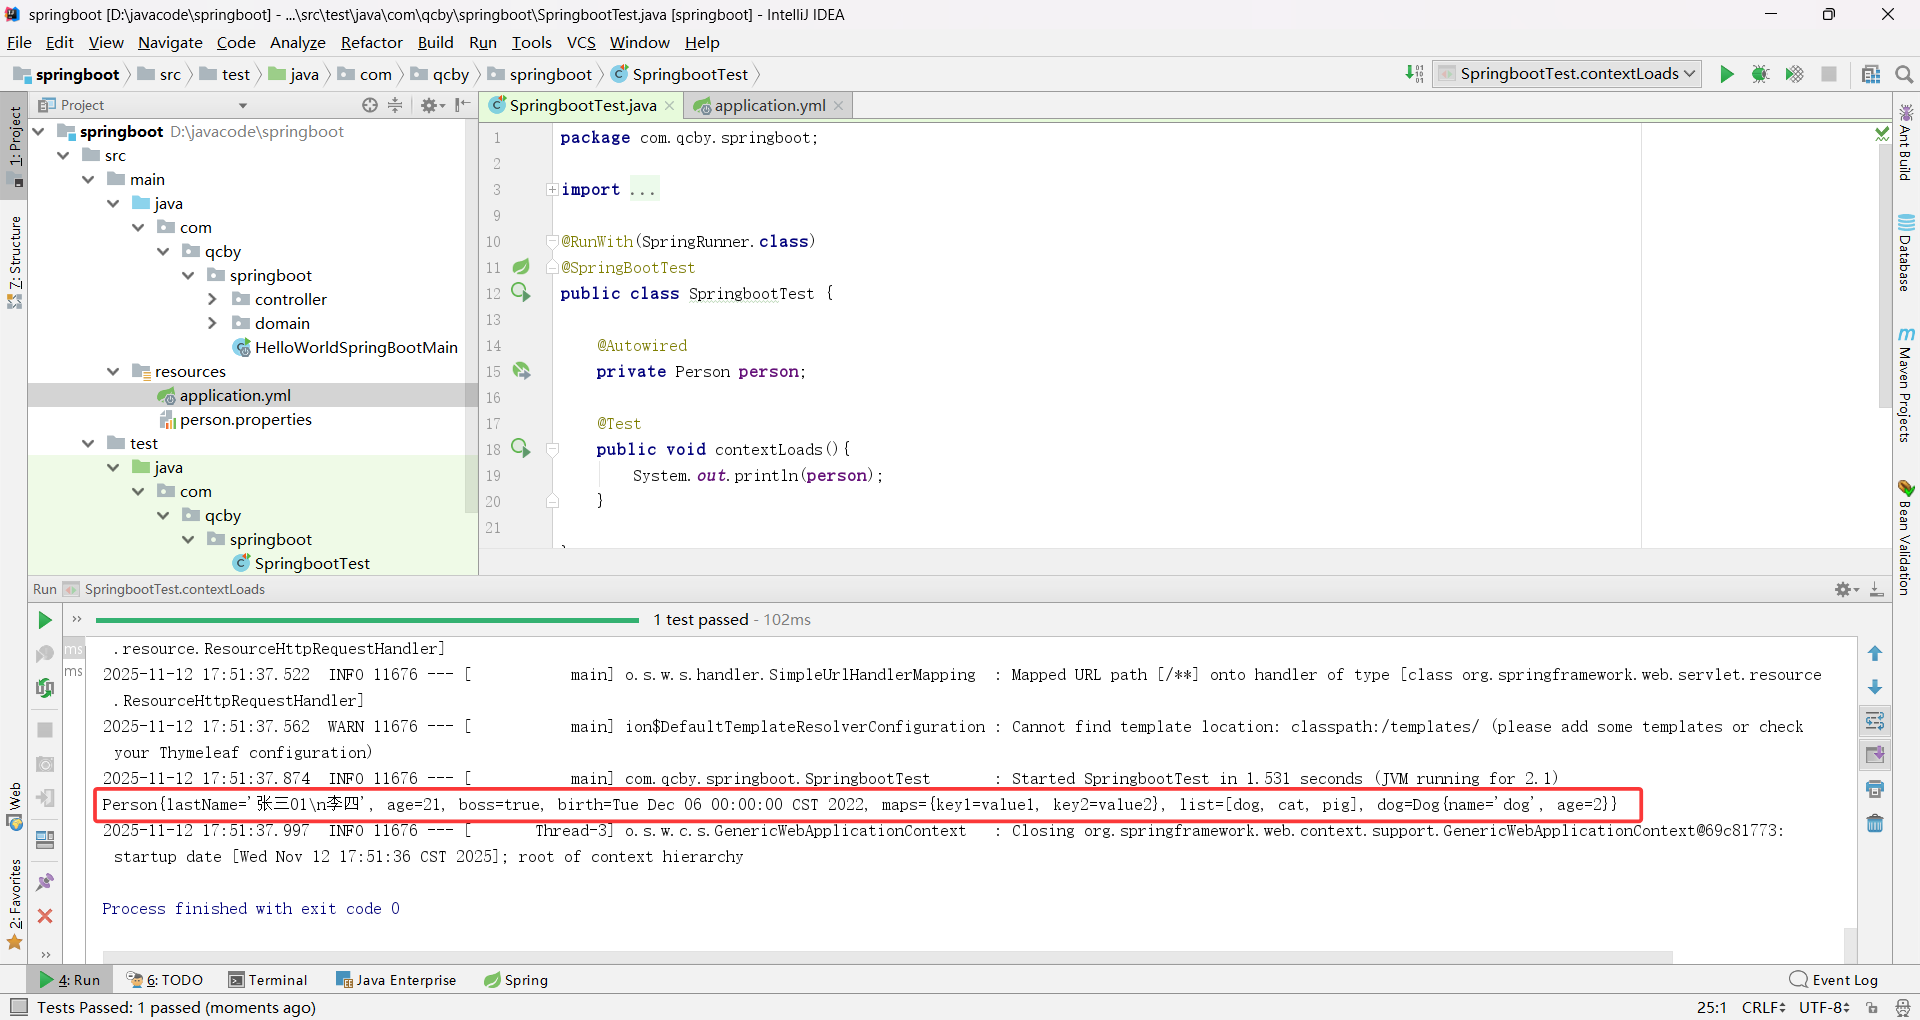
public class SpringbootTest {@Autowiredprivate Person person;@Testpublic void contextLoads(){System.out.println(person);}}
运行 contextLoads() 测试方法时,JUnit 会先读取 @RunWith(SpringRunner.class),使用 Spring 提供的 SpringRunner 运行器(其中 SpringRunner 是 SpringJUnit4ClassRunner 的简化别名),SpringRunner 识别到 @SpringBootTest 注解,触发 SpringBoot 的自动配置,启动 Spring Boot 应用上下文(容器),容器启动过程中会进行扫描组件和属性绑定,扫描项目中的 @Configuration 配置类,找到 Person 类上的 @Component 将其注册为容器 Bean,通过 @ConfigurationProperties(prefix = “person”) 读取配置文件中 person 前缀的属性,注入 Person Bean 的字段。容器启动完成后,@Autowired Person person 从容器中找到并注入测试类的 Person Bean,执行 contextLoads() 方法,打印 person 对象,调用 toString() 输出结果,测试结束后,Spring 容器自动销毁,释放资源。
若测试单元的三级包与代码的三级包名称不一致,会出现 Spring Boot 测试启动时找不到核心配置类报错
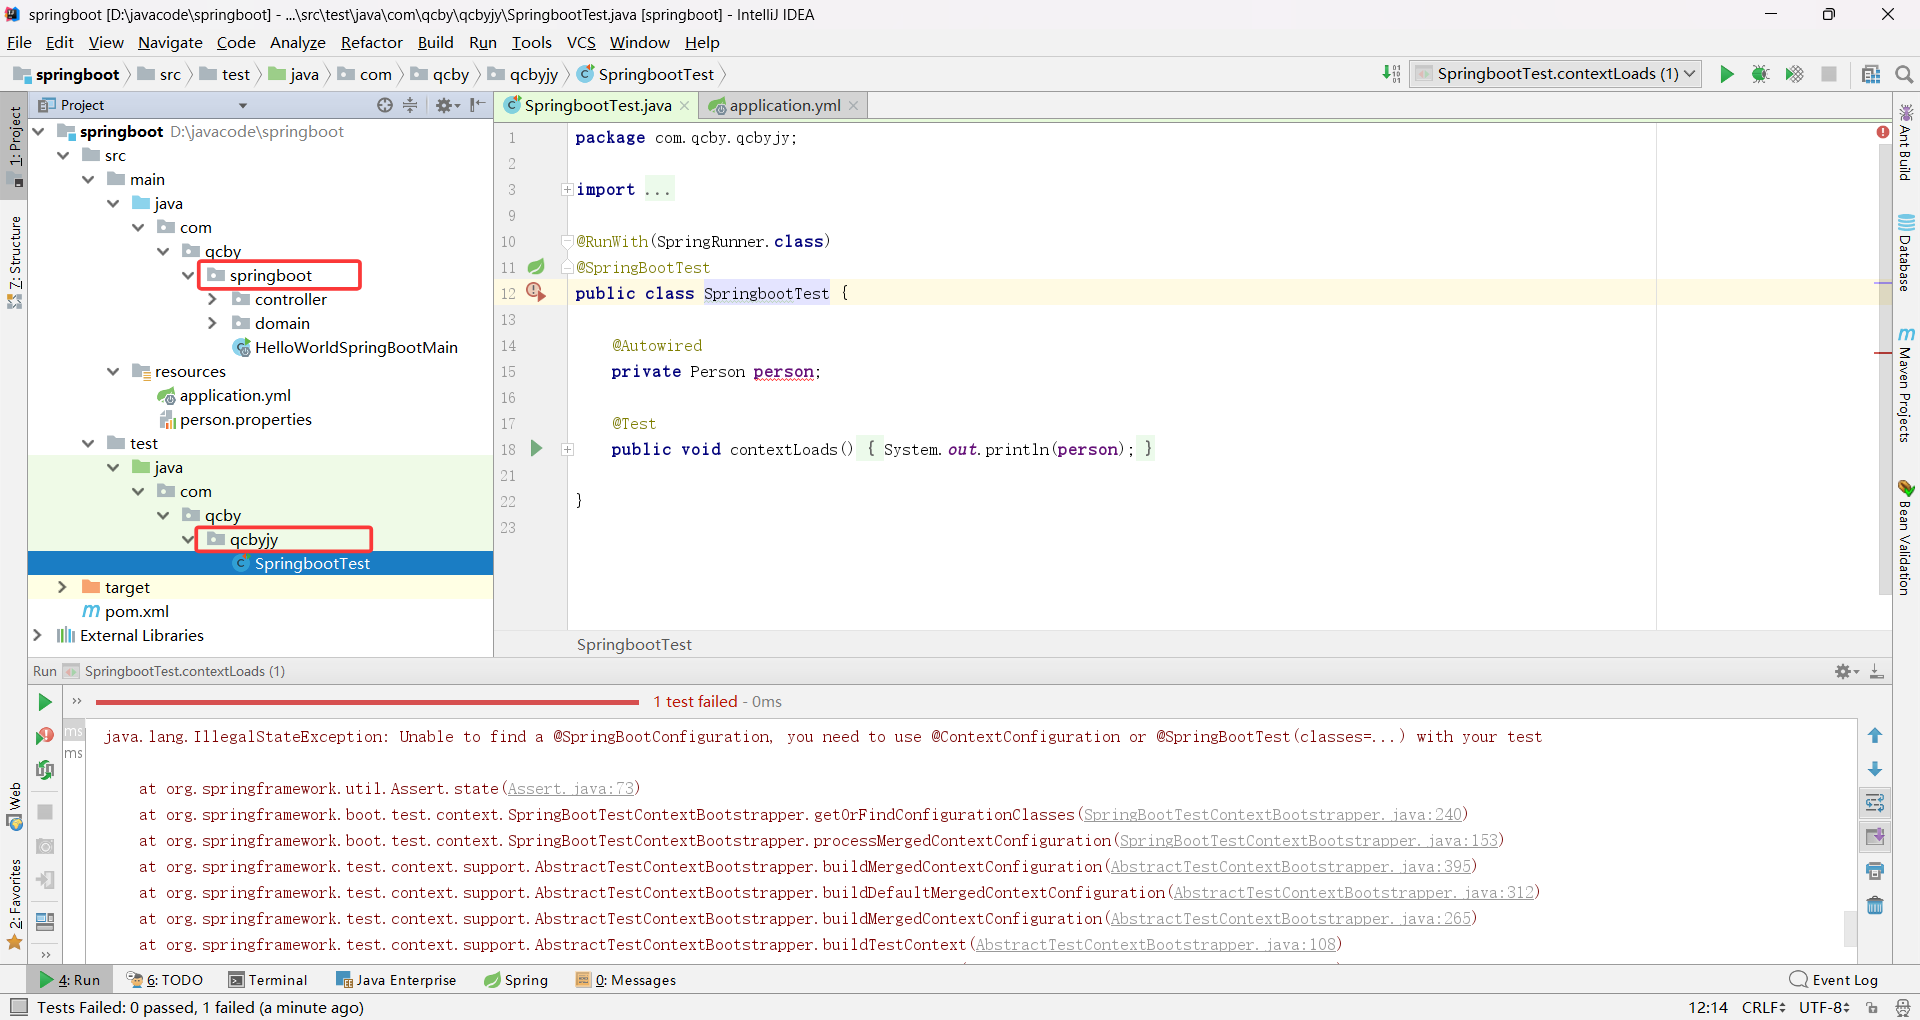
Spring 测试默认只扫描测试类所在的包(com.qcby.qcbyjy)及其子包,但主配置类在 com.qcby.springboot,不在扫描范围内,所以找不到。
验证YAML 字符串类型写法
双引号(“”)不转义特殊字符,按原含义生效,单引号(‘’)转义特殊字符,特殊字符仅作为普通字符串
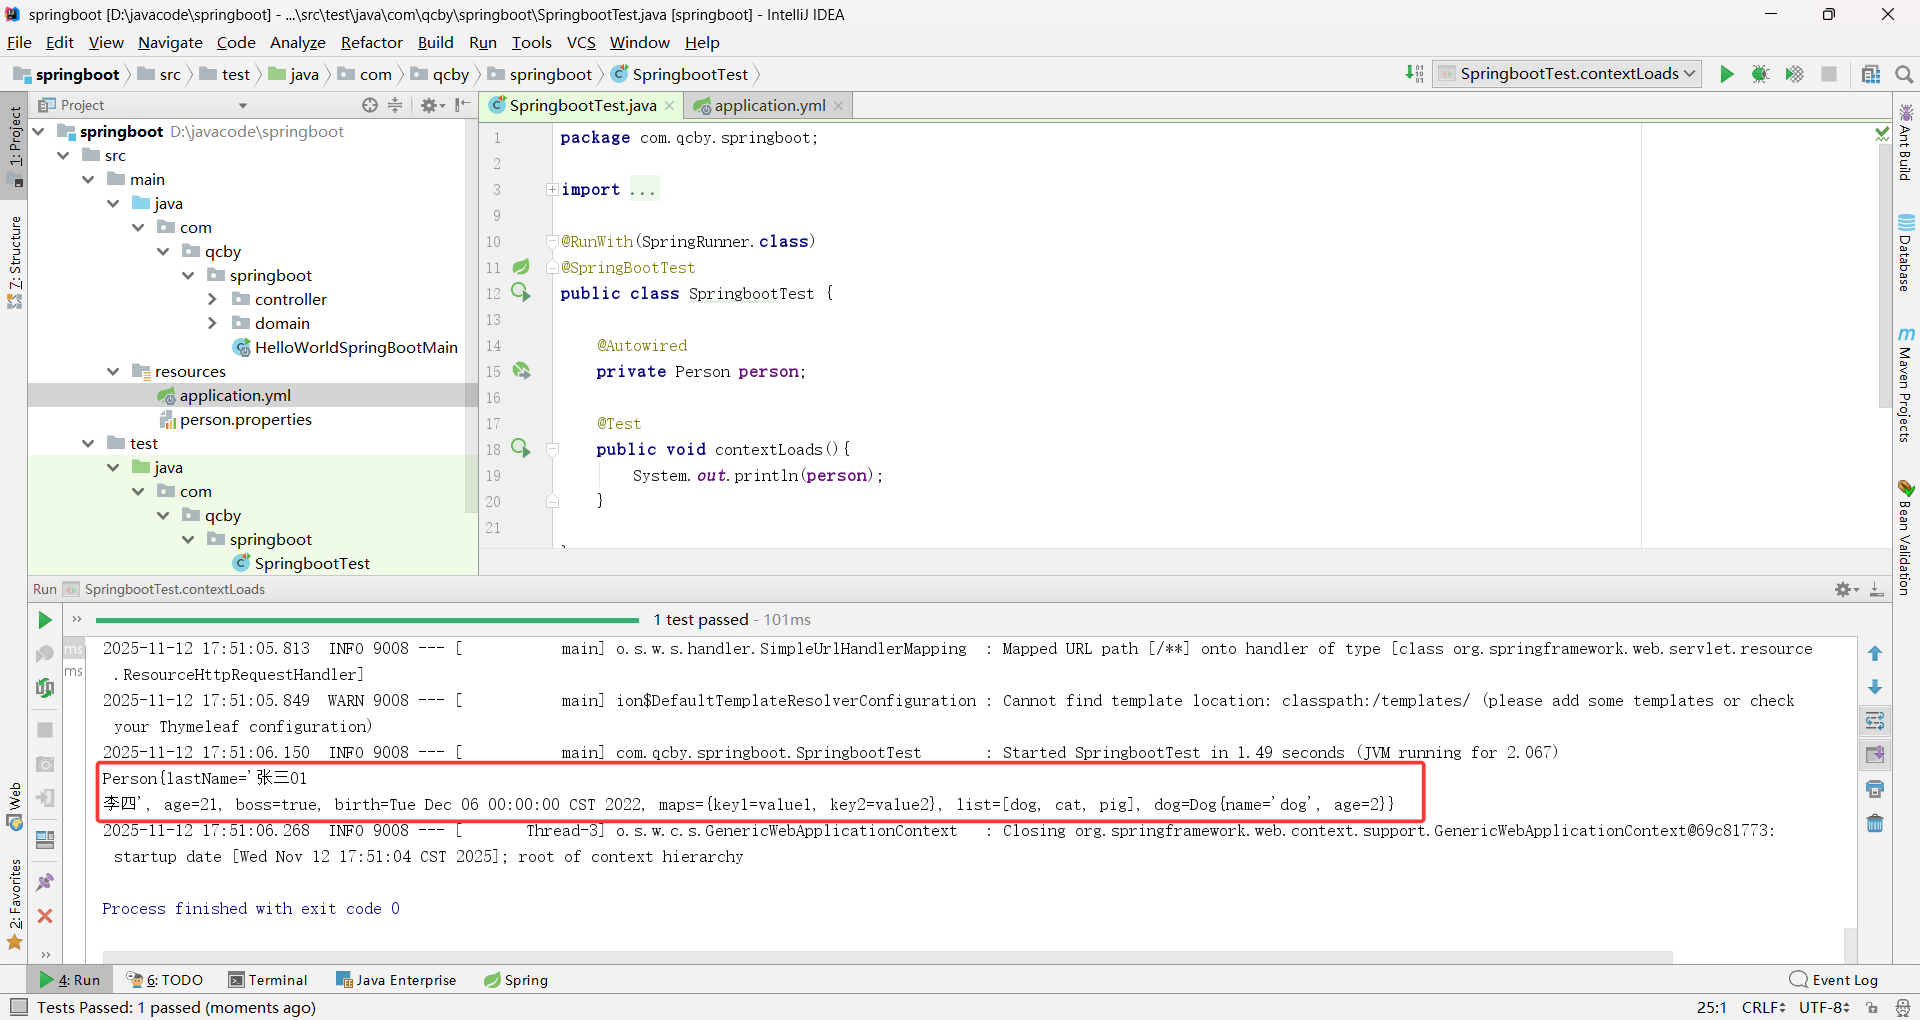
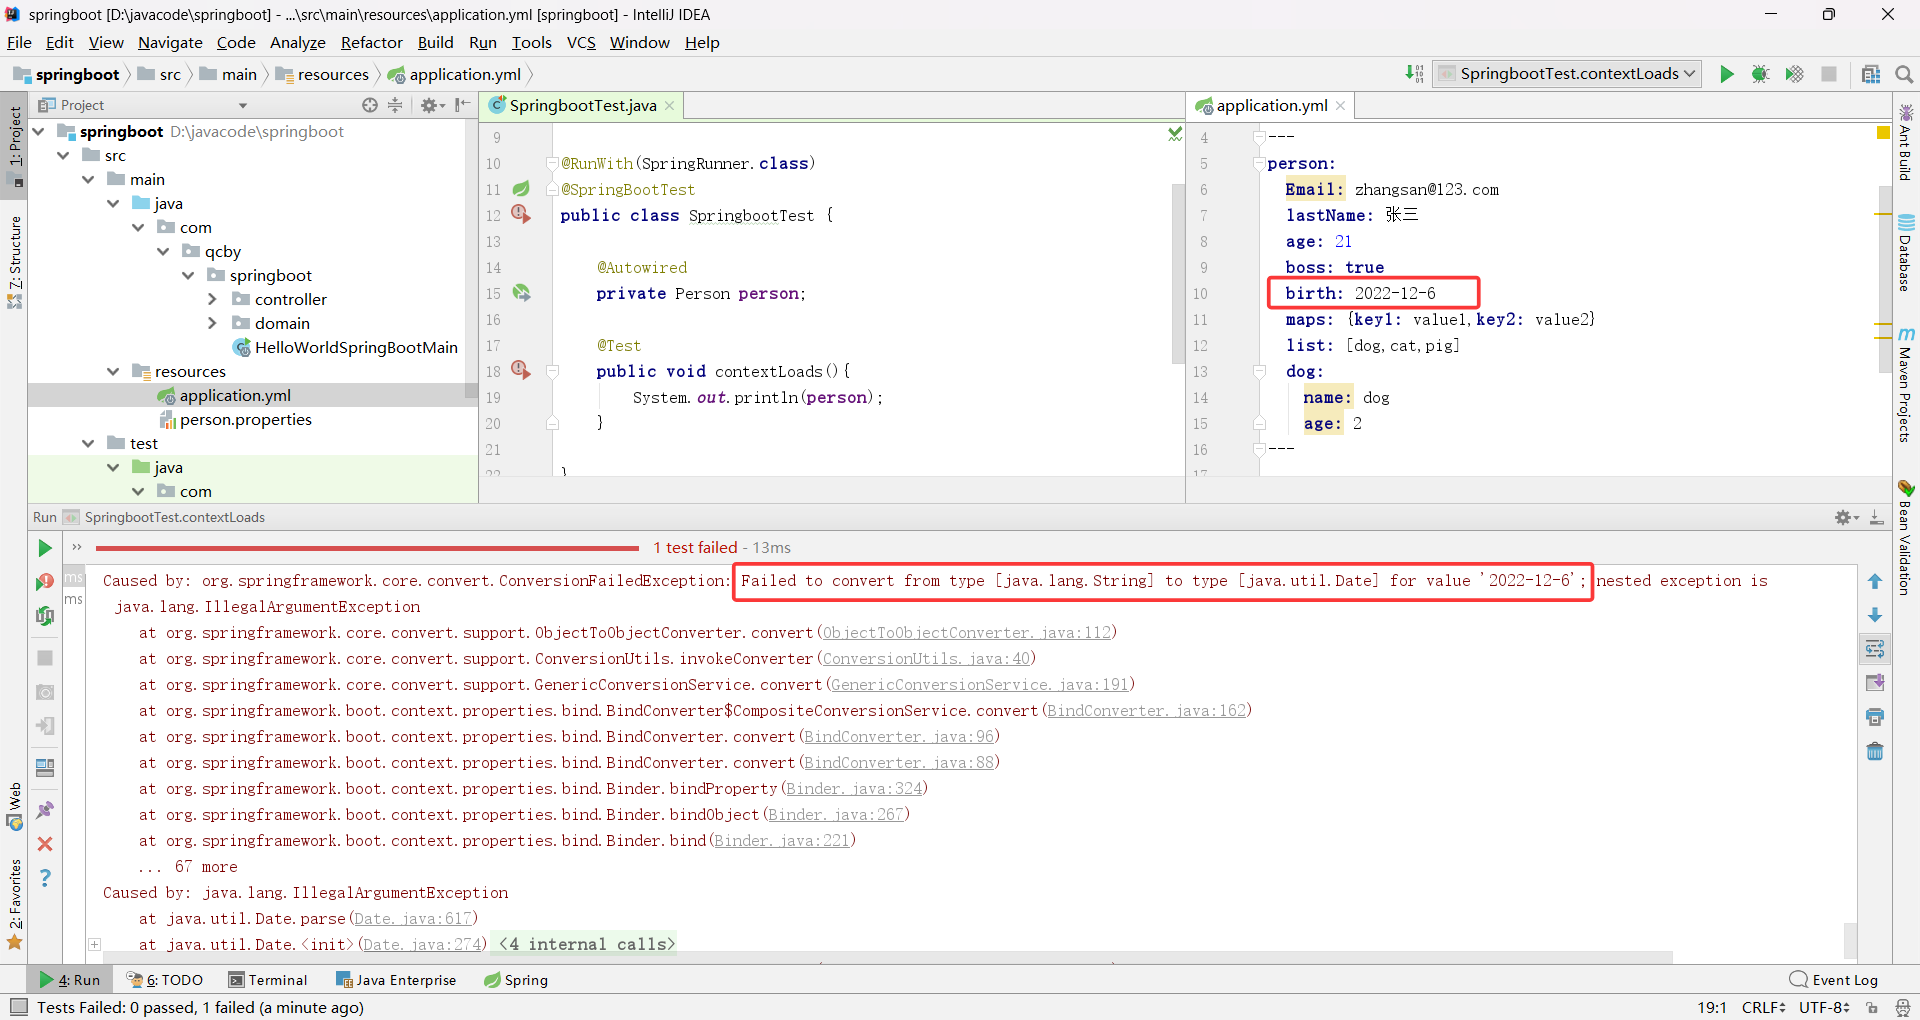
java.util.Date 传统日期类型默认支持斜杠分隔(yyyy/MM/dd)不默认支持横杠分隔(yyyy-MM-dd)格式
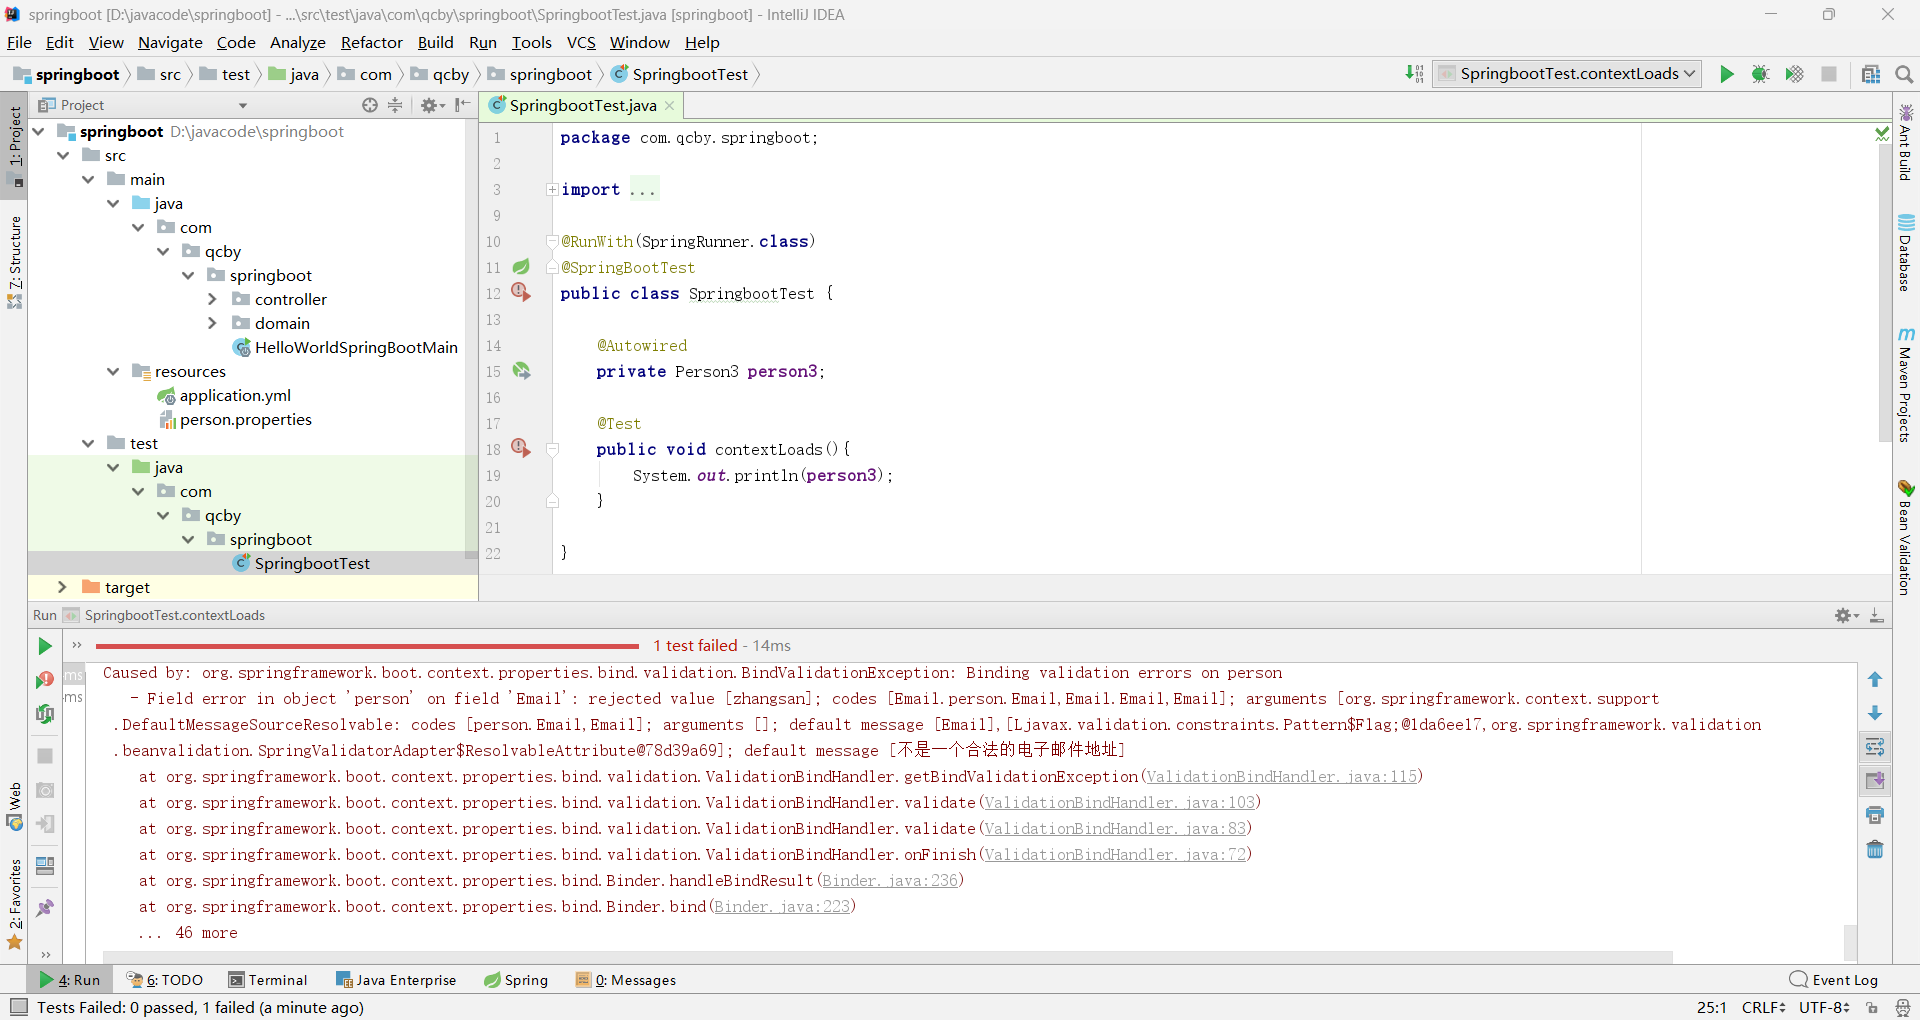
验证占位符的使用
@Value 属性注入
@Value 是一个核心注解,用于给 Spring 管理的 Bean 属性注入值
第一种常见注入场景:直接注入常量值
如果属性值是固定的常量,可以直接用 @Value(“常量”) 注入属性值(字符串需加引号,数字 / 布尔无需,不支持复杂类型的注入),无需配置文件。
package com.qcby.springboot.domain;import org.springframework.beans.factory.annotation.Value;
import org.springframework.stereotype.Component;import java.util.Date;
import java.util.List;
import java.util.Map;@Component
public class Person1 {@Value("zhangsan@123.com")private String Email;@Value("zhangsan")private String lastName;@Value("#{11*2}")private Integer age;@Value("true")private Boolean boss;@Value("2025/11/12")private Date birth;private Map<String,Object> maps;private List<Object> list;private Dog dog;public String getEmail() {return Email;}public void setEmail(String email) {Email = email;}public String getLastName() {return lastName;}public void setLastName(String lastName) {this.lastName = lastName;}public Integer getAge() {return age;}public void setAge(Integer age) {this.age = age;}public Boolean getBoss() {return boss;}public void setBoss(Boolean boss) {this.boss = boss;}public Date getBirth() {return birth;}public void setBirth(Date birth) {this.birth = birth;}public Map<String, Object> getMaps() {return maps;}public void setMaps(Map<String, Object> maps) {this.maps = maps;}public List<Object> getLists() {return list;}public void setLists(List<Object> lists) {this.list = lists;}public Dog getDog() {return dog;}public void setDog(Dog dog) {this.dog = dog;}@Overridepublic String toString() {return "Person1{" +"Email='" + Email + '\'' +", lastName='" + lastName + '\'' +", age=" + age +", boss=" + boss +", birth=" + birth +", maps=" + maps +", lists=" + list +", dog=" + dog +'}';}
}
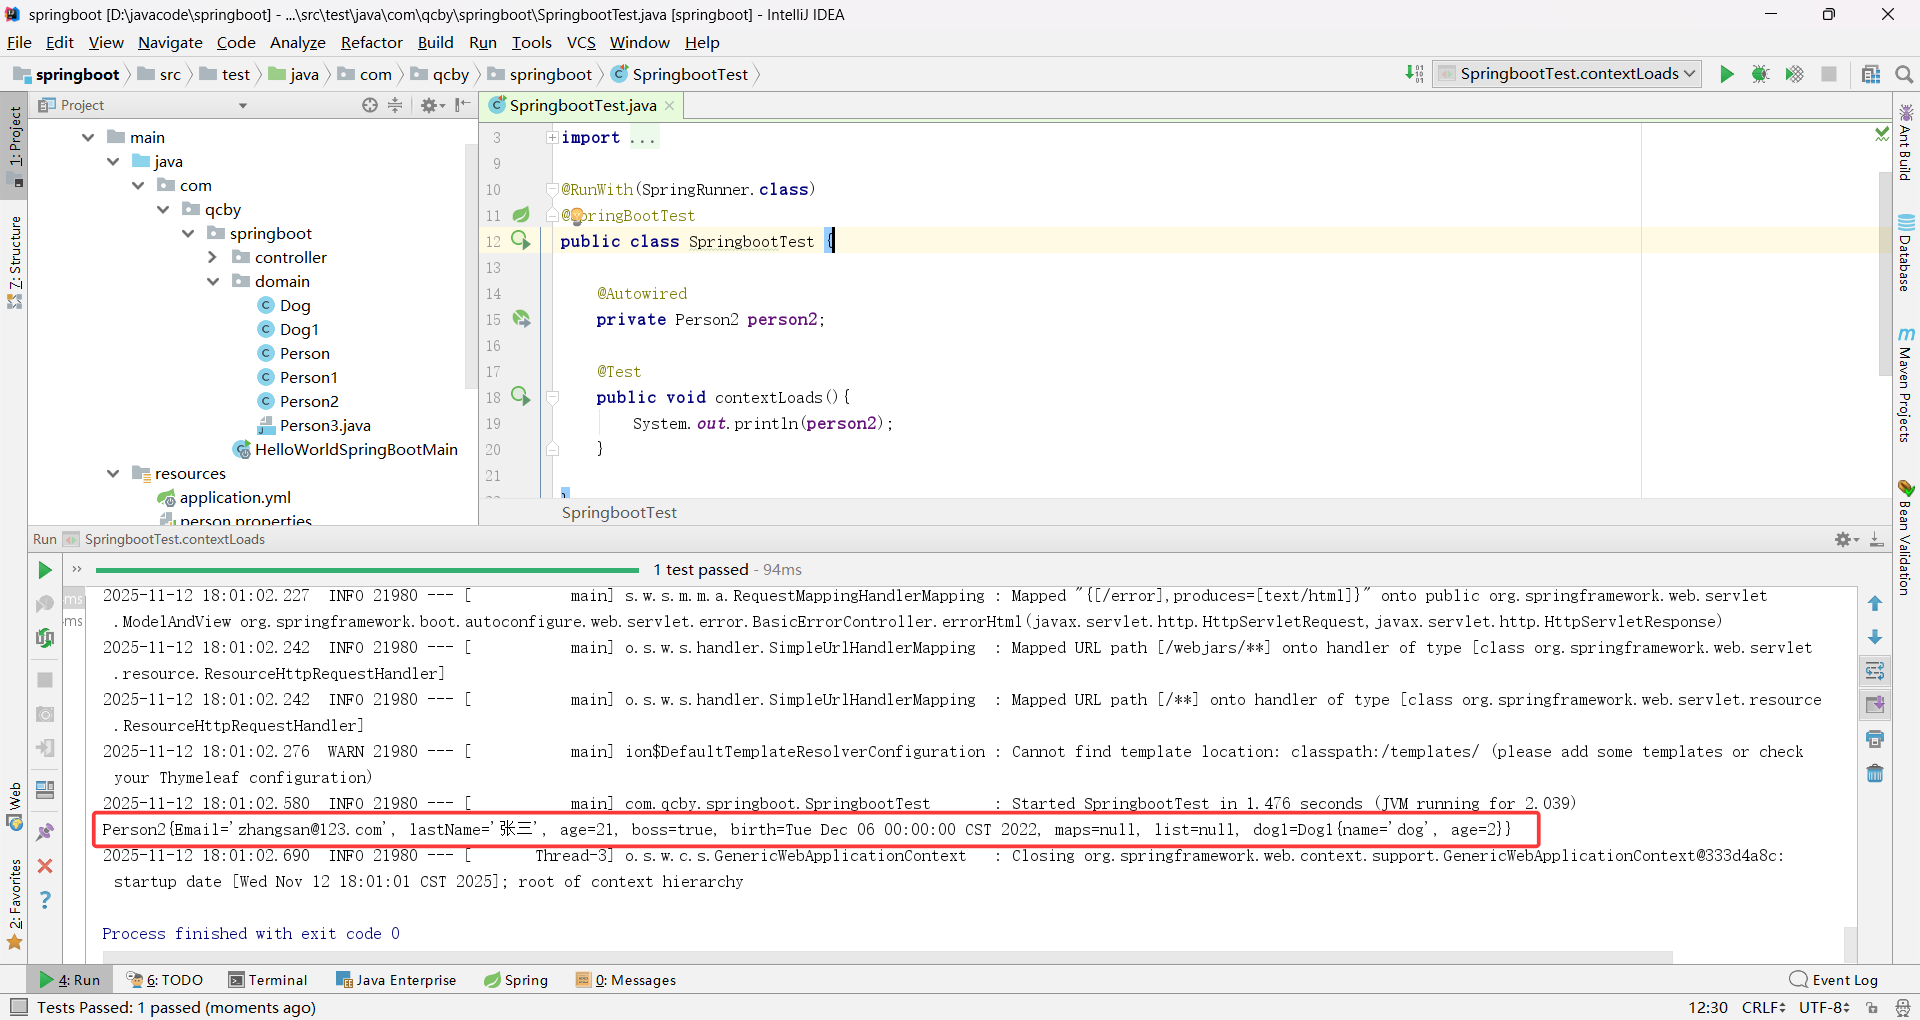
第二种注入配置文件(application.properties/yaml)中的值
package com.qcby.springboot.domain;import org.springframework.beans.factory.annotation.Autowired;
import org.springframework.beans.factory.annotation.Value;
import org.springframework.stereotype.Component;import java.util.Date;
import java.util.List;
import java.util.Map;@Component
public class Person2 {@Value("${person.Email}")private String Email;@Value("${person.lastName}")private String lastName;@Value("${person.age}")private Integer age;@Value("${person.boss}")private Boolean boss;@Value("${person.birth}")private Date birth;private Map<String,Object> maps;private List<Object> list;@Autowiredprivate Dog1 dog1;public String getEmail() {return Email;}public void setEmail(String email) {Email = email;}public String getLastName() {return lastName;}public void setLastName(String lastName) {this.lastName = lastName;}public Integer getAge() {return age;}public void setAge(Integer age) {this.age = age;}public Boolean getBoss() {return boss;}public void setBoss(Boolean boss) {this.boss = boss;}public Date getBirth() {return birth;}public void setBirth(Date birth) {this.birth = birth;}public Map<String, Object> getMaps() {return maps;}public void setMaps(Map<String, Object> maps) {this.maps = maps;}public List<Object> getList() {return list;}public void setList(List<Object> list) {this.list = list;}public Dog1 getDog1() {return dog1;}public void setDog1(Dog1 dog1) {this.dog1 = dog1;}@Overridepublic String toString() {return "Person2{" +"Email='" + Email + '\'' +", lastName='" + lastName + '\'' +", age=" + age +", boss=" + boss +", birth=" + birth +", maps=" + maps +", list=" + list +", dog1=" + dog1 +'}';}
}
package com.qcby.springboot.domain;import org.springframework.beans.factory.annotation.Value;
import org.springframework.stereotype.Component;@Component
public class Dog1 {@Value("${person.dog.name}")private String name;@Value("${person.dog.age}")private Integer age;public Dog1() {}public Dog1(String name, Integer age) {this.name = name;this.age = age;}public String getName() {return name;}public void setName(String name) {this.name = name;}public Integer getAge() {return age;}public void setAge(Integer age) {this.age = age;}@Overridepublic String toString() {return "Dog1{" +"name='" + name + '\'' +", age=" + age +'}';}
}
@Validated 数据校验
Spring Boot 2.3.0 之前,spring-boot-starter-web 会默认传递依赖 spring-boot-starter-validation,而该 starter 已包含 Hibernate Validator(数据校验实现核心)。
Spring Boot 2.3.0 发布后,官方将 spring-boot-starter-validation 从 spring-boot-starter-web/spring-boot-starter-webflux 的默认传递依赖中移除,因此,若需使用 @Validated 实现参数校验,必须手动引入 spring-boot-starter-validation,否则仅能使用注解标记,校验逻辑不会执行(无报错,仅不生效)。
<!-- 2.3.0 之后的版本需手动引入校验 starter -->
<dependency><groupId>org.springframework.boot</groupId><artifactId>spring-boot-starter-validation</artifactId>
</dependency>
package com.qcby.springboot.domain;import org.springframework.beans.factory.annotation.Value;
import org.springframework.boot.context.properties.ConfigurationProperties;
import org.springframework.stereotype.Component;
import org.springframework.validation.annotation.Validated;import javax.validation.constraints.NotNull;
import java.util.Date;
import java.util.List;
import java.util.Map;@Component
@ConfigurationProperties(prefix = "person")
@Validated
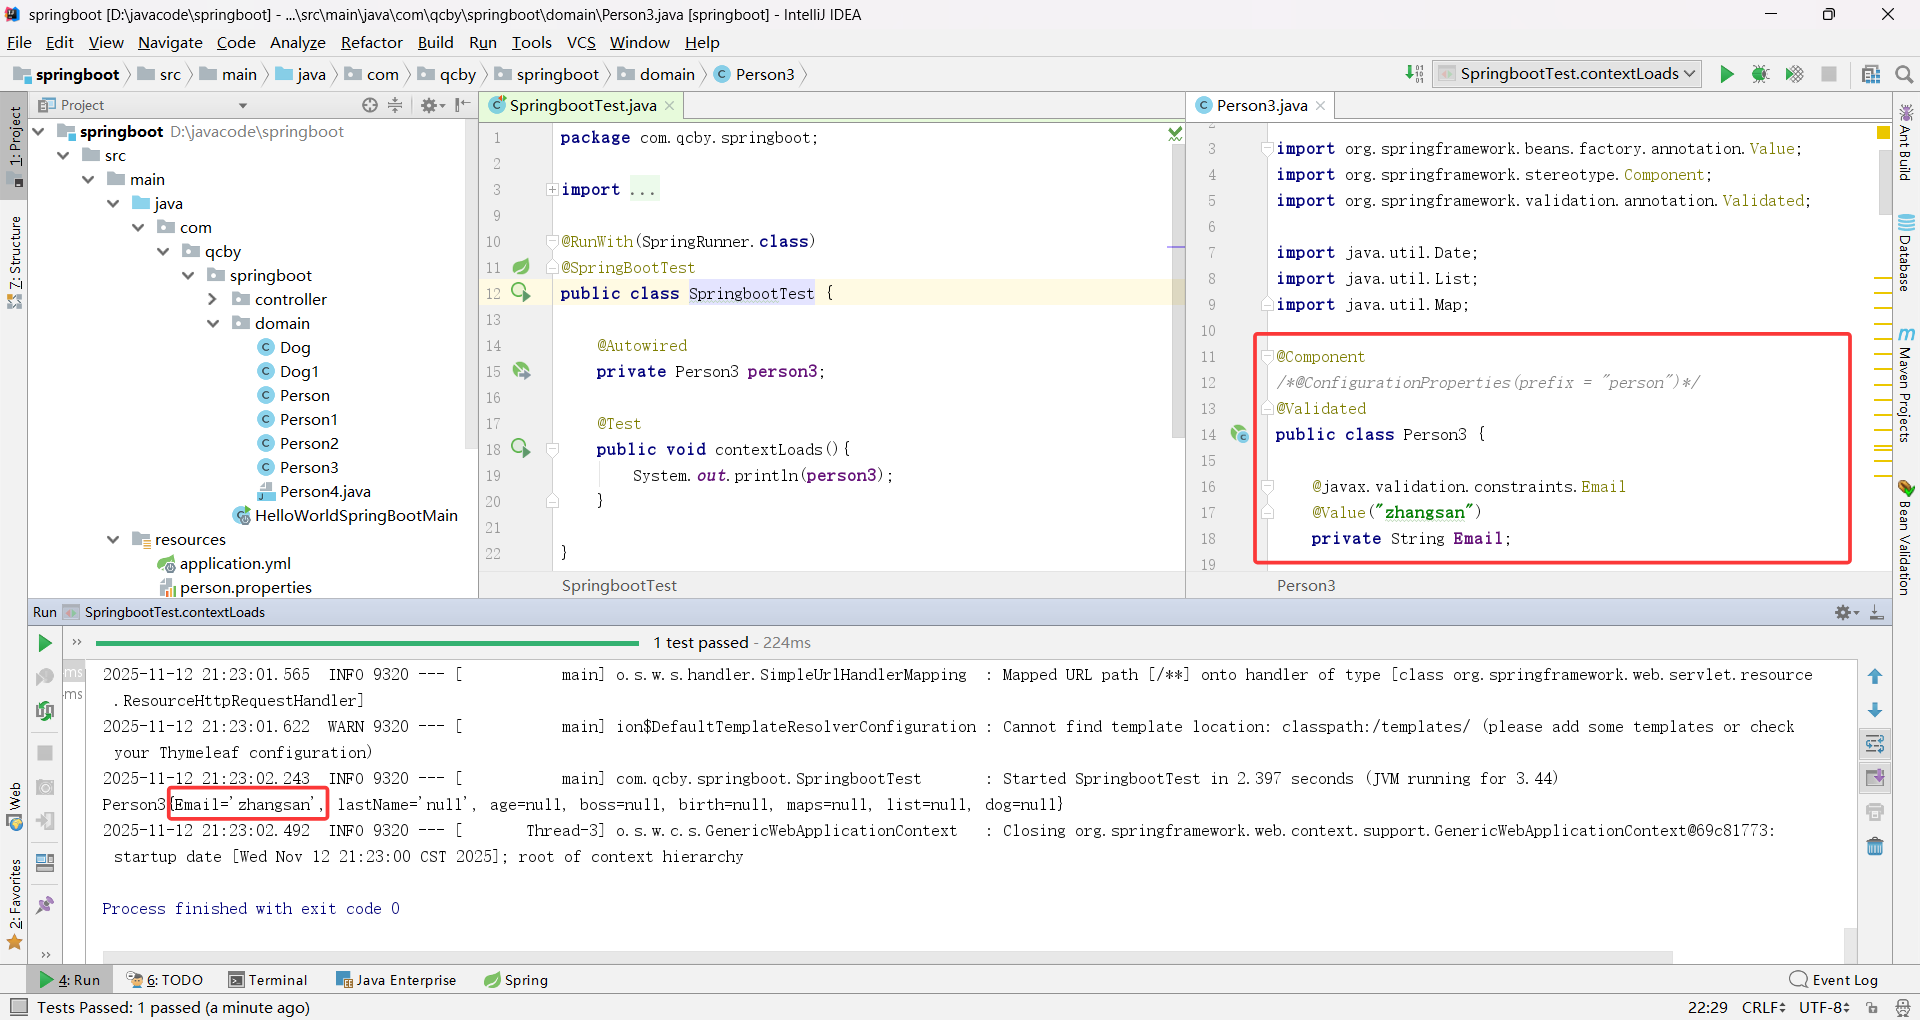
public class Person3 {@javax.validation.constraints.Email@Value("${person.Email}")private String Email;@NotNull@Value("${person.lastName}")private String lastName;private Integer age;private Boolean boss;private Date birth;private Map<String,Object> maps;private List<Object> list;private Dog dog;public Person3() {}public Person3(@javax.validation.constraints.Email String email, Integer age, Boolean boss, Date birth, Map<String, Object> maps, List<Object> list, Dog dog) {Email = email;this.age = age;this.boss = boss;this.birth = birth;this.maps = maps;this.list = list;this.dog = dog;}public String getEmail() {return Email;}public void setEmail(String email) {Email = email;}public String getLastName() {return lastName;}public void setLastName(String lastName) {this.lastName = lastName;}public Integer getAge() {return age;}public void setAge(Integer age) {this.age = age;}public Boolean getBoss() {return boss;}public void setBoss(Boolean boss) {this.boss = boss;}public Date getBirth() {return birth;}public void setBirth(Date birth) {this.birth = birth;}public Map<String, Object> getMaps() {return maps;}public void setMaps(Map<String, Object> maps) {this.maps = maps;}public List<Object> getList() {return list;}public void setList(List<Object> list) {this.list = list;}public Dog getDog() {return dog;}public void setDog(Dog dog) {this.dog = dog;}@Overridepublic String toString() {return "Person3{" +"Email='" + Email + '\'' +", lastName='" + lastName + '\'' +", age=" + age +", boss=" + boss +", birth=" + birth +", maps=" + maps +", list=" + list +", dog=" + dog +'}';}
}
package com.qcby.springboot.domain;public class Dog {private String name;private Integer age;public Dog() {}public Dog(String name, Integer age) {this.name = name;this.age = age;}public String getName() {return name;}public void setName(String name) {this.name = name;}public Integer getAge() {return age;}public void setAge(Integer age) {this.age = age;}@Overridepublic String toString() {return "Dog{" +"name='" + name + '\'' +", age=" + age +'}';}
}
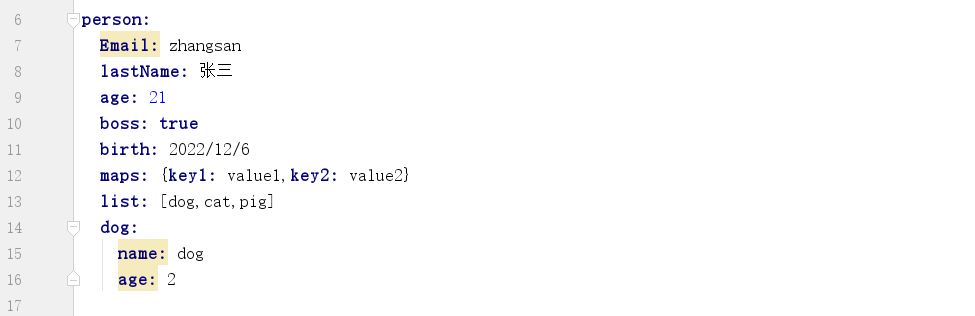
Email 被 @Email 注解修饰,配置文件输入的属性 Email 邮箱不合法时会报错
lastName 被 @NotNull 注解修饰,配置文件输入的属性 lastName 为空时会报错
@javax.validation.constraints.Email
@Value(“zhangsan”)
连个注解同时使用的时候邮箱校验就不生效了
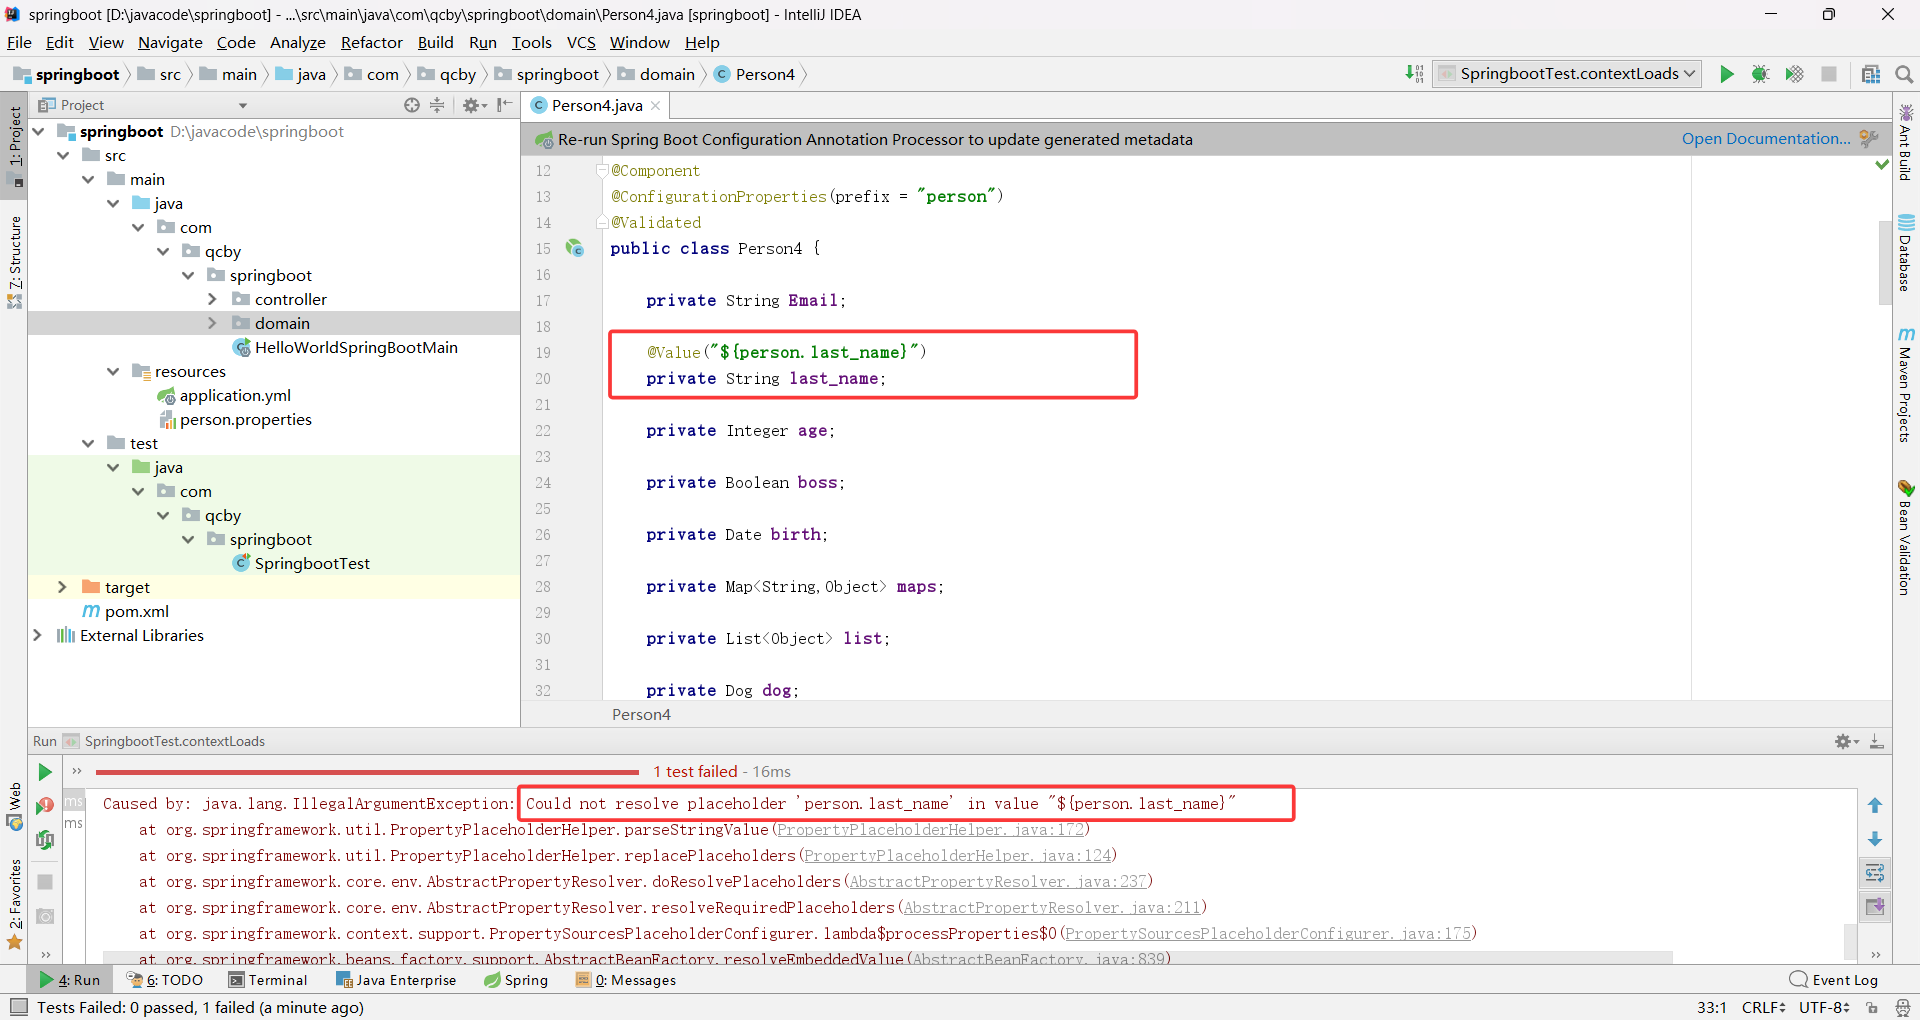
@Value获取值和@ConfigurationProperties获取值比较
验证松散绑定的区别
package com.qcby.springboot.domain;import org.springframework.boot.context.properties.ConfigurationProperties;
import org.springframework.stereotype.Component;import java.util.Date;
import java.util.List;
import java.util.Map;@Component
@ConfigurationProperties(prefix = "person")
//@Validated
public class Person4 {private String Email;//@Value("${person.last_name}")private String last_name;private Integer age;private Boolean boss;private Date birth;private Map<String,Object> maps;private List<Object> list;private Dog dog;public Person4() {}public Person4(String email, Integer age, Boolean boss, Date birth, Map<String, Object> maps, List<Object> list, Dog dog) {Email = email;this.age = age;this.boss = boss;this.birth = birth;this.maps = maps;this.list = list;this.dog = dog;}public String getEmail() {return Email;}public void setEmail(String email) {Email = email;}public String getLast_name() {return last_name;}public void setLast_name(String last_name) {this.last_name = last_name;}public Integer getAge() {return age;}public void setAge(Integer age) {this.age = age;}public Boolean getBoss() {return boss;}public void setBoss(Boolean boss) {this.boss = boss;}public Date getBirth() {return birth;}public void setBirth(Date birth) {this.birth = birth;}public Map<String, Object> getMaps() {return maps;}public void setMaps(Map<String, Object> maps) {this.maps = maps;}public List<Object> getList() {return list;}public void setList(List<Object> list) {this.list = list;}public Dog getDog() {return dog;}public void setDog(Dog dog) {this.dog = dog;}@Overridepublic String toString() {return "Person4{" +"Email='" + Email + '\'' +", last_name='" + last_name + '\'' +", age=" + age +", boss=" + boss +", birth=" + birth +", maps=" + maps +", list=" + list +", dog=" + dog +'}';}
}
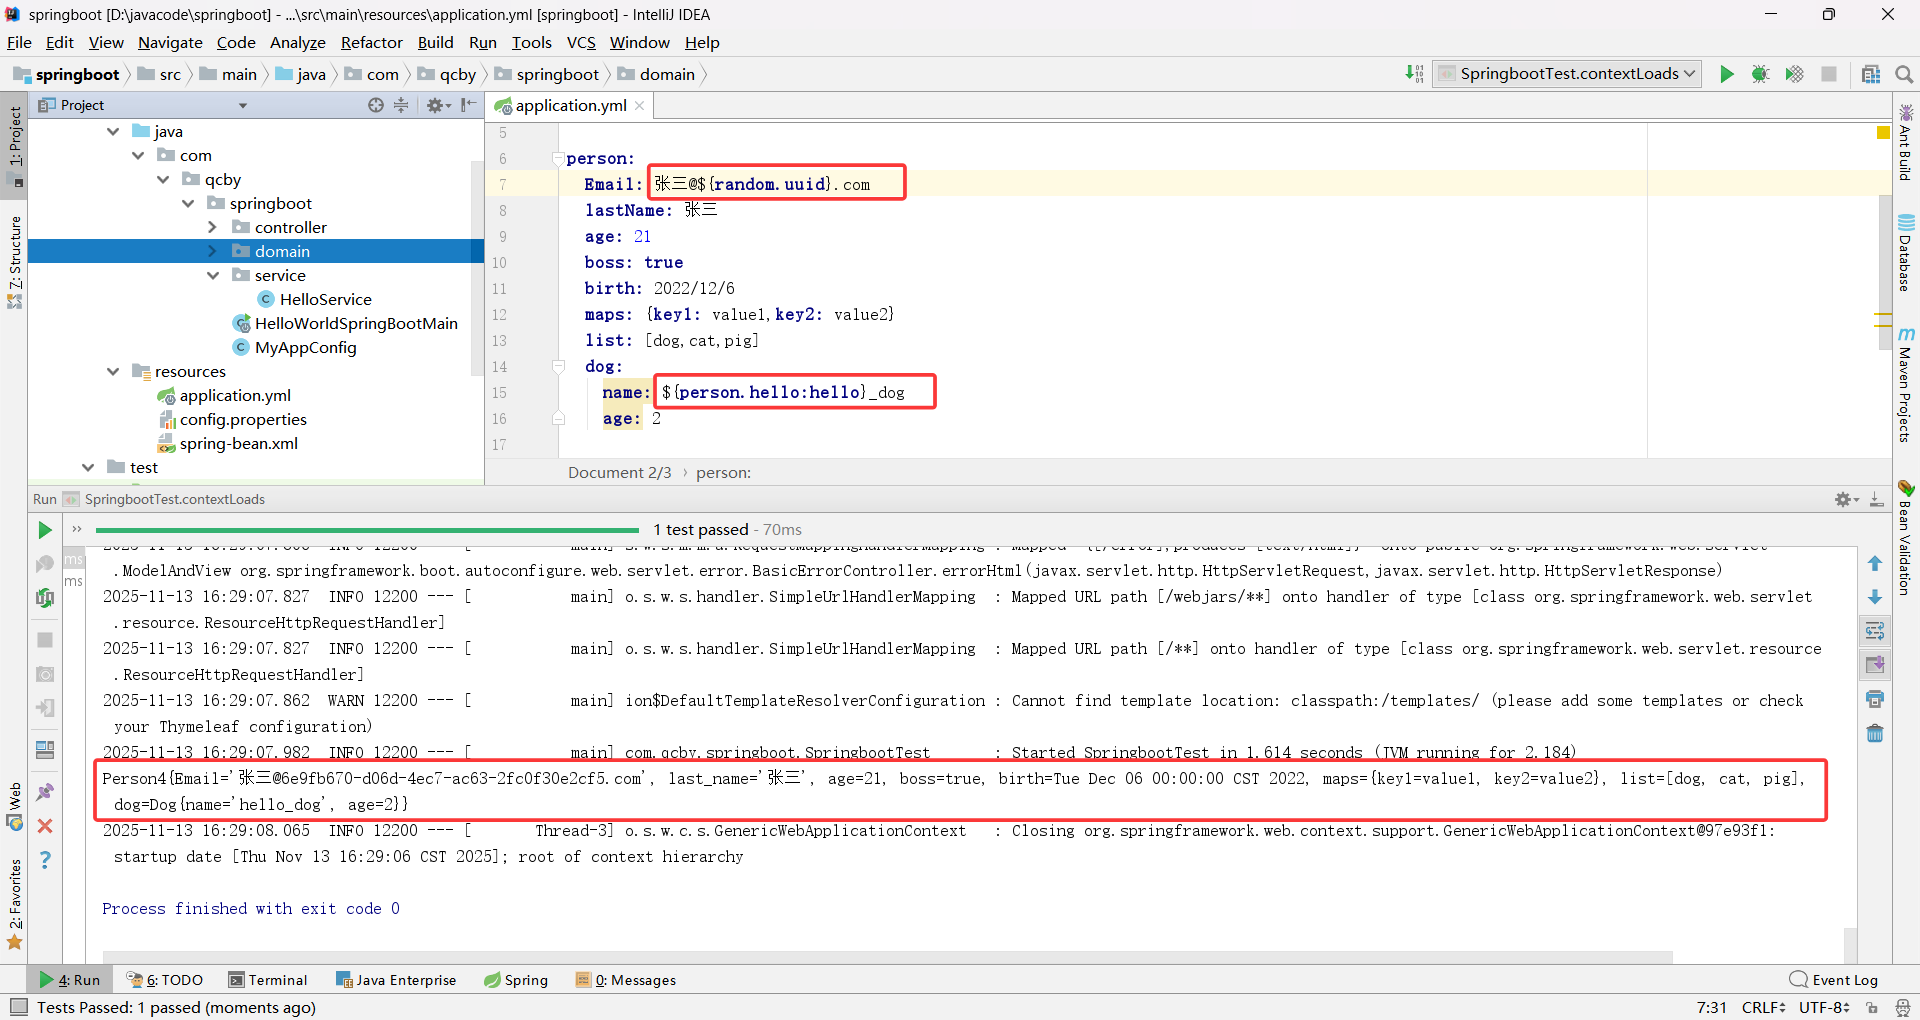
@ConfigurationProperties 支持配置名与 Java 属性名的格式自动转换
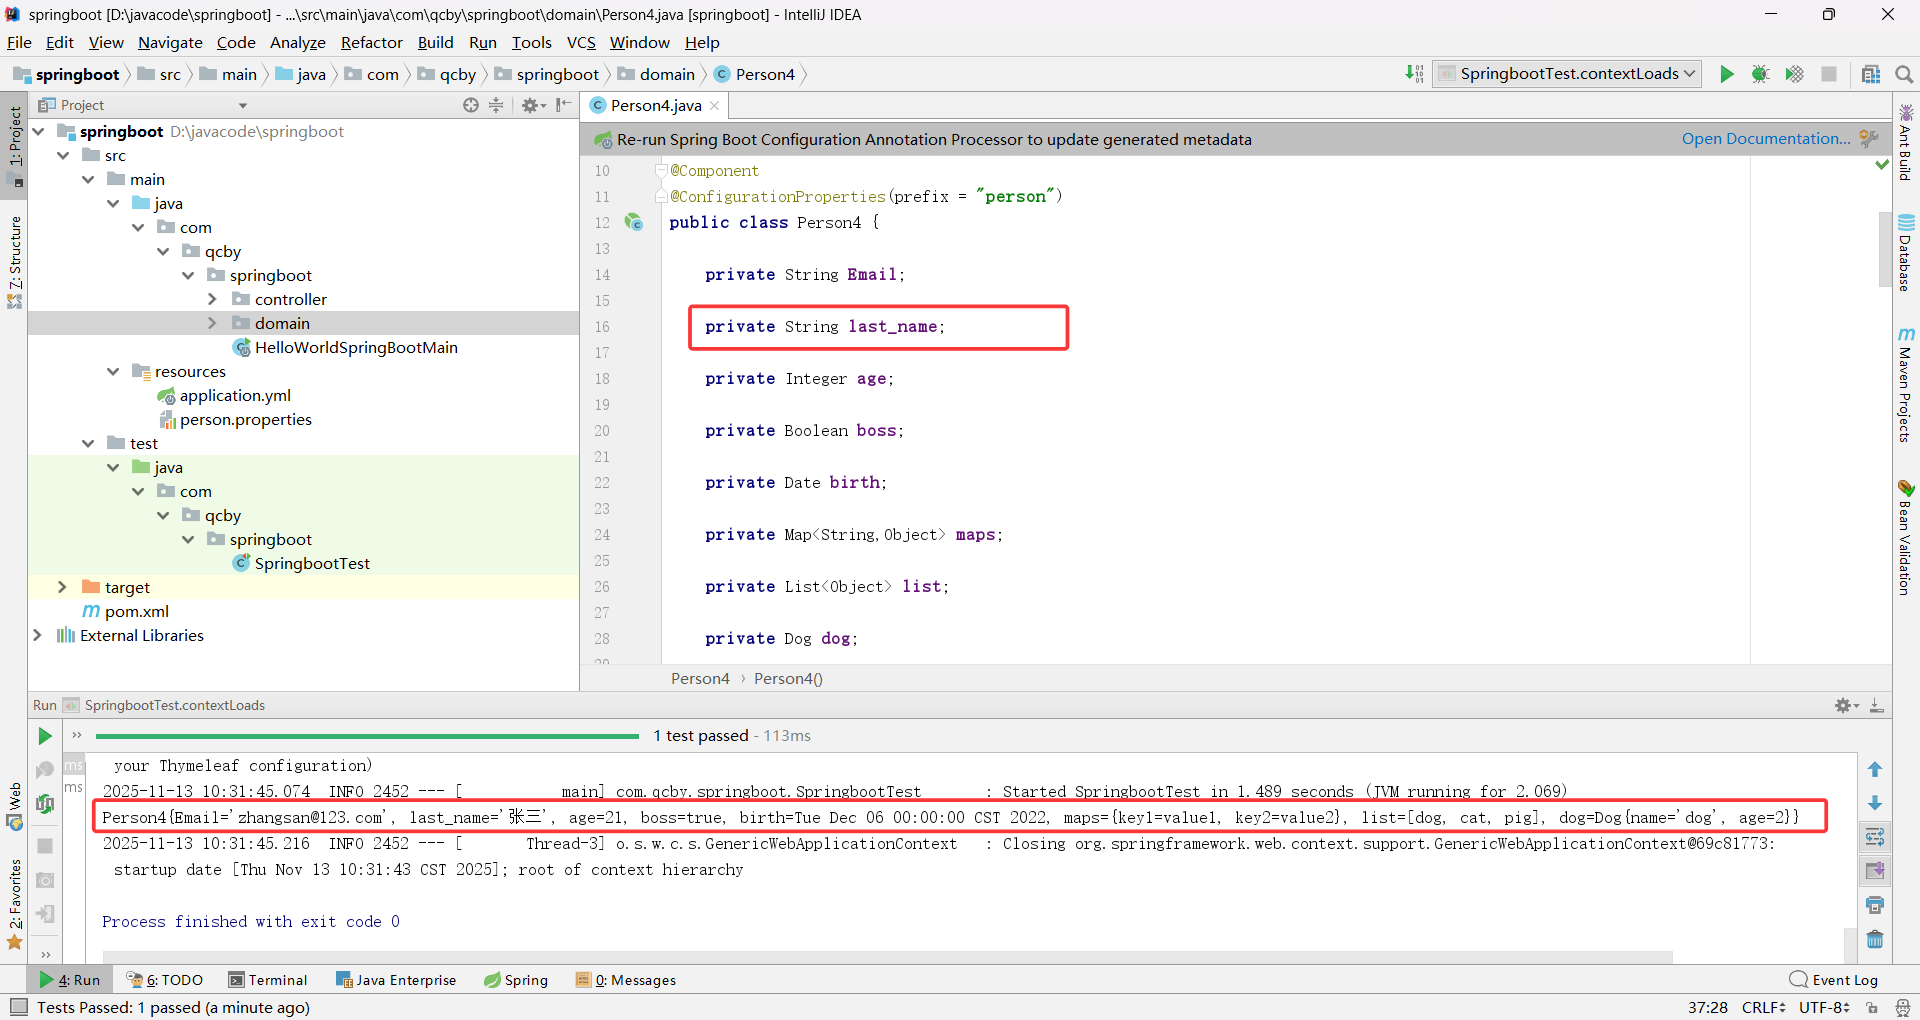
@Value 不支持配置名与 Java 属性名的格式自动转换,必须严格匹配配置名(大小写、分隔符完全一致)
加载指定的配置文件
@PropertySource 加载自定义配置文件
加载非默认的配置文件 person.properties,补充 Spring 环境中的配置属性,加载后的配置属性可通过 @Value 或 @ConfigurationProperties 直接获取。
@ImportResource 导入传统的 Spring XML 配置文件 spring-bean.xml,让 XML 中定义的 Bean 被 Spring 容器管理。Spring Boot 默认不扫描 XML 配置文件,这个注解是为了兼容旧项目。
示例代码:

package com.qcby.springboot;import com.qcby.springboot.service.HelloService;
import org.springframework.context.annotation.Bean;
import org.springframework.context.annotation.Configuration;
import org.springframework.context.annotation.ImportResource;
import org.springframework.context.annotation.PropertySource;@Configuration
@PropertySource("classpath:config.properties")
@ImportResource(locations = "classpath:spring-bean.xml")
public class MyAppConfig {}
package com.qcby.springboot.service;import org.springframework.beans.factory.annotation.Value;public class HelloService {@Value("${hello.service.version}")private String version;public void sayHello() {System.out.println("HelloService 业务版本:" + version);}
}
<?xml version="1.0" encoding="UTF-8"?>
<beans xmlns="http://www.springframework.org/schema/beans"xmlns:xsi="http://www.w3.org/2001/XMLSchema-instance"xsi:schemaLocation="http://www.springframework.org/schema/beanshttp://www.springframework.org/schema/beans/spring-beans.xsd"><bean id="helloService" class="com.qcby.springboot.service.HelloService"></bean></beans>
package com.qcby.springboot;import com.qcby.springboot.service.HelloService;
import org.junit.Test;
import org.junit.runner.RunWith;
import org.springframework.beans.factory.annotation.Autowired;
import org.springframework.beans.factory.annotation.Qualifier;
import org.springframework.boot.test.context.SpringBootTest;
import org.springframework.test.context.junit4.SpringRunner;@RunWith(SpringRunner.class)
@SpringBootTest
public class SpringbootTest {@Autowiredprivate HelloService helloService;@Testpublic void testPropertyInjection() {helloService.sayHello();}
}
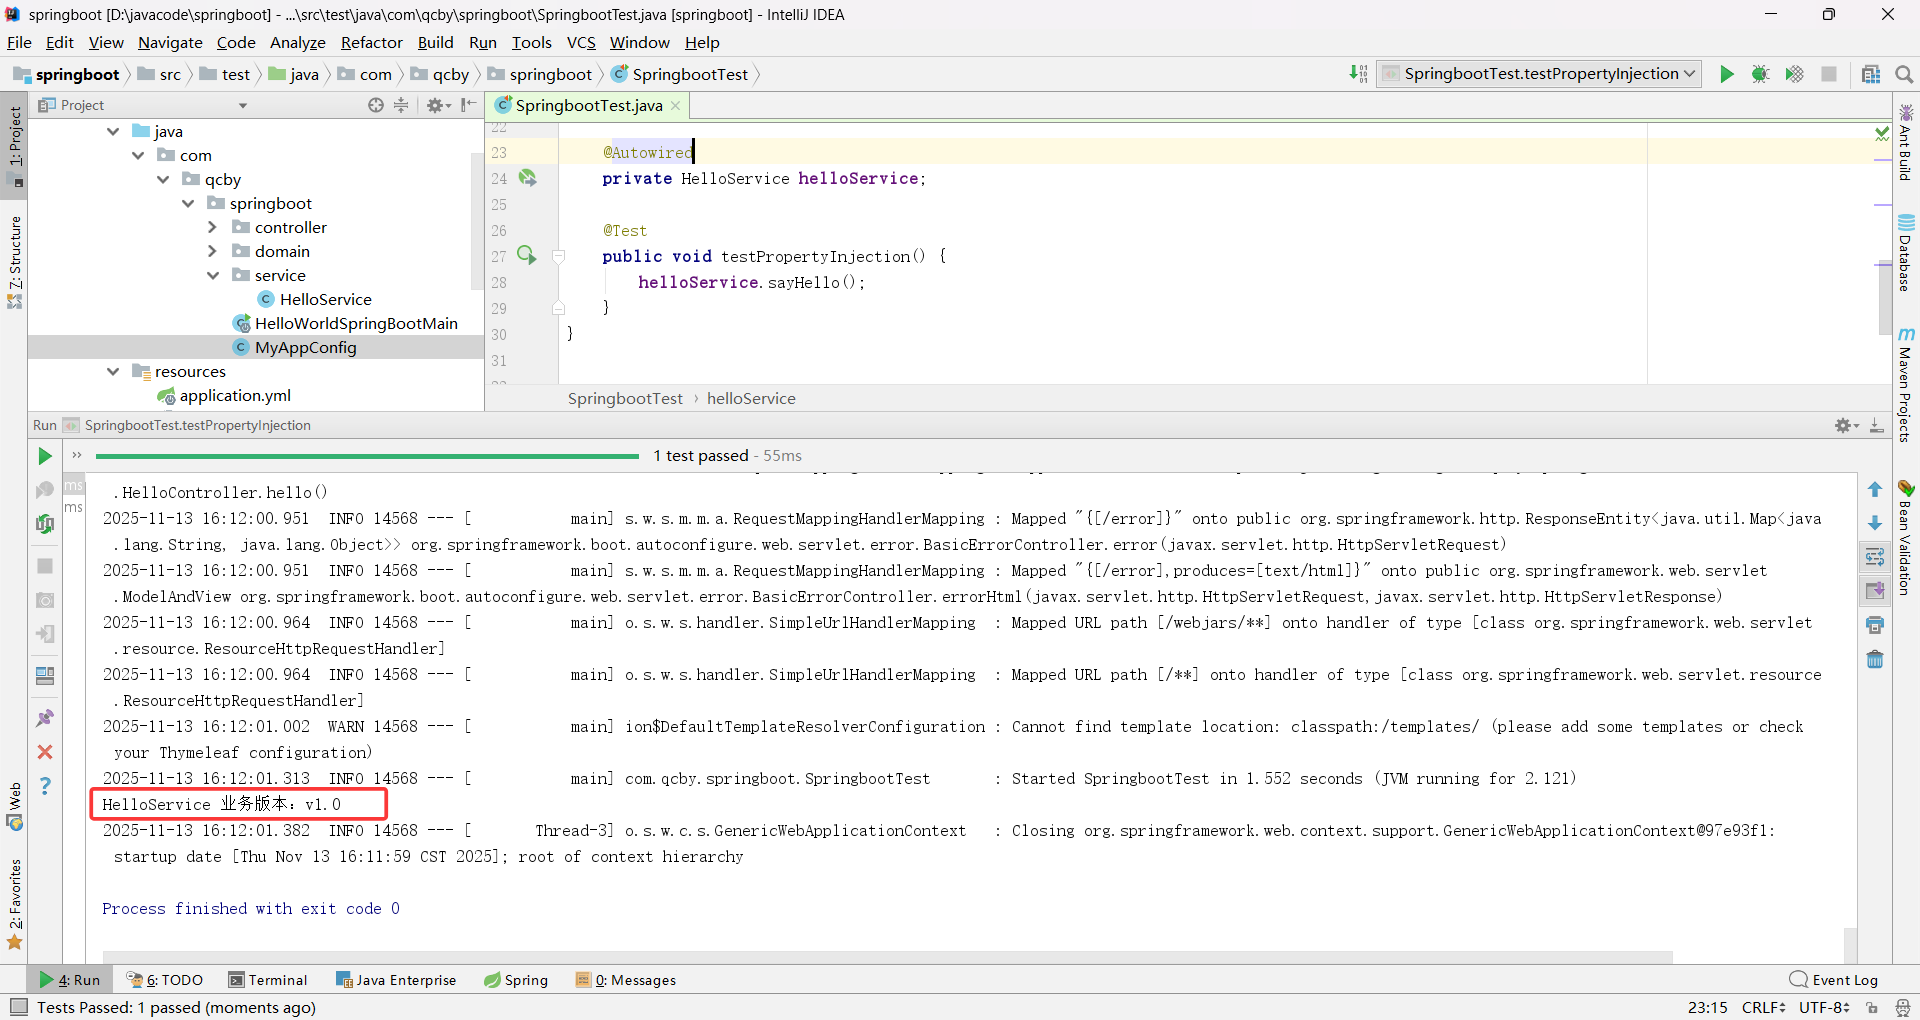
整体核心逻辑:通过 @SpringBootTest 启动 Spring 容器,容器自动扫描并加载 @Configuration 配置类,先通过 @PropertySource 读取自定义配置文件,再通过 @Bean 注册 HelloService 实例到容器,最后 @Autowired 从容器中取出该实例,调用方法验证配置注入是否成功。
@Bean 时 JavaConfig 方式注册 Bean
在 @Configuration 标注的配置类中,通过方法手动注册 Bean 到 Spring 容器,Spring 会管理 Bean 的生命周期(创建、依赖注入、销毁)。
package com.qcby.springboot;import com.qcby.springboot.service.HelloService;
import org.springframework.context.annotation.Bean;
import org.springframework.context.annotation.Configuration;
import org.springframework.context.annotation.PropertySource;@Configuration
@PropertySource("classpath:config.properties")
public class MyAppConfig {@Beanpublic HelloService helloService01() {System.out.println("配置类@Bean注册组件:helloService01");return new HelloService();}
}
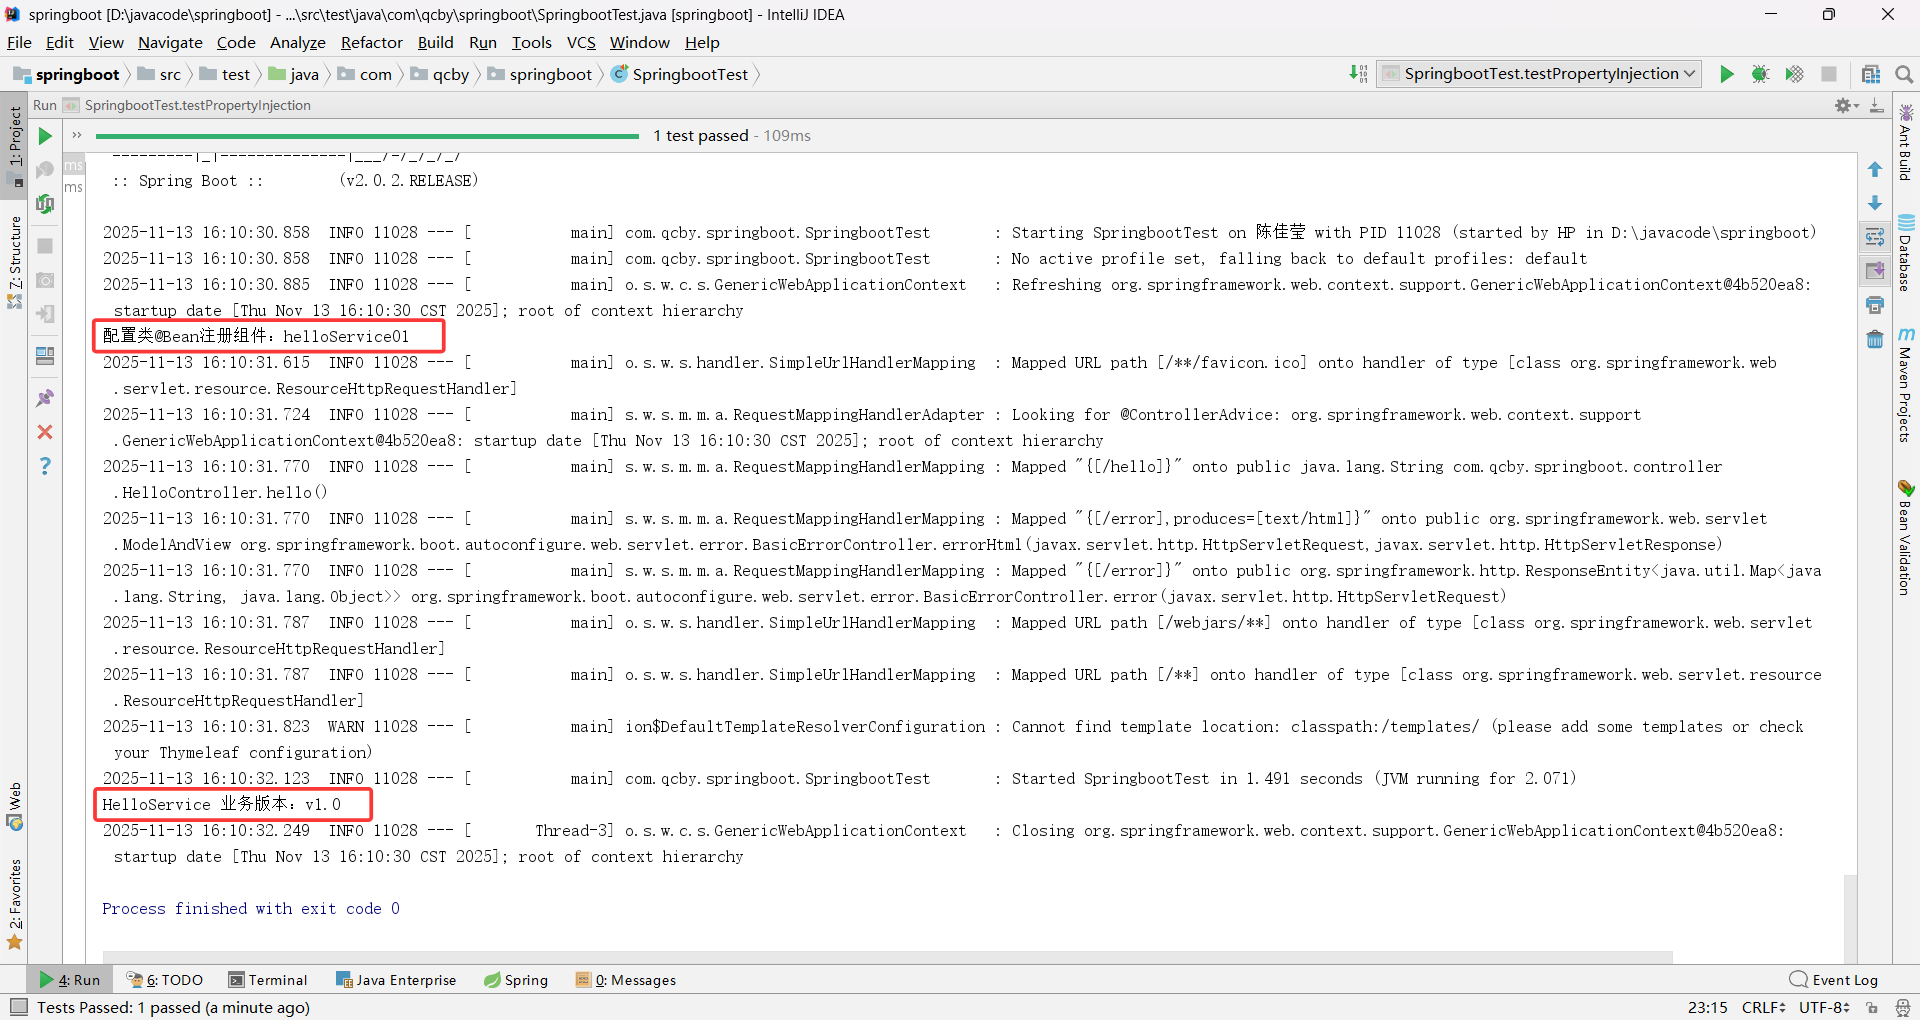
整体核心逻辑:测试类通过 @SpringBootTest 启动 Spring 容器,容器加载 @Configuration 配置类后,通过 @PropertySource 读取自定义配置文件、@ImportResource 导入 XML 配置并注册 HelloService 类型 Bean,Spring 自动为该 Bean 注入配置文件中的版本属性,最终测试类通过 @Autowired 注入 Bean 并调用方法验证属性注入效果。