python将Excel数据写进图片中
需求
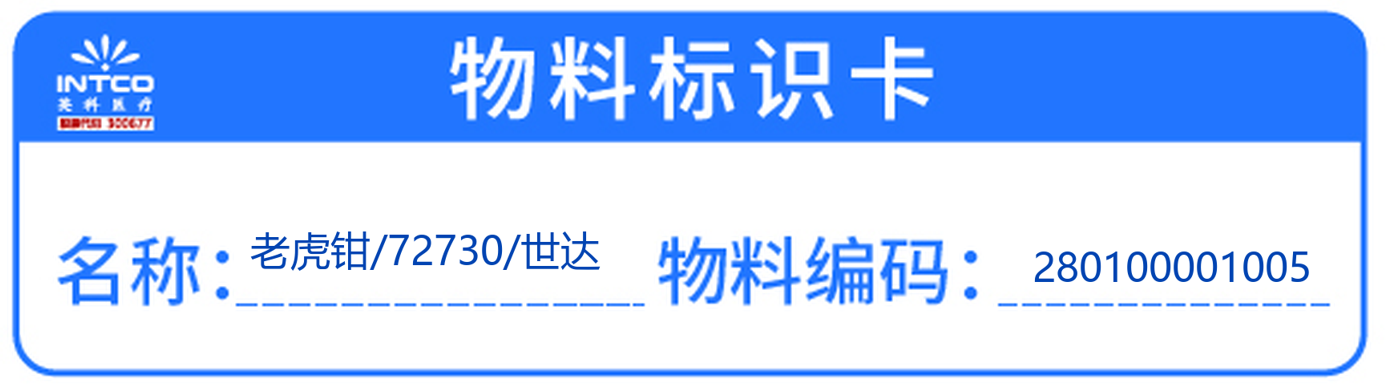
一张图片模板,里面有两个字段,内容都要来自Excel,Excel里,对应两个字段。
分析
针对这种需求,没有代码基础的人可以直接使用ppt+Excel的结合的方式。有代码基础的人我直接推荐接下来的代码。
目录结构
auto.py就是主文件内容就是下面的代码。image.png就是要被操作的图片模板。test.xlsx是需要对应放上图片的数据。以本例子为例就是名称和编码的内容。
代码
# -*- coding: utf-8 -*-
"""
物料标识卡(小模板 299x92)自动生成
- 写字区域用相对比例,适配任意尺寸模板
- 名称自动换行(最多2行),编码单行
- 自动修正无效矩形(left>right / 越界)
- 支持红框调试与放大渲染(提升清晰度)
依赖: pip install pillow pandas openpyxl
"""import os, re
import pandas as pd
from PIL import Image, ImageDraw, ImageFont# ========= 基本配置 =========
TEMPLATE = "image.png"      # 模板图(当前这张小模板)
EXCEL    = "test.xlsx"      # 数据表
OUTDIR   = "output"         # 输出目录# 兼容列名
CAND_CODE = ["物料编码","编码","料号","物料代号","物料編碼"]
CAND_NAME = ["物料名称","名称","品名","物料名稱"]# 字体(按系统情况自选一个存在的)
FONT_CANDIDATES = ["C:/Windows/Fonts/msyh.ttc",     # 微软雅黑"C:/Windows/Fonts/simsun.ttc",   # 宋体"/System/Library/Fonts/STHeiti Light.ttc",  # mac 旧系统"/System/Library/Fonts/PingFang.ttc",       # mac 苹方(若存在)
]
COLOR = (0, 68, 178)   # 文字颜色(与模板蓝一致或相近)# ========= 版面(相对比例) =========
# 这组比例已针对 299×92 的模板精调,如对不上可微调 0.01~0.02
# (left, top, right, bottom) 都是 0~1 的比例
NAME_BOX_RATIO = (0.19, 0.50, 0.46, 0.74)  # “名称”字段的可写区做上右下
CODE_BOX_RATIO = (0.74, 0.55, 0.97, 0.74)  # “物料编码”字段的可写区 (0.74, 0.60, 0.97, 0.86# 细微像素级偏移(先保持 0,0;想再贴线就 +-1~2 调)
NUDGE_NAME = (0, 0)
NUDGE_CODE = (0, 0)# 对齐与字号
V_RATIO = 0.50           # 垂直几何居中(0.5)
H_ALIGN = 'left'         # 'left' 或 'right'
MIN_FONT      = 18
NAME_MAX_FONT = 50
CODE_MAX_FONT = 50# 其他
SAFE_MARGIN_PX = 6       # 防止贴边
DRAW_GUIDE = False       # True 显示红框调试
UPSCALE = 3              # 放大渲染倍数:1/2/3(2或3更清晰)# ========= 工具函数 =========
def choose_font(size: int):for fp in FONT_CANDIDATES:try:return ImageFont.truetype(fp, size)except Exception:continue# 全部失败则退回默认位图字体return ImageFont.load_default()def text_wh(draw, txt, font):x1, y1, x2, y2 = draw.textbbox((0, 0), txt, font=font)return x2 - x1, y2 - y1def fit_font(draw, txt, max_w, max_font, min_font=MIN_FONT, safe_margin=SAFE_MARGIN_PX):target_w = max(1, max_w - safe_margin)for sz in range(max_font, min_font - 1, -1):f = choose_font(sz)w, _ = text_wh(draw, txt, f)if w <= target_w:return freturn choose_font(min_font)def norm(s: str) -> str:s = re.sub(r"\s+", "", str(s or "")).lower()s = s.replace("編","编").replace("名稱","名称")return sdef find_col(df: pd.DataFrame, cands):nm = {c: norm(c) for c in df.columns}cs = [norm(x) for x in cands]# 完全匹配优先for col, n in nm.items():if n in cs:return col# 子串次之for col, n in nm.items():if any(c in n for c in cs):return colraise KeyError(f"找不到列:{cands}")def normalize_box(box, W, H, min_w=2, min_h=2):l, t, r, b = box# 排序,保证 l<=r, t<=bif l > r: l, r = r, lif t > b: t, b = b, t# 夹到边界l = max(0, min(l, W-1)); r = max(0, min(r, W-1))t = max(0, min(t, H-1)); b = max(0, min(b, H-1))# 保证最小宽高(防止 0 宽/高引发报错)if r - l < min_w: r = min(W-1, l + min_w)if b - t < min_h: b = min(H-1, t + min_h)return (l, t, r, b)def ratio2box(ratio_box, W, H, nudge=(0,0)):l = int(ratio_box[0] * W) + nudge[0]t = int(ratio_box[1] * H) + nudge[1]r = int(ratio_box[2] * W) + nudge[0]b = int(ratio_box[3] * H) + nudge[1]return normalize_box((l, t, r, b), W, H)def draw_in_box(draw, text, box, v_ratio=0.5, h_align='left', max_font=46):l, t, r, b = boxmax_w = r - lfont = fit_font(draw, text, max_w, max_font=max_font)w, h = text_wh(draw, text, font)# 标准几何居中:去除之前实现里的 "*2"y = int(t + (b - t - h) * v_ratio)x = (r - w) if h_align == 'right' else ldraw.text((x, y), text, font=font, fill=COLOR)def _wrap_fit_lines(draw, text, box, max_font, min_font=MIN_FONT, max_lines=2,safe_margin=SAFE_MARGIN_PX, line_spacing=1.08):l, t, r, b = boxmax_w = r - l - safe_marginmax_h = b - t - safe_marginseps = ['/', '/', '、', ',', ',', ' ']def tokenize(s):tokens, cur = [], ''for ch in str(s).replace('\n', ' '):if ch in seps:if cur: tokens.append(cur); cur = ''tokens.append(ch)else:cur += chif cur: tokens.append(cur)return tokenstokens = tokenize(text)for sz in range(max_font, min_font - 1, -1):f = choose_font(sz)lines, cur = [], ''for tk in tokens:trial = cur + tkw, _ = text_wh(draw, trial, f)if w <= max_w or cur == '':cur = trialelse:lines.append(cur); cur = tkif len(lines) >= max_lines:breakif cur and len(lines) < max_lines:lines.append(cur)# 对超宽行做硬切保障def hard_wrap(s):out, buf = [], ''for ch in s:trial = buf + chw, _ = text_wh(draw, trial, f)if w <= max_w or buf == '':buf = trialelse:out.append(buf); buf = chif buf: out.append(buf)return outfixed = []for ln in lines:if text_wh(draw, ln, f)[0] <= max_w:fixed.append(ln)else:fixed.extend(hard_wrap(ln))if len(fixed) > max_lines:fixed = fixed[:max_lines]; breakif not fixed:continueline_h = int(sz * line_spacing)if line_h * len(fixed) <= max_h:return f, fixed[:max_lines]# 兜底:省略号f = choose_font(min_font)lines = [''] * max_linesi = 0; buf = ''for ch in ''.join(tokens):trial = buf + chif text_wh(draw, trial, f)[0] <= max_w:buf = trialelse:lines[i] = buf; i += 1; buf = chif i >= max_lines: breakif i < max_lines: lines[i] = buflast = lines[-1]while last and text_wh(draw, last + '…', f)[0] > max_w:last = last[:-1]lines[-1] = (last + '…') if last else '…'return f, linesdef draw_wrapped_in_box(draw, text, box, v_ratio=0.5, h_align='left',max_font=46, min_font=MIN_FONT, max_lines=2, line_spacing=1.08):l, t, r, b = boxf, lines = _wrap_fit_lines(draw, text, box, max_font, min_font, max_lines, line_spacing)line_h = int(f.size * line_spacing)total_h = line_h * len(lines)y0 = int(t + (b - t - total_h) * v_ratio)for idx, ln in enumerate(lines):w, h = text_wh(draw, ln, f)x = (r - w) if h_align == 'right' else ly = y0 + idx * line_hdraw.text((x, y), ln, font=f, fill=COLOR)# ========= 主流程 =========
def main():os.makedirs(OUTDIR, exist_ok=True)df = pd.read_excel(EXCEL, dtype=str).fillna("")base = Image.open(TEMPLATE).convert("RGBA")# 放大渲染(整体先放大再写字,字更锐利)if UPSCALE > 1:W0, H0 = base.sizebase = base.resize((W0*UPSCALE, H0*UPSCALE), resample=Image.LANCZOS)W, H = base.sizename_box = ratio2box(NAME_BOX_RATIO, W, H, NUDGE_NAME)code_box = ratio2box(CODE_BOX_RATIO, W, H, NUDGE_CODE)# 调试输出print("Template size:", (W, H))print("name_box:", name_box, "code_box:", code_box)col_code = find_col(df, CAND_CODE)col_name = find_col(df, CAND_NAME)for i, row in df.iterrows():code = str(row.get(col_code, "")).strip()name = str(row.get(col_name, "")).strip()img = base.copy()draw = ImageDraw.Draw(img)if DRAW_GUIDE:draw.rectangle(name_box, outline=(255, 0, 0), width=1)draw.rectangle(code_box, outline=(255, 0, 0), width=1)# 编码:单行draw_in_box(draw, code, code_box, v_ratio=V_RATIO, h_align=H_ALIGN, max_font=CODE_MAX_FONT)# 名称:自动换行(最多两行)draw_wrapped_in_box(draw, name, name_box, v_ratio=V_RATIO, h_align=H_ALIGN,max_font=NAME_MAX_FONT, min_font=MIN_FONT, max_lines=2, line_spacing=1.08)out = os.path.join(OUTDIR, f"{code or '未命名'}_{i+1}.png")img.save(out, dpi=(300, 300))print("Saved:", out)print("\n✅ 完成,输出目录:", os.path.abspath(OUTDIR))if __name__ == "__main__":main()
效果

扩展
我如何调整数据的位置 比如 觉得他在虚线太靠上了,怎么做呢。我如果图片换模板,该怎么做呢。就需要回到代码去调整。
NAME_BOX_RATIO = (0.19, 0.50, 0.46, 0.74)  # “名称”字段的可写区做上右下
CODE_BOX_RATIO = (0.74, 0.55, 0.97, 0.74)  # “物料编码”字段的可写区 (0.74, 0.60, 0.97, 0.86
这部分就是框的大小调整。这个框可以让他暂时显示
DRAW_GUIDE = False # True 显示红框调试
调整上述的参数就可以调整框的大小,进而调整字体自适应大小。