Oracle19c单机部署(本地)
目录
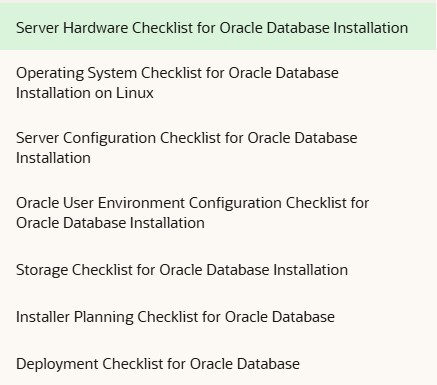
一、Oracle数据库安装检查清单
1.1.Oracle数据库安装的服务器硬件检查清单
1.2.Linux系统上Oracle数据库安装的操作系统检查清单
1.3.Oracle数据库安装的服务器配置检查清单
1.4.Oracle数据库安装的用户环境配置检查清单
1.5.Oracle数据库安装的存储检查清单
1.6.Oracle数据库安装程序规划检查清单
1.7.Oracle数据库部署检查清单
1.8.查看本地配置
1.8.1.配置oracle官方yum源
二、系统配置(root用户操作)
2.1. 创建Oracle用户与组
2.2. 创建安装目录
编辑 2.3.修改目录权限
2.4. 配置内核参数(视情况进行修改)
2.5. 配置用户资源限制
三、Oracle用户环境变量配置
四、准备安装介质与响应文件
4.1. 上传并解压Oracle 19c安装包
4.2. 创建静默安装响应文件
4.2.1.复制并修改
4.2.2.修改以下关键参数(其他参数保持默认或根据需求调整)
五、静默安装Oracle软件(oracle用户下)
5.1.执行runInstaller静默安装
六、静默创建数据库实例(DBCA)
6.1. 直接命令行创建(推荐)
6.2. 通过响应文件创建(可选)
七、验证安装结果
7.1. 检查监听状态
7.2. 连接数据库验证
官方链接:
Oracle Linux官网安装包链接:
Oracle Linux ISOs | Oracle, Software. Hardware. Complete.
Oracle官方安装操作手册
https://docs.oracle.com/en/database/oracle/oracle-database/19
一、Oracle数据库安装检查清单
使用检查表审查系统要求,并规划和执行Oracle数据库安装。
甲骨文官方建议您使用检查表作为您的安装计划过程的一部分。使用检查表可以帮助您确认您的服务器硬件和配置是否符合此版本的最低要求,并可以帮助您确保成功进行安装。
1.1.Oracle数据库安装的服务器硬件检查清单
| Check | Task |
|---|---|
| Runlevel | 3 or 5 |
| Server Display Cards | At least 1024 x 768 display resolution, which Oracle Universal Installer requires. |
| Minimum network connectivity | Server is connected to a network |
| Minimum RAM |
|
| Linux for Arm (aarch64) processor | Oracle Database 19c Linux for Arm (aarch64) requires a CPU capable of Neoverse N1. Oracle recommends using a server with an Ampere Altra or Ampere Altra Max CPU. Oracle Database 19c Linux for Arm (aarch64) 需要支持 Neoverse N1 的 CPU。Oracle 建议使用配备 Ampere Altra 或 Ampere Altra Max CPU 的服务器。 |
1.2.Linux系统上Oracle数据库安装的操作系统检查清单
使用此检查表来确认Oracle数据库的最低操作系统要求。重点关注操作系统版本,openssh的要求。
| Item | Task |
|---|---|
| Operating system general requirements | OpenSSH installed manually, if you do not have it installed already as part of a default Linux installation. A Linux kernel in the list of supported kernels and releases listed in this guide. |
| Linux x86-64 operating system requirements | The following Linux x86-64 kernels are supported:
Review the system requirements section for a list of minimum package requirements. |
| IBM: Linux on System z operating system requirements | The following IBM: Linux on System z kernels are supported:
Review the system requirements section for a list of minimum package requirements. |
| Linux for Arm (aarch64) operating system requirements | Starting with Oracle Database 19c Release 19.19, the Linux for Arm (aarch64) operating system is supported with the following minimum supported version: Oracle Linux 8.6 with Unbreakable Enterprise Kernel 7: 5.15.0-6.80.3.1.el8uek.aarch64 or later |
| Oracle Database Preinstallation RPM for Oracle Linux | If you use Oracle Linux, then Oracle recommends that you run the Oracle Database Preinstallation RPM for your Linux release to configure your operating system for Oracle Database and Oracle Grid Infrastructure installations. |
| Oracle RPM Checker utility for IBM: Linux on System z | Oracle recommends that you use the Oracle RPM Checker utility to verify that you have the required Red Hat Enterprise Linux or SUSE packages installed on your IBM: Linux on System z operating system before you start the Oracle Database or Oracle Grid Infrastructure installation. |
| Disable Transparent HugePages | Oracle recommends that you disable Transparent HugePages and use standard HugePages for enhanced performance. |
1.3.Oracle数据库安装的服务器配置检查清单
使用此检查表来确认Orace数据库安装所需要的最低版务器配置要求
| Check | Task |
|---|---|
| Disk space allocated to the | At least 1 GB of space in the |
| Swap space allocation relative to RAM (Oracle Database) | Between 1 GB and 2 GB: 1.5 times the size of the RAM |
| Swap space allocation relative to RAM (Oracle Restart) | Between 8 GB and 16 GB: Equal to the size of the RAM |
| Oracle Inventory (oraInventory) and OINSTALL Group Requirements |
The Oracle Inventory directory is the central inventory of Oracle software installed on your system. Users who have the Oracle Inventory group as their primary group are granted the OINSTALL privilege to write to the central inventory. The OINSTALL group must be the primary group of all Oracle software installation owners on the server. It should be writable by any Oracle installation owner. |
| Groups and users | Oracle recommends that you create groups and user accounts required for your security plans before starting installation. Installation owners have resource limits settings and other requirements. Group and user names must use only ASCII characters. |
| Mount point paths for the software binaries | Oracle recommends that you create an Optimal Flexible Architecture configuration as described in the appendix "Optimal Flexible Architecture" in Oracle Database Installation Guide for your platform. |
| Ensure that the Oracle home (the Oracle home path you select for Oracle Database) uses only ASCII characters | The ASCII character restriction includes installation owner user names, which are used as a default for some home paths, as well as other directory names you may select for paths. |
| Unset Oracle software environment variables | If you have an existing Oracle software installation, and you are using the same user to install this installation, then unset the following environment variables: If you have set |
| Set locale (if needed) | Specify the language and the territory, or locale, in which you want to use Oracle components. A locale is a linguistic and cultural environment in which a system or program is running. NLS (National Language Support) parameters determine the locale-specific behavior on both servers and clients. The locale setting of a component determines the language of the user interface of the component, and the globalization behavior, such as date and number formatting. |
| Check Shared Memory File System Mount | By default, your operating system includes an entry in
Note These options may not be listed as they are usually set as the default permissions by your operating system. |
| Symlinks | Oracle home or Oracle base cannot be |
1.4.Oracle数据库安装的用户环境配置检查清单
使用此检查表来规划Oracle数据库管理的操作系统用户、组和环境。
| Check | Task |
|---|---|
| Review Oracle Inventory (oraInventory) and OINSTALL Group Requirements | The physical group you designate as the Oracle Inventory directory is the central inventory of Oracle software installed on your system. It should be the primary group for all Oracle software installation owners. Users who have the Oracle Inventory group as their primary group are granted the OINSTALL privilege to read and write to the central inventory.
Ensure that the group designated as the OINSTALL group is available as the primary group for all planned Oracle software installation owners. |
| Create operating system groups and users for standard or role-allocated system privileges | The Preinstallation RPM automatically creates the Create additional operating system groups and users depending on your security requirements as described in this installation guide. Set resource limits settings and other requirements for Oracle software installation owners. Group and user names must use only ASCII characters. |
| Unset Oracle Software Environment Variables | If you have had an existing installation on your system, and you are using the same user account for this installation, then unset the ORACLE_HOME, ORACLE_BASE, ORACLE_SID, TNS_ADMIN environment variables and any other environment variable set for the Oracle installation user that is connected with Oracle software homes. |
| Configure the Oracle Software Owner Environment | Configure the environment of the
|
1.5.Oracle数据库安装的存储检查清单
使用此检查表来审查存储最低要求并协助配置规划。
| Check | Task |
|---|---|
| Minimum local disk storage space for Oracle software | For Linux x86-64 and Linux for Arm (aarch64): Note Oracle recommends that you allocate approximately 100 GB to allow additional space for applying any future patches on top of the existing Oracle home. For specific patch-related disk space requirements, please refer to your patch documentation. |
| Select Database File Storage Option | Ensure that you have one of the following storage options available:
|
| Determine your recovery plan | If you want to enable recovery during installation, then be prepared to select one of the following options:
Review the storage configuration sections of this document for more information about configuring recovery. |
1.6.Oracle数据库安装程序规划检查清单
使用此检查清单帮助您在开始Oracle通用安装程序之前做好准备。
| Check | Task |
|---|---|
| Read the Release Notes | Review release notes for your platform, which are available for your release at the following URL: http://docs.oracle.com/en/database/database.html |
| Review Oracle Support Certification Matrix | New platforms and operating system software versions may be certified after this guide is published, review the certification matrix on the My Oracle Support website for the most up-to-date list of certified hardware platforms and operating system versions: https://support.oracle.com/ You must register online before using My Oracle Support. After logging in, from the menu options, select the Certifications tab. On the Certifications page, use the Certification Search options to search by Product, Release, and Platform. You can also search using the Certification Quick Link options such as Product Delivery, and Lifetime Support. |
| Review the Licensing Information | You are permitted to use only those components in the Oracle Database media pack for which you have purchased licenses. For more information about licenses, refer to the following URL: Oracle Database Licensing Information |
| Run OUI with CVU and use fixup scripts | Oracle Universal Installer is fully integrated with Cluster Verification Utility (CVU), automating many CVU prerequisite checks. Oracle Universal Installer runs all prerequisite checks and creates fixup scripts when you run the installer. You can run OUI up to the Summary screen without starting the installation. You can also run CVU commands manually to check system readiness. For more information, see: Oracle Clusterware Administration and Deployment Guide |
| Update and run Oracle ORAchk for runtime and upgrade checks, or runtime health checks | Oracle recommends that you update to the latest version of Oracle ORAchk by installing the latest version of Autonomous Health Framework (AHF). The Oracle ORAchk utility provides system checks that can help to prevent issues before and after installation. These checks include kernel requirements, operating system resource allocations, and other system requirements. Use the Oracle ORAchk Upgrade Readiness Assessment to obtain an automated upgrade-specific system health check for upgrades to 19c. For example:
The Oracle ORAchk Upgrade Readiness Assessment automates many of the manual pre- and post-upgrade checks described in Oracle upgrade documentation. Check My Oracle Support Note 2550798.1 for more information about Oracle ORAchk support. https://support.oracle.com/epmos/faces/DocContentDisplay?id=2550798.1&parent=DOCUMENTATION&sourceId=USERGUIDE |
| Verify if Oracle Grid Infrastructure is installed | If you want to use Oracle ASM or Oracle Restart, then install Oracle Grid Infrastructure for a standalone server before you install and create the database. Otherwise, to use Oracle ASM, you must complete an Oracle Grid Infrastructure installation, and then manually register the database with Oracle Restart. For Oracle Real Application Clusters (Oracle RAC) installations, ensure that you have installed and configured Oracle Grid Infrastructure for a cluster. |
| Check running Oracle processes, and shut down if necessary |
|
Ensure cron jobs do not run during installation | If the installer is running when daily cron jobs start, then you may encounter unexplained installation problems if your cron job is performing cleanup, and temporary files are deleted before the installation is finished. Oracle recommends that you complete installation before daily cron jobs are run, or disable daily |
| Obtain your My Oracle Support account information. | During installation, you may require a My Oracle Support user name and password to configure updates, download software updates, and other installation tasks. You can register for My Oracle Support at the following URL: https://support.oracle.com/ |
| Decide Oracle Database management tool | By default, Oracle Database is managed by Oracle Enterprise Manager Database Express. If you have an existing Oracle Management Agent, and decide to use Oracle Enterprise Manager Cloud Control to centrally manage your database, then obtain the following information to enter during the database installation:
For more information, see:
|
| Review memory allocation and Automatic Memory Management feature | You can enable automatic memory management either during, or after Oracle Database installation. If you enable automatic memory management after installation, then you must shut down and restart the database. If the total physical memory of your database instance is greater than 4 GB, then you cannot select the Oracle Automatic Memory Management option during database installation and creation. Instead, use automatic shared memory management. Automatic shared memory management automatically distributes the available memory among the various components as required, allowing the system to maximize the use of all available SGA memory. For more information, see: Oracle Database Administrator's Guide |
| Determine superuser ( | During a database or grid infrastructure installation, you are asked to run configuration scripts as the You can either run these scripts manually as To run
|
| Oracle Database Client and Oracle Database interoperability | For information about interoperability between Oracle Database Client and Oracle Database releases, see My Oracle Support Note 207303.1: https://support.oracle.com/rs?type=doc&id=207303.1 |
1.7.Oracle数据库部署检查清单
使用此检查表来决定单实例Oracle数据库的部署方法。
| Item | Task |
|---|---|
| To deploy single-instance Oracle Database software | Use one of the following deployment methods:
|
| To deploy single-instance Oracle Database software and create databases | Use one of the following deployment methods:
|
| To create single-instance Oracle Database in an already-installed Oracle home |
|
1.8.查看本地配置
使用此程序收集有关您的服务器配置的信息。
grep MemTotal /proc/meminfo
grep SwapTotal /proc/meminfo
df -h /tmp
free
uname -m
df -h /dev/shm
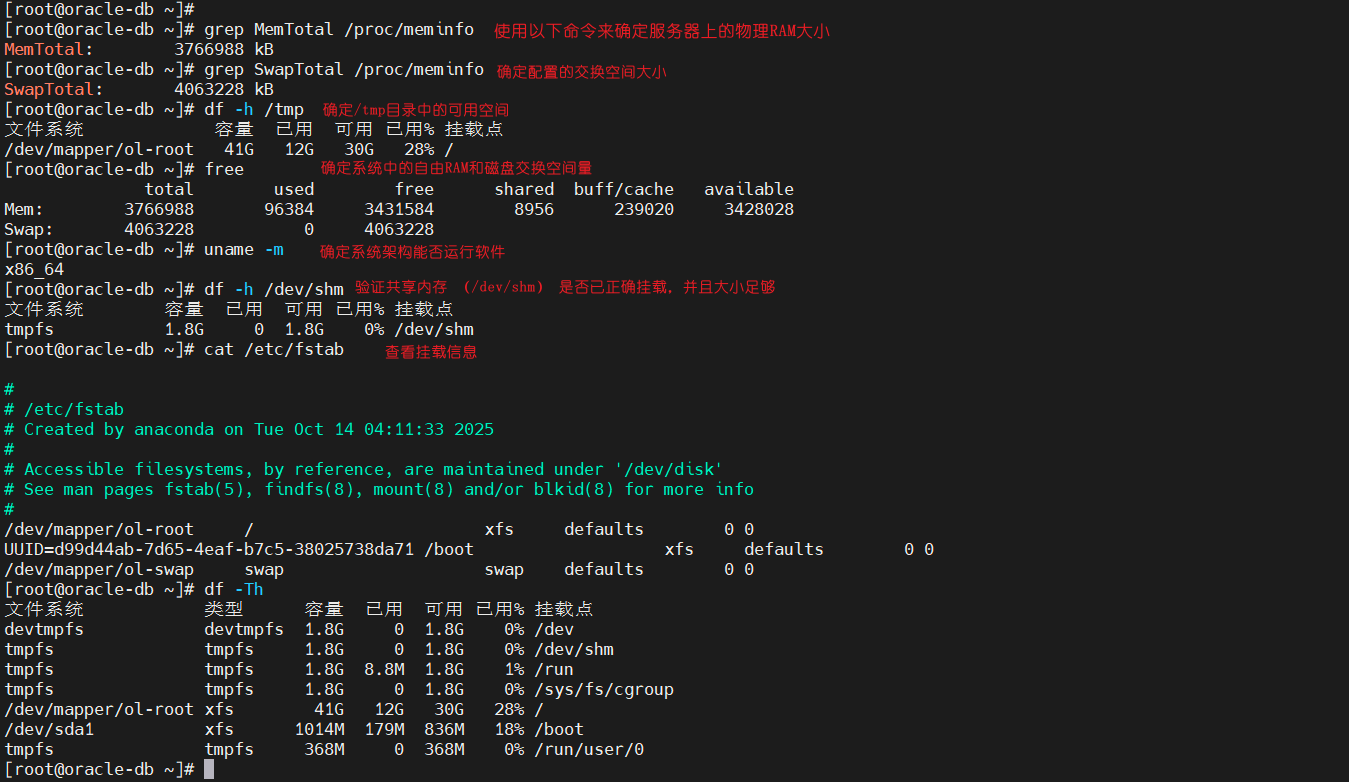
为 Oracle 软件安装做准备。
1.8.1.配置oracle官方yum源
wget https://yum.oracle.com/public-yum-ol7.repo -O /etc/yum.repos.d/public-yum-ol7.repo
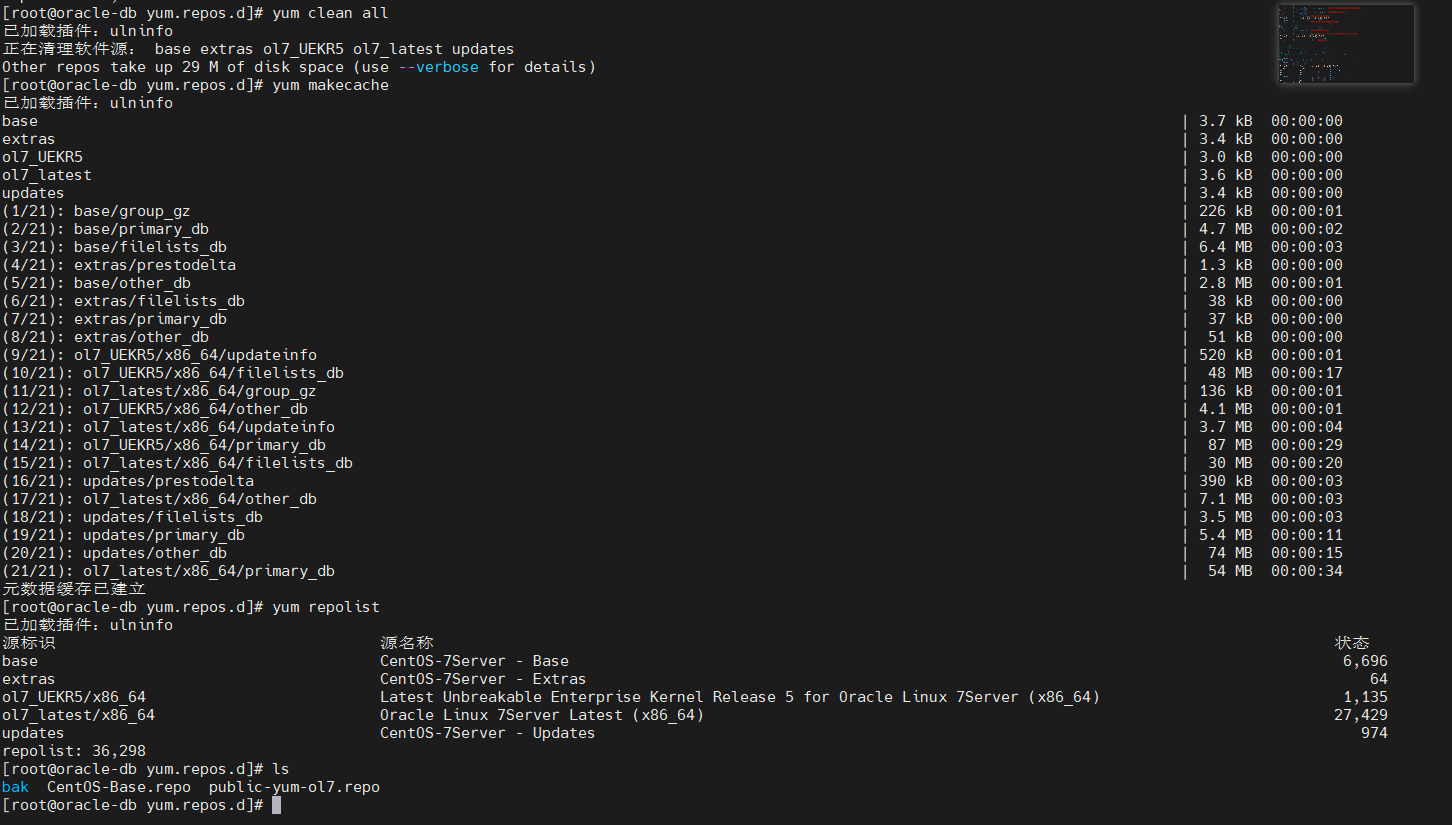
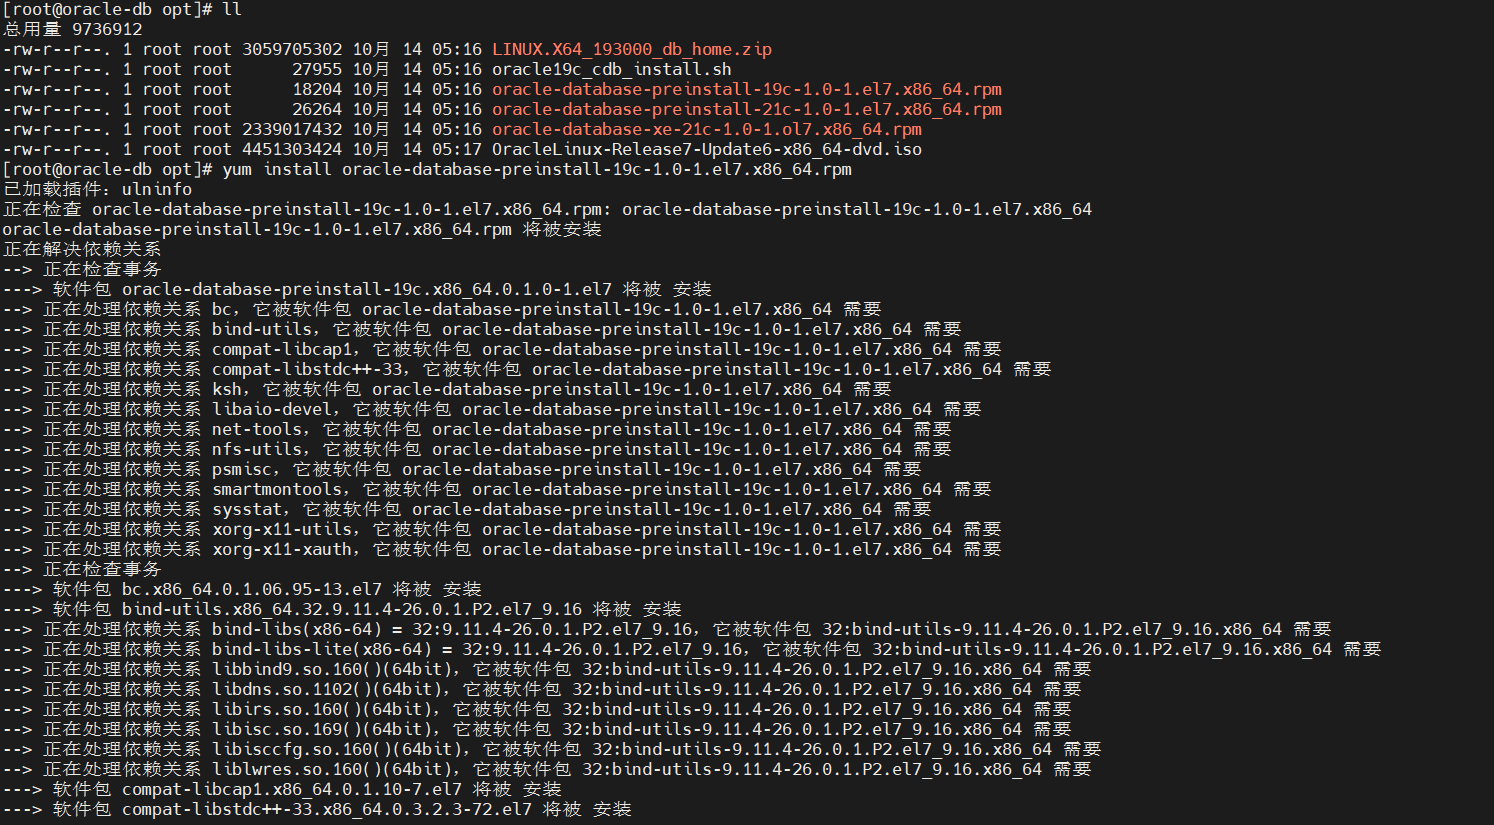
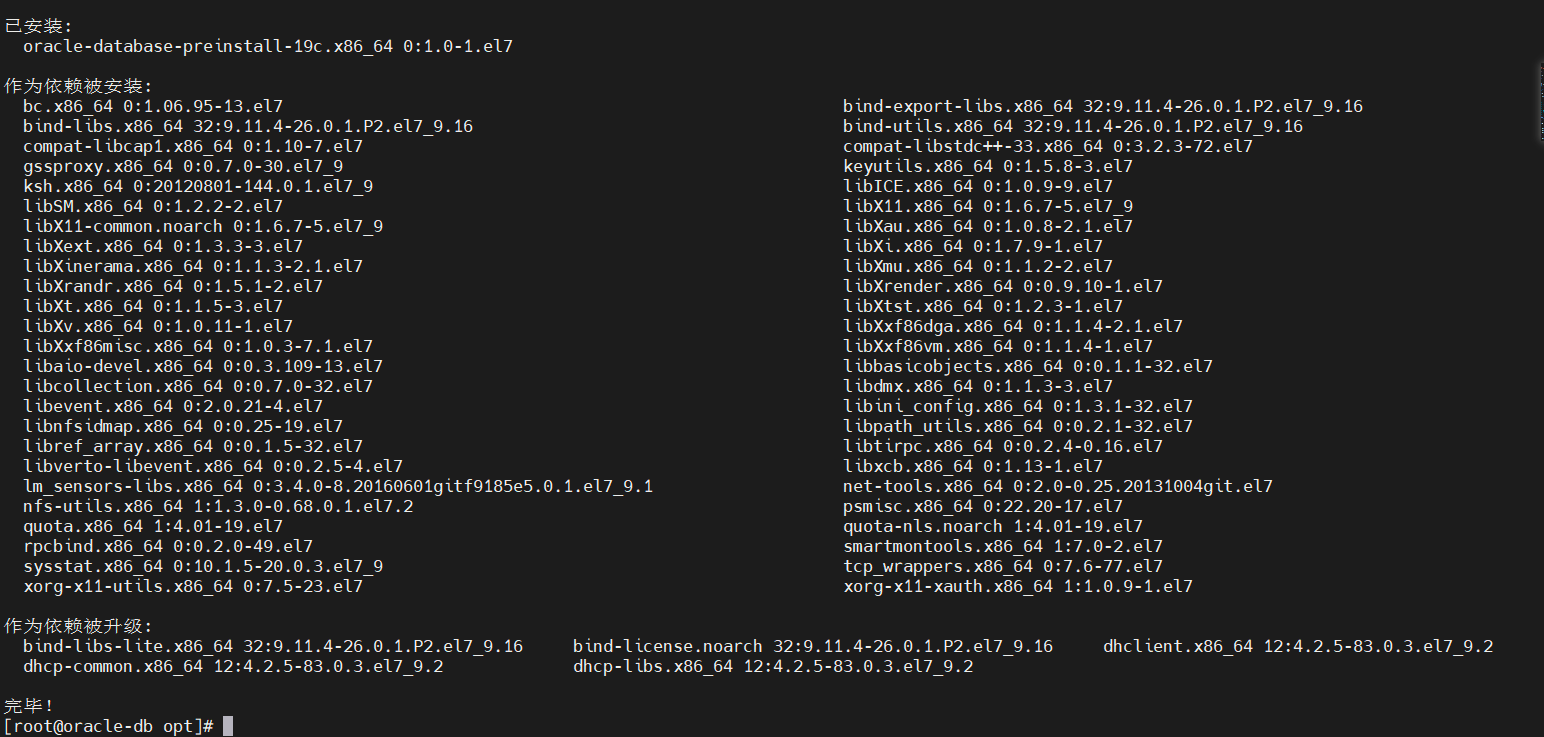
安装oracle linux的预安装包,此操作会预先安装所需依赖和安装程序。
如果没有预安装程序,则依次对下边的安装包进行安装:
yum install -y bc binutils compat-libcap1 compat-libstdc++-33 gcc gcc-c++ glibc glibc-devel ksh libaio libaio-devel libgcc libstdc++ libstdc++-devel libXi libXtst make sysstat motif motif-devel smartmontools net-tools
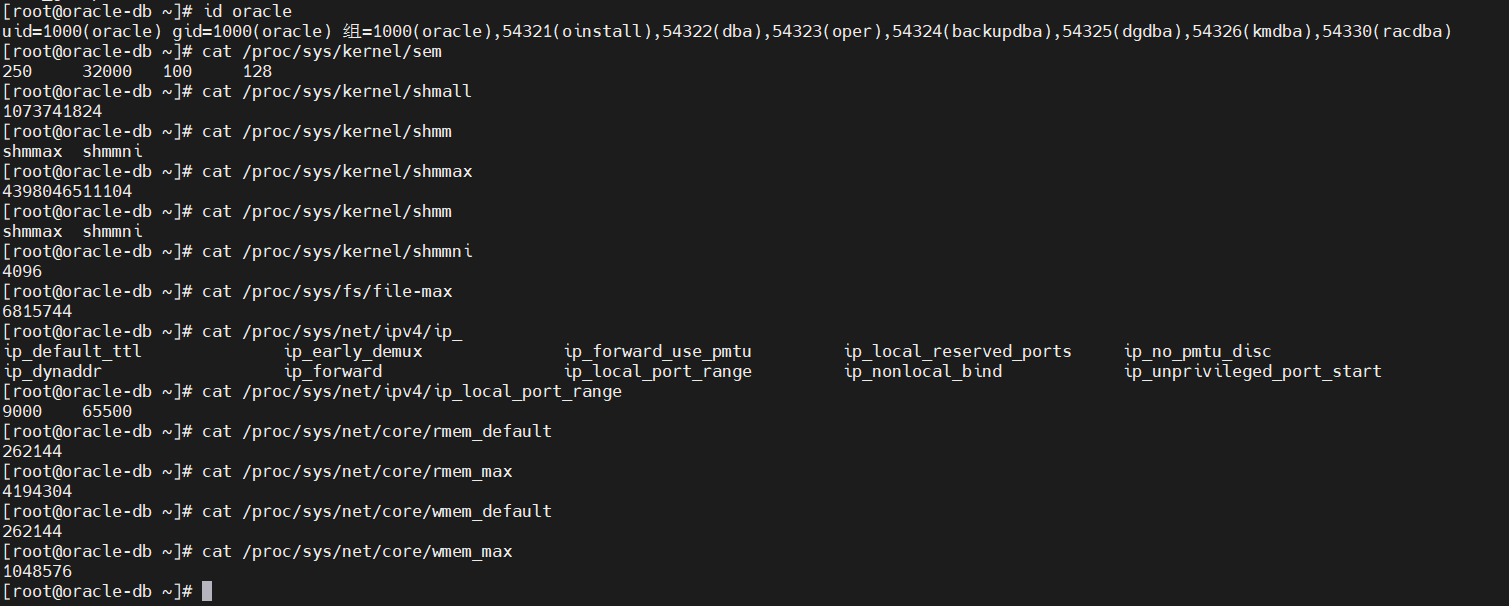
确认内核参数:
二、系统配置(root用户操作)
2.1. 创建Oracle用户与组
Oracle安装需专用用户和组(避免使用root直接操作):
# 创建组
groupadd -g 54321 oinstall # 安装组
groupadd -g 54322 dba # 数据库管理员组
groupadd -g 54323 oper # 操作员组(可选)
# 创建oracle用户并加入组(这里非常容易出问题,后边如果遇到用户组归属不多,可通过usermod来进行修改)
useradd -u 54321 -g oinstall -G dba,oper oracle
![]()
# 设置oracle用户密码(可选)
passwd oracle # 输入密码(如Oracle123)
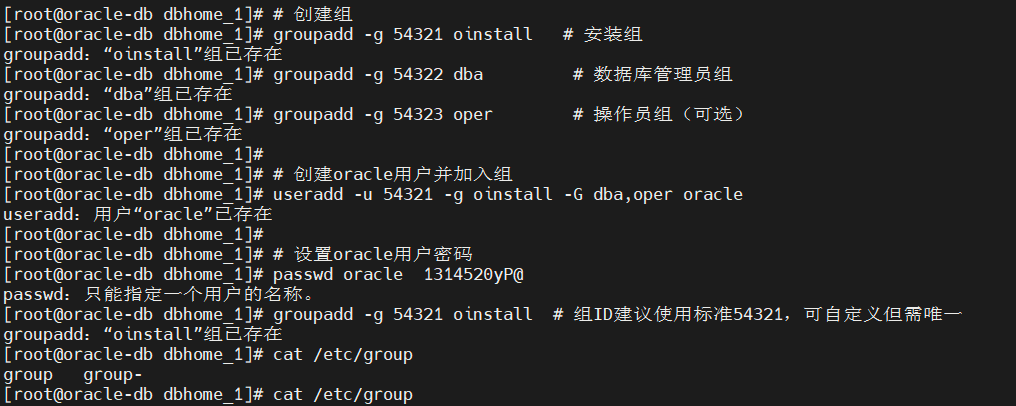
一般如果执行预安装程序的话,用户及用户组之间的所属关系都会提前建立好。
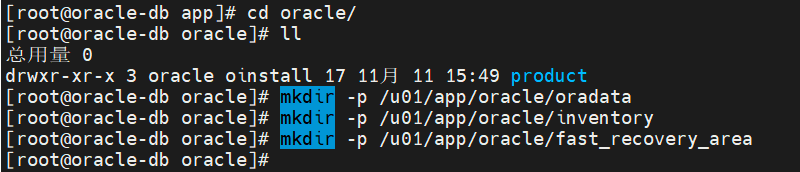
2.2. 创建安装目录
指定Oracle软件和数据存储路径(需oracle用户有读写权限):
inventory:翻译为库存;(商店的)存货,这里指安装信息
mkdir -p /u01/app/oracle/product/19c/dbhome_1 # ORACLE_HOME
mkdir -p /u01/app/oracle/oradata # 数据文件目录
mkdir -p /u01/app/oracle/inventory # inventory目录(安装信息)
mkdir -p /u01/app/oracle/fast_recovery_area # 闪回区(可选)
2.3.修改目录权限
chown -R oracle:oinstall /u01/app/oracle
chmod -R 775 /u01/app/oracle

2.4. 配置内核参数(视情况进行修改)
配置文件目录:/etc/sysctl.conf
Oracle依赖内核参数优化,编辑/etc/sysctl.conf添加:
fs.aio-max-nr = 1048576
fs.file-max = 6815744
kernel.shmall = 2097152 # 物理内存/页大小(例:4GB内存=4*1024*1024/4=1048576,默认页大小可通过getconf PAGE_SIZE查看)
kernel.shmmax = 4294967296 # 最大共享内存段(建议为物理内存的50%,单位字节,4GB=4*1024^3=4294967296)
kernel.shmmni = 4096
kernel.sem = 250 32000 100 128
net.ipv4.ip_local_port_range = 9000 65500
net.core.rmem_default = 262144
net.core.rmem_max = 4194304
net.core.wmem_default = 262144
net.core.wmem_max = 1048576
配置生效:sysctl -p
2.5. 配置用户资源限制
配置文件目录:/etc/security/limits.conf
编辑/etc/security/limits.conf,添加oracle用户限制:
oracle soft nproc 2047
oracle hard nproc 16384
oracle soft nofile 1024
oracle hard nofile 65536
oracle soft stack 10240
oracle hard stack 32768
oracle soft memlock 1048576 # 软限制(KB,根据内存调整)
oracle hard memlock 2097152 # 硬限制(KB)
生效配置:重启系统或执行ulimit -a(需重新登录oracle用户)。
三、Oracle用户环境变量配置
切换到oracle用户,编辑.bash_profile(/home/oracle/.bash_profile):
su oracle
vi .bash_profile/~/.bash_profile
添加以下内容(根据实际路径调整):export ORACLE_BASE=/u01/app/oracle
export ORACLE_HOME=$ORACLE_BASE/product/19c/dbhome_1
export ORACLE_SID=orcl # 数据库实例名(自定义,如orcl、prod)
export PATH=$ORACLE_HOME/bin:$PATH:$HOME/.local/bin:$HOME/bin
export LD_LIBRARY_PATH=$ORACLE_HOME/lib:/lib:/usr/lib
export NLS_LANG=AMERICAN_AMERICA.AL32UTF8 # 字符集(或ZHS16GBK)
环境变量生效:source .bash_profile/source ~/.bash_profile
四、准备安装介质与响应文件
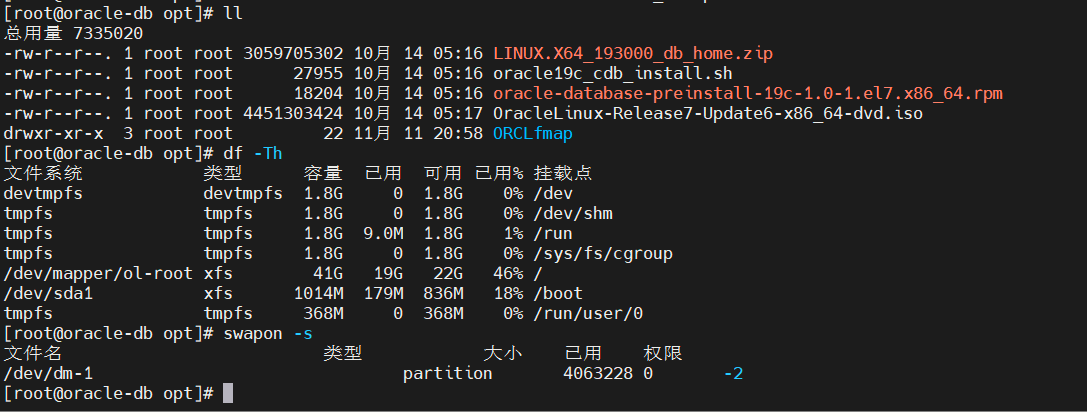
4.1. 上传并解压Oracle 19c安装包
从Oracle官网下载Linux x86-64的Oracle 19c安装包(如LINUX.X64_193000_db_home.zip),上传至虚拟机/opt目录后进行解压

# 切换到oracle用户
su - oracle
# 解压安装包(确保ORACLE_HOME为空目录)
如:unzip /opt/LINUx.X64 193000 db home.zip -d /u01/app/oracle/product/19c/dbhome 1

4.2. 创建静默安装响应文件
Oracle静默安装需通过响应文件指定参数,模板位于$ORACLE_HOME/install/response/db_install.rsp
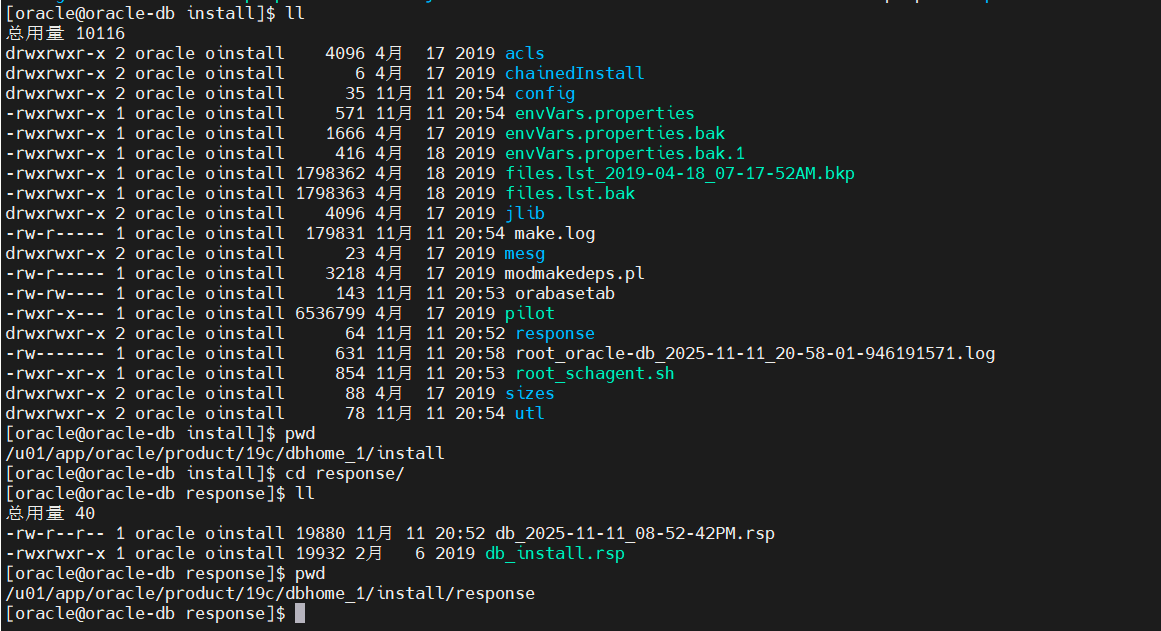
4.2.1.复制并修改
cp $ORACLE_HOME/install/response/db_install.rsp /tmp/db_install.rsp
vi /tmp/db_install.rsp
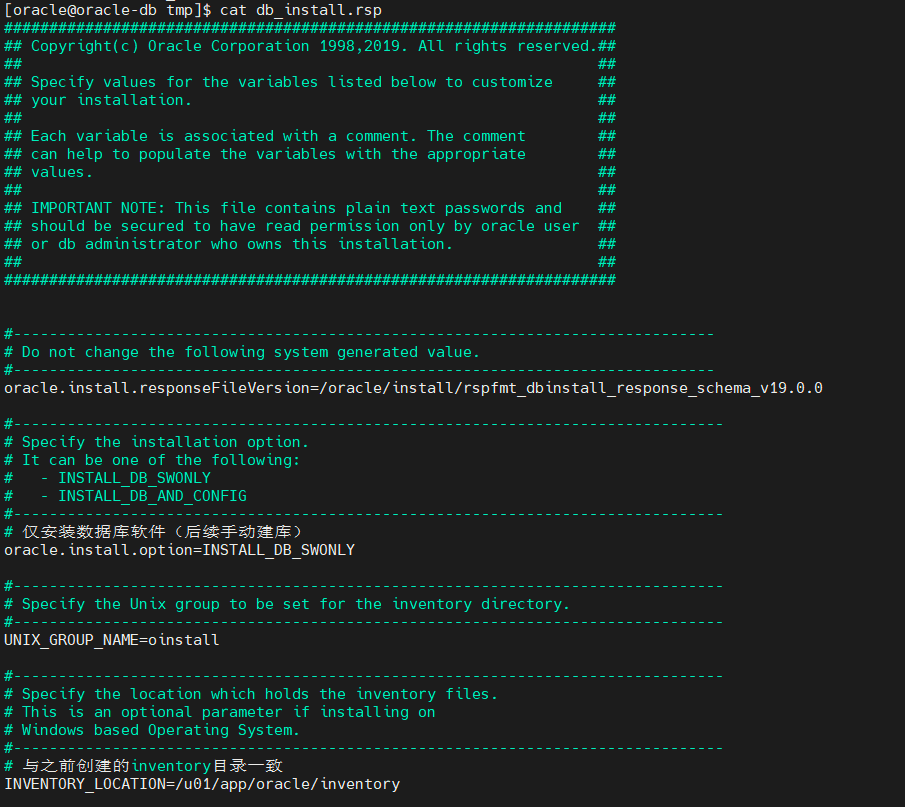
4.2.2.修改以下关键参数(其他参数保持默认或根据需求调整)
oracle.install.option=INSTALL_DB_SWONLY # 仅安装数据库软件(后续手动建库)
UNIX_GROUP_NAME=oinstall
INVENTORY_LOCATION=/u01/app/oracle/inventory # 与之前创建的inventory目录一致
ORACLE_BASE=/u01/app/oracle
ORACLE_HOME=/u01/app/oracle/product/19c/dbhome_1 # 必须与环境变量一致
oracle.install.db.InstallEdition=EE # 企业版(EE)或标准版(SE2)
oracle.install.db.OSDBA_GROUP=dba
oracle.install.db.OSOPER_GROUP=oper
oracle.install.db.OSBACKUPDBA_GROUP=dba # 备份管理员组(使用dba)
oracle.install.db.OSDGDBA_GROUP=dba # 数据卫士组(使用dba)
oracle.install.db.OSKMDBA_GROUP=dba # 加密管理员组(使用dba)
oracle.install.db.OSRACDBA_GROUP=dba # 恢复目录组(使用dba)
DECLINE_SECURITY_UPDATES=true # 拒绝安全更新(无Oracle账号时)
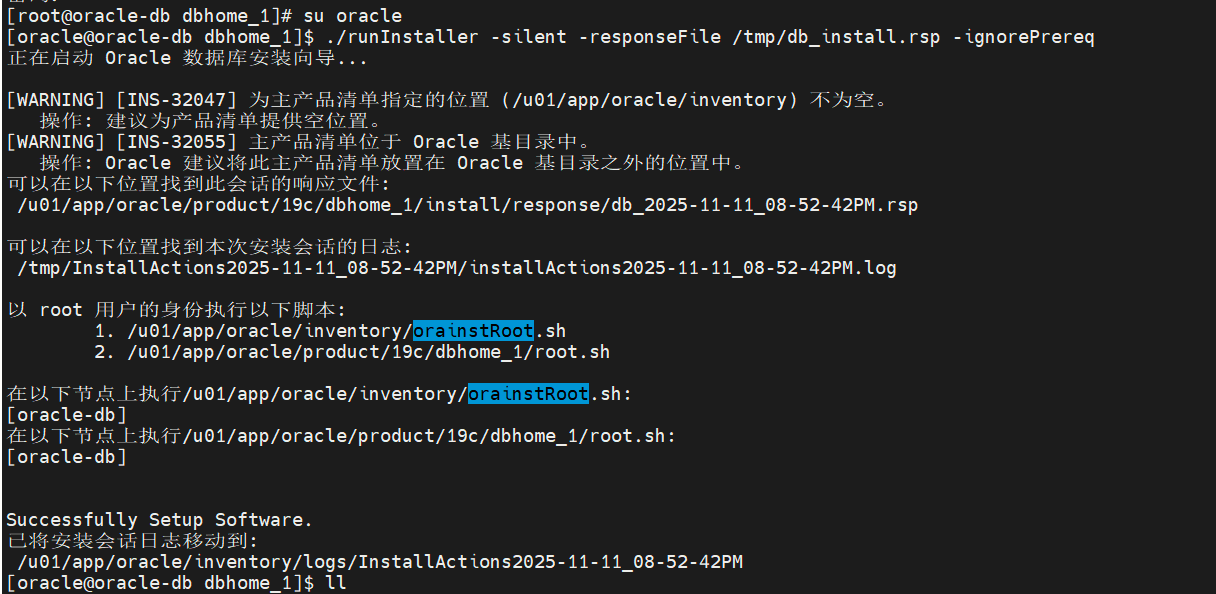
五、静默安装Oracle软件(oracle用户下)
5.1.执行runInstaller静默安装
指定响应文件:
cd $ORACLE_HOME
./runInstaller -silent -responseFile /tmp/db_install.rsp -ignorePrereq
-silent:静默模式(无图形界面);
-responseFile:指定响应文件路径;
-ignorePrereq:忽略部分先决条件检查(如系统配置不完全符合时)。
安装过程监控
安装日志默认位于/u01/app/oracle/inventory/logs/installActions<时间戳>.log,可通过日志查看进度:
tail -f /u01/app/oracle/inventory/logs/installActions*.log
执行root脚本(安装完成后,root用户操作)
安装成功后,日志会提示执行以下脚本(路径以实际日志为准):
# 切换到root用户
su - root
# 执行inventory脚本
/u01/app/oracle/inventory/orainstRoot.sh
# 执行ORACLE_HOME下的root脚本
/u01/app/oracle/product/19c/dbhome_1/root.sh
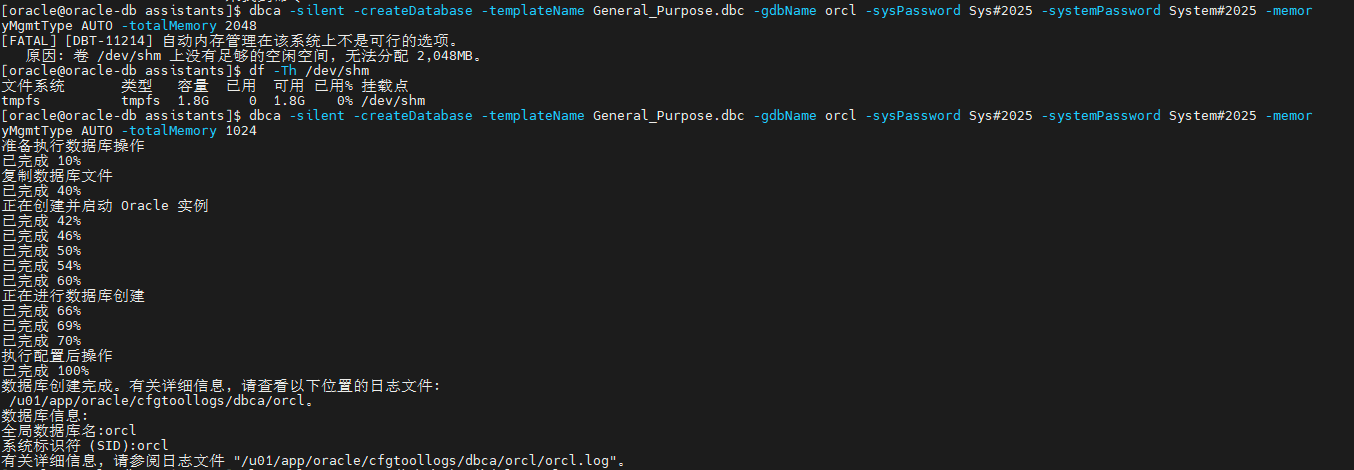
六、静默创建数据库实例(DBCA)
实例:instance
安装软件后,通过dbca(数据库配置助手)静默创建数据库实例:
6.1. 直接命令行创建(推荐)
执行以下命令(根据需求调整参数):
# 切换到oracle用户
su - oracledbca -silent \-createDatabase \-templateName General_Purpose.dbc \ # 通用模板(位于$ORACLE_HOME/assistants/dbca/templates)-gdbname orcl \ # 全局数据库名-sid orcl \ # 实例名(与ORACLE_SID一致)-responseFile NO_VALUE \-characterSet AL32UTF8 \ # 字符集-memoryMgmtType AUTO_SGA \ # 自动内存管理-totalMemory 1024 \ # 总内存(MB,根据系统内存调整,如1024=1GB)-storageType FS \ # 文件系统存储-datafileDestination /u01/app/oracle/oradata \ # 数据文件路径-redoLogFileSize 50 \ # 重做日志大小(MB)-emConfiguration NONE \ # 不配置EM Express-dbUserPasswords sys_password \ # 统一密码(如Oracle123)-createAsContainerDatabase false \ # 不创建容器数据库(CDB)-databaseType MULTIPURPOSE \ # 多用途数据库-automaticMemoryManagement false # 禁用自动内存管理(若使用AUTO_SGA则设为false)若提示输入密码,直接输入(如Oracle123);
如需为不同用户设置密码(sys、system等),用-sysPassword、-systemPassword分别指定。
6.2. 通过响应文件创建(可选)
若参数较多,可使用DBCA响应文件模板($ORACLE_HOME/assistants/dbca/dbca.rsp),修改后执行:
dbca -silent -createDatabase -templateName General_Purpose.dbc -gdbName orcl -sysPassword Sys#2025 -systemPassword System#2025 -memoryMgmtType AUTO -totalMemory 2048
七、验证安装结果
7.1. 检查监听状态
lsnrctl status # 若未启动,执行lsnrctl start
输出应包含LISTENER状态为READY,端口1521。

7.2. 连接数据库验证
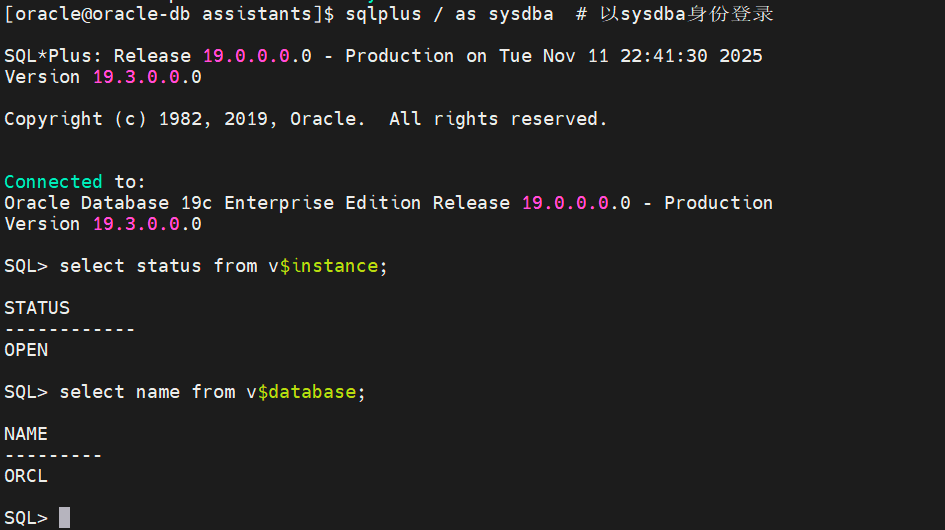
通过sqlplus连接数据库实例:
sqlplus / as sysdba # 以sysdba身份登录
执行以下命令检查实例状态:
SQL> select status from v$instance; # 输出应为OPEN
SQL> select name from v$database; # 输出数据库名(如ORCL)
SQL> exit
示例:
关键总结
核心步骤
系统准备:检查OS版本、依赖包、硬件资源,创建oracle用户/组和安装目录。
配置关键:内核参数(sysctl.conf)、用户限制(limits.conf)、Oracle环境变量(.bash_profile)。
安装软件:解压安装包,修改响应文件,执行runInstaller -silent静默安装,运行root脚本。
创建数据库:使用dbca -silent命令行创建实例,指定字符集、内存、存储路径等参数。
验证:检查监听状态(lsnrctl)、数据库连接(sqlplus)、实例状态(v$instance)。
常见问题解决
依赖包缺失:通过yum whatprovides <包名>查找缺失包并安装;
响应文件参数错误:核对ORACLE_HOME、ORACLE_BASE路径,确保与实际目录一致;
权限不足:检查/u01目录所有者是否为oracle:oinstall,权限是否为775;
内存不足:调整/etc/security/limits.conf中的memlock参数或增加系统内存。