车载消息中间件FastDDS 源码解析(一)FastDDS 介绍和使用
车载消息中间件FastDDS 源码解析(一)FastDDS 介绍和使用
文章目录
- 车载消息中间件FastDDS 源码解析(一)FastDDS 介绍和使用
- 1.车载消息中间件的前世今生
- 1.1蛮荒时代
- 1.2.can总线时代
- 1.3.以太网阶段
- 1.3.1 someip
- 1.3.2 dds
- 1.3.3 someip dds的比较
- 2.dds简介
- 2.1概念
- 2.2应用
- 2.3示意图
- 2.4架构图
- 3.代码示例
- 3.1发送端初始化代码示例
- 3.2接收端初始化代码示例
- 3.3接收发送消息代码示例
- 4.代码示例发送端代码的简单源码解析
- 4.1时序图
- 4.2DomainParticipantFactory
- 4.3创建participant
- 4.3.1participant的配置参数
- 几个重要的配置参数
- 4.3.2创建DomainParticipant
- 4.3.3创建DomainParticipantImpl
- 4.3.4关键参数 guid
- 4.4Type
- 4.5创建publisher
- 4.6 Topic
- 4.7创建datawriter
- 5.类图
- 6.总结:
转载好友文章
作者:zhuhit
链接:https://juejin.cn/column/7388347353408094245
1.车载消息中间件的前世今生
1.1蛮荒时代
随着计算机行业的发展,越来越多的电子设备和应用被引入到了汽车领域。
1920年代,收音机第一次和汽车结合,雪弗兰第一次发布了配备收音机的汽车。
1930 年,第一台商业化的车载收音机推出,名为摩托罗拉5T71,这个第一款被命名为摩托罗拉的产品,标志着摩托罗拉公司的正式诞生。
1970年代初,卡式收录机第一次装入汽车。80年代末,一般汽车音响多是以一个收放机与一对扬声器为基础组合,扬声器分为左右两路声道,置于仪表板两侧,或者车门后座后方。
1980年代卫星电话第一次装入汽车。
1977年本田研发的第一款车载导航原型产品,1995年博世发布的带有GPS定位功能的TravelPilot RGS05。
2001年MP3播放器问世,随后我们的车载系统上就陆续搭载了USB接口。与此同时,Apple凭着IPod开始涉足娱乐系统。诸多汽车厂商很快发现了消费者希望把Ipod融入到自己汽车的需求,于是开始联合苹果公司出台了针对iPod的集成式解决方案。到了2006年,许多新款汽车上就已经开始配备iPod专用的接口。
······
在早期的车载电子设备中,设备和设备的连接,设备和设备的数据传输都是点对点的物理连线,也没有一个总线的概念,这样随着车载电子设备的增多,线束越来越多,连接越来越复杂。急需一个连接总线和协议来管理这些电子设备的消息传输。这样can总线就应运而生。
1.2.can总线时代
在1980年代初期,博世的工程师正在评估现有的串行总线系统,以探讨其在汽车中的可能用途。由于没有可用的网络协议能够满足汽车工程师的要求,因此Uwe Kiencke于1983年开始开发新的串行总线系统。
1986年2月,CAN诞生了:在底特律的SAE大会上,新的总线系统被称为“Automove Serial Controller Area Network(汽车串行控制器局域网)”。
1987年中期,英特尔交付了第一款CAN控制器芯片82526。
1990年代初,博世CAN规范(2.0版)提交国际标准化。
1993年,CAN 已成为国际标准 ISO11898(高速应用)和 ISO11519(低速应用)。 CAN 是一种多主方式的串行通讯总线,基本设计规范要求有高的位速率,高抗电磁干扰性,而且能够检测出产生的任何错误。
can总线(Controller Area Network)的出现解决了车载系统的一部分问题,但是随着计算机系统,电子设备的发展,can总线的问题也逐渐暴露,速度慢,器件大的特点让can总线越来越力不从心。
高速can 2.0,最高速度只有1Mbps。2004年,宝马汽车的OBD诊断口采用的是高速CAN总线,速率为500kbit/s,除去CAN协议本身的开销,通过OBD口升级控制器的净升级速度降到200kbit/s。预计2008年需要刷写的系统软件数据量会达到1GB以上,那么整个刷写系统软件的时间将会达到16小时以上,这个肯定是不能接受的。
宝马开始了将以太网应用到车上,包括组织联盟建立车载以太网标准,例如OPEN联盟,着手基于以太网的上层协议,一些以太网协议就应运而生了。
1.3.以太网阶段
1.3.1 someip
SOME/IP 是 Scalable Service-Oriented Middleware over IP 的缩写,由宝马于 2011 年开发。这个名字清楚地表明它是一种中间件解决方案,可以在控制器之间实现面向服务的通信。更具体地说,SOME/IP 提供了广泛的中间件功能,如序列化、远程过程调用 (RPC)、服务发现和订阅。也有相应的开源版本。
在2014年,SOME/IP正式被集成进AUTOSAR 4.X。
1.3.2 dds
dds的发展要早一点,早在2004年第一版dds协议就由OMG(Object Management Group)对象管理组织发布的。OMG组织是一个国际性、开放性、非盈利性技术标准联盟,由供应商、终端用户、学术机构、政府机构推动,已经有31年的历史;OMG工作组针对各种技术和行业制定企业集成标准,并开发可为数千个垂直行业提供现实价值的技术标准。主要应用于船舶,无人机,机器人等领域。
但是在汽车领域dds的使用要晚得多。2018年,dds被引入AUTOSAR。
dds 虽然被引入AUTOSAR较晚,但是有后来居上的态势。
1.3.3 someip dds的比较
| someip | dds | |
|---|---|---|
| 应用场景 | 专为车而生 | 应用场景更广泛(车,船,无人机,机器人,物联网) |
| qos | 不支持 | 支持多种qos,更灵活,支持更多特性 |
| 资源 | 包体更小,内存占用更小 | 需要更多内存,包体更大 |
| 共享内存 | 不支持 | 支持 |
| udp | 最大1472 字节 | 没有限制 |
| tcp | 支持 | 支持 |
| 开源 | 有开源版本 | Opendds 和 fastdds |
2.dds简介
2.1概念
什么是dds:
DDS(Data Distribution Service 数据分发服务),由OMG(分布式面向对象建立标准的国际组织)发布的分布式通信规范,包含中间件协议和 API 标准等内容,采用订阅/发布模型,具有低延迟、高可靠和可扩展等特点。
DDs提供多种QoS服务质量策略,包含25个标准的qos 和32个扩展的qos。qos就是可以理解为通信通道的参数,需要在速度,质量,资源等因素之间做一定的选择和权衡。
现有的dds 实现一共有4种,3种开源版本(fastdds,cyclondds,opendds),和一种商业闭源版本(connex dds),内部的实现都不一样,支持的qos 也是略有不同,标准的qos 都有支持,扩展的qos 选择性的支持。
我们这里主要是分析一下fastdds的源码
2.2应用
dds最早是在国防军工上应用的,欧美已广泛应用于国防军工领域,THALES泰雷兹、EADS欧洲宇航防务、Raytheon雷神、Lockheed Martin洛克希德·马丁等国际主流军工厂商均将DDS作为其各种作战指挥与控制系统的核心中间件,为F124/宙斯盾DDG1000护卫舰、MQ-9捕食者无人机、波音预警机、MK-41舰载导弹发射系统、SSDS舰艇自卫系统、美国和欧洲宇航局发射控制系统等提供可靠、高实时的分布式通信功能。
在机器人领域,传统单机作业模式已发展为群体分布式协同,对于生产作业等环节中的机器人集群,存在相互协作的可靠、灵活、实时、安全的连接需求,在ROS2中也将DDS确定为通信层标准,促进了机器人产业的发展。
自动驾驶汽车是复杂的分布式系统,它结合了视觉、雷达、GPS、导航、规划和控制等组件,这些模块必须组成安全可靠的系统,实时分析复杂的环境并对其作出正确反应。多家自动驾驶平台均采用DDS集成多种复杂易购传感器收集的信息,以支撑其作出及时正确的控制决策。
在物联网领域,dds在分布式场景中也有广泛的应用。
2.3示意图
下面这张图是fastdds 官网的一张示意图

Domain ID标识一个DDS Domain。
DomainParticipant 表示通信的实体,domain ID来指定它所属的DDS域。两个具有不同ID的domainParticipant不知道对方在网络中的存在。
Topic表示通信的主题,这个是在domain下面做更细的划分,只有在同一topic下才能互相通信,一般不同的topic的传输的message的数据格式也是不一样的。
Publisher 表示消息的发布者,一般有1到多个的DataWriter,用来发送消息。
Subscriber表示消息的订阅者,一般有1到多个的DataReader,用来订阅消息。
Publisher ,Subscriber , topic是软总线的标准配置,android 的EventBus,微服务的mq,都有类似的角色。

在总线的概念里,需要publisher 和 subscriber 是同一个topic,这样publisher 发送的消息才能传送到subscriber
而dds在总线的基础上又有了domain的概念,在只有在同一domain中,属于同一个topic的publisher 和 subscriber才能通信。
2.4架构图

我们看一下这张官方的架构图:fastdds其实大致可以分为2层,上层是DCPS(Data-Centric Publish -subscribe)域,我们简称dds层。
下层是RTPS域,RTPS 是 Real-Time Publish Subscribe 的缩写,它是 DDS 的通信中间件。
什么是 RTPS 协议?
Real-Time Publish-Subscribe 协议。
RTPS 是一种实时发布/订阅协议,它是 OMG(Object Management Group)为 DDS(Data Distribution Service)制定的底层传输协议。底层依赖的是tcp/udp和共享内存(shm),在同一个物理节点一般使用共享内存的方式进行传输,在不同的物理节点一般使用tcp/udp进行传输。不同物理节点之间通过wifi 或者有线路由器相连接。
在官方的用例中使用dds的过程中主要是涉及了上层DCPS(Data-Centric Publish -subscribe)域
而RTPS 是底层的通信逻辑。
这样大家就能建立一个关于fastdds 的初步的概念。
3.代码示例
下面是fastdds 给的示例代码,我们根据这个示例来逐步分析fastdds 的源码:
一般而言fastdds 有两个程序,一个是接收端程序,一个是发送端程序。
如果跨网络通信,则两个程序运行在不同的机器上。两台机器在同一个局域网中。
当然接收端程序,发送端程序也能运行在同一个设备,这时候就是使用了dds的跨进程通信(共享内存)的能力。
3.1发送端初始化代码示例
我们先看一下发送端程序的主要内容:
ini 体验AI代码助手 代码解读复制代码 bool HelloWorldPublisher::init(bool use_env){//这个是需要发送的数据对象hello_.index(0);hello_.message("HelloWorld");// 设置DomainParticipantQosDomainParticipantQos pqos = PARTICIPANT_QOS_DEFAULT;pqos.name("Participant_pub");auto factory = DomainParticipantFactory::get_instance();if (use_env){factory->load_profiles();factory->get_default_participant_qos(pqos);}//创建DomainParticipant对象participant_ = factory->create_participant(0, pqos);if (participant_ == nullptr){return false;}//REGISTER THE TYPE// 注册type 为后续数据解析使用type_.register_type(participant_);//CREATE THE PUBLISHER// 设置PublisherQoPublisherQos pubqos = PUBLISHER_QOS_DEFAULT;if (use_env){participant_->get_default_publisher_qos(pubqos);}//创建publisher对象publisher_ = participant_->create_publisher(pubqos,nullptr);if (publisher_ == nullptr){return false;}//CREATE THE TOPIC//设置TopicQosTopicQos tqos = TOPIC_QOS_DEFAULT;if (use_env){participant_->get_default_topic_qos(tqos);}//根据qos创建topic对象topic_ = participant_->create_topic("HelloWorldTopic","HelloWorld",tqos);if (topic_ == nullptr){return false;}// CREATE THE WRITER//设置writerqosDataWriterQos wqos = DATAWRITER_QOS_DEFAULT;if (use_env){publisher_->get_default_datawriter_qos(wqos);}//创建writerwriter_ = publisher_->create_datawriter(topic_,wqos,&listener_);if (writer_ == nullptr){return false;}return true;}
HelloWorldPublisher的init函数按照顺序创建了这几个对象:
- DomainParticipant对象
- Publisher对象
- Topic 对象
- DataWriter 对象
//在发送端(publisher)如何使用dds
好,我们总结一下,application发送端在使用dds中在初始化阶段主要创建了哪些对象,经过了哪些步骤:
-
第一步创建了DomainParticipant对象,这个对象包含很多内容,包括rtpsparticipant对象,这个在本章中会略微看一下源代码,具体的内容会在后面一些章节展开
在这里使用了DomainParticipantQos,对DomainParticipant对象进行了参数配置
-
第二步调用了TypeSupport 的register_type,这里面主要是为了之后数据传输的过程中数据解析使用,约定传输数据的数据结构。
如果type 不对,数据解析就无法进行。
-
第三步创建的Publisher对象,是在DomainParticipant内部创建的,DomainParticipant内部可以包含0到多个Publisher和Subsciber,
Publisher对象是消息的发布者,Subsciber对象是消息的接收者。
在这里使用了PublisherQos对Publisher对象进行了参数配置。
-
第四步创建了Topic 对象,在这里使用了TopicQos对Topic 对象进行了参数配置。
topic 在前面讲过,就是通信的主题,只有在同一topic下才能互相通信。
-
第五步在第三步的基础上创建DataWriter 对象,在这里使用了DataWriterQos对DataWriter 对象进行了参数配置
上面这些操作都是在dds 层进行的,当然dds层的操作都对应了rtps的操作,dds层的对象都对应了rtps层的对象。
3.2接收端初始化代码示例
我们再看一下接收端的主要内容
ini 体验AI代码助手 代码解读复制代码 bool HelloWorldSubscriber::init(bool use_env){------ 省略的内容与HelloWorldPublisher 4-27行类似//CREATE THE SUBSCRIBERSubscriberQos sqos = SUBSCRIBER_QOS_DEFAULT;if (use_env){participant_->get_default_subscriber_qos(sqos);}subscriber_ = participant_->create_subscriber(sqos, nullptr);if (subscriber_ == nullptr){return false;}------省略的内容与HelloWorldPublisher 47-67行类似// CREATE THE READERDataReaderQos rqos = DATAREADER_QOS_DEFAULT;rqos.reliability().kind = RELIABLE_RELIABILITY_QOS;if (use_env){subscriber_->get_default_datareader_qos(rqos);}reader_ = subscriber_->create_datareader(topic_, rqos, &listener_);if (reader_ == nullptr){return false;}return true;}
HelloWorldSubscriber的init函数按照顺序创建了这几个对象:
- DomainParticipant对象
- Subscriber对象
- Topic 对象
- DataReader 对象
这个函数其实和HelloWorldPublisher的函数内容类似
这里面有两个地方有点区别就是创建的是Subscriber 和 DataReader
在接收端(subscriber)
好,我们总结一下,application在使用dds中在初始化阶段主要创建了哪些对象,经过了哪些步骤:
-
第一步创建了DomainParticipant对象,这个对象包含很多内容,包括rtpsparticipant对象,这个在本章中会略微看一下源代码,具体的内容会在后面一些章节展开
在这里使用了DomainParticipantQos,对DomainParticipant对象进行了参数配置
-
第二步调用了TypeSupport 的register_type,这里面主要是为了之后数据传输的过程中数据解析使用,约定传输数据的数据结构,
-
第三步创建的Subscriber对象,是在DomainParticipant内部创建的
在这里使用了SubscriberQos对Subscriber对象进行了参数配置。
-
第四步创建了Topic 对象,在这里使用了TopicQos对Topic 对象进行了参数配置
-
第五步在第三步的基础上创建DataReader对象,在这里使用了DataReaderQos对DatarReader 对象进行了参数配置
以上就是Publisher 在发送端初始化,Subscriber在接收端初始化
3.3接收发送消息代码示例
下面介绍一下发送和接收消息
//发送和接收消息
rust 体验AI代码助手 代码解读复制代码 bool HelloWorldPublisher::publish(bool waitForListener){if (listener_.firstConnected_ || !waitForListener || listener_.matched_ > 0){hello_.index(hello_.index() + 1);writer_->write(&hello_);return true;}return false;}
hello_ 这个是要发送的消息,是一个数据结构,这个和topic,type一一对应 // (instancehandler)
writer*->write(&hello*) 就是使用DataWriter发送消息。
对端收到消息,会调用一个回掉函数
hello_ 和发送的消息是相同的数据结构。
c 体验AI代码助手 代码解读复制代码 void HelloWorldSubscriber::SubListener::on_data_available(DataReader* reader){SampleInfo info;if (reader->take_next_sample(&hello_, &info) == ReturnCode_t::RETCODE_OK){if (info.instance_state == ALIVE_INSTANCE_STATE){samples_++;// Print your structure data here.std::cout << "Message " << hello_.message() << " " << hello_.index() << " RECEIVED" << std::endl;}}}
这就是如何使用dds的一个简单的例子。
4.代码示例发送端代码的简单源码解析
例子源码的简单解析
4.1时序图
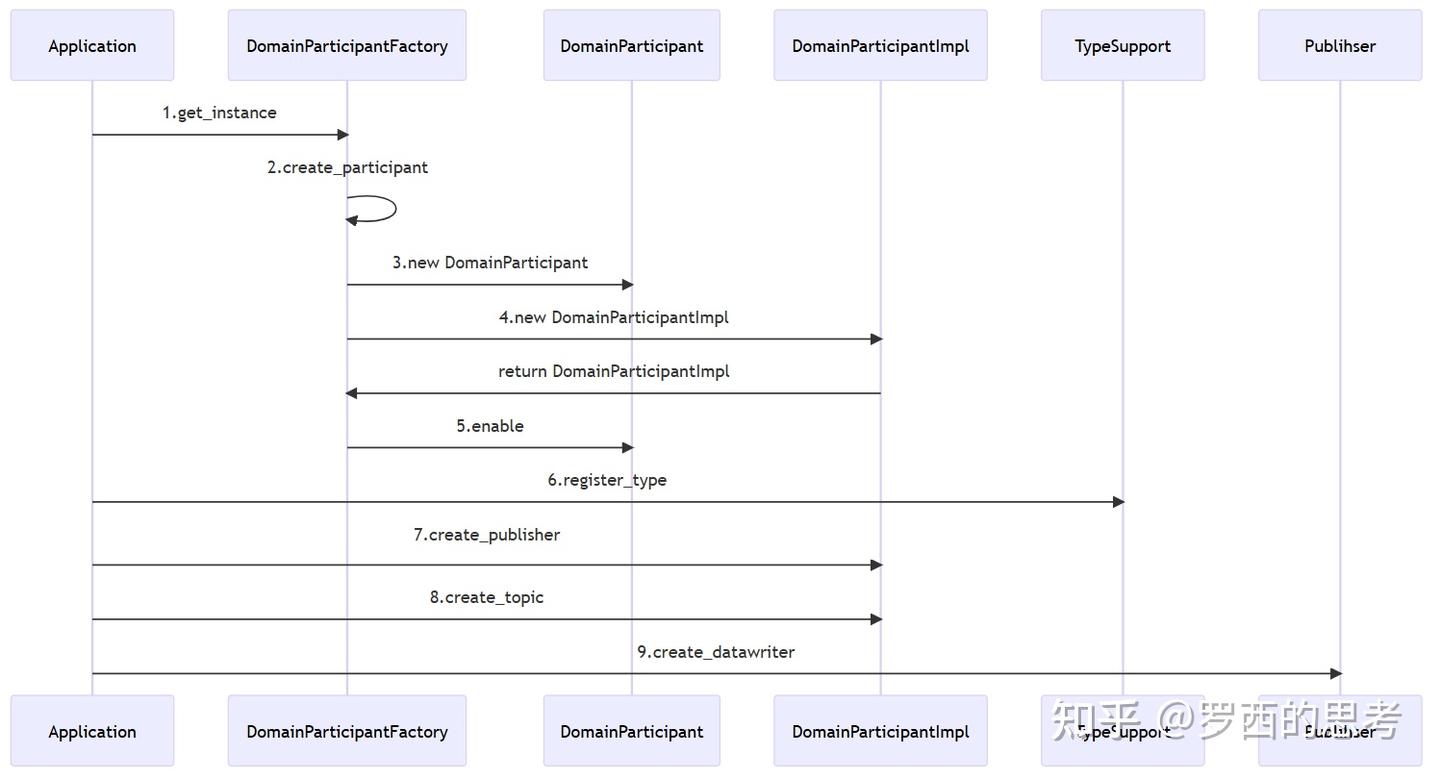
ApplicationDomainParticipantFactoryDomainParticipantDomainParticipantImplTypeSupportPublihser1.get_instance2.create_participant3.new DomainParticipant4.new DomainParticipantImplreturn DomainParticipantImpl5.enable6.register_type7.create_publisher8.create_topic9.create_datawriterApplicationDomainParticipantFactoryDomainParticipantDomainParticipantImplTypeSupportPublihser
-
DomainParticipantFactory::get_instance() 获取一个DomainParticipantFactory的对象
-
DomainParticipantFactory 调用create_participant主要干了三件事情:
a.new DomainParticipant()
b.new DomainParticipantImpl() 在这里DomainParticipant 和DomainParticipantImpl对象是一一对应关系
c.调用DomainParticipant对象的enable函数, 最终会调用到 DomainParticipantImpl对象 的enable函数,就是启动participant,pdp发现协议等
-
new 了一个DomainParticipant
-
new了一个 DomainParticipantImpl()
-
调用DomainParticipant对象的enable函数
-
注册type,这个type 和 topic 是关联关系
-
只有同一个topic的2个participant 才能互相通信,通信内容的解析需要使用type解析
-
调用DomainParticipantImpl的create_publisher函数,配置qos
-
调用DomainParticipantImpl的create_topic函数,配置qos
-
调用Publihser的create_datawriter函数,配置qos,发送消息就是由这个datawriter执行的
我们按照这个顺序逐一过一下发送端的源码:
4.2DomainParticipantFactory
对应的时序图中的步骤1
HelloWorldPublisher::init 的第9行调用了DomainParticipantFactory::get_instance()
scss 体验AI代码助手 代码解读复制代码 DomainParticipantFactory* DomainParticipantFactory::get_instance(){return get_shared_instance().get();}//DomainParticipantFactory::get_instance 调用了get_shared_instance()//这是c++单例的一种写法。std::shared_ptr<DomainParticipantFactory> DomainParticipantFactory::get_shared_instance(){// Note we need a custom deleter, since the destructor is protected.static std::shared_ptr<DomainParticipantFactory> instance(new DomainParticipantFactory(),[](DomainParticipantFactory* p){delete p;});return instance;}//get_shared_instance()函数调用了new DomainParticipantFactory()DomainParticipantFactory::DomainParticipantFactory(): default_xml_profiles_loaded(false), default_participant_qos_(PARTICIPANT_QOS_DEFAULT), topic_pool_(fastrtps::rtps::TopicPayloadPoolRegistry::instance()), rtps_domain_(fastrtps::rtps::RTPSDomainImpl::get_instance()), log_resources_(detail::get_log_resources()){}
DomainParticipantFactory::get_instance() 获取一个DomainParticipantFactory的对象
DomainParticipantFactory是一个单例的设计,看名字就能明白是主要是用来创建DomainParticipant的工厂类,工厂设计模式是26种设计模式之一,关于设计模式部分不在这边介绍了,有兴趣的可以自己查阅相关文档。
4.3创建participant
对应的时序图中的步骤2:
HelloWorldPublisher::init 的第17行调用了DomainParticipantFactory::create_participant函数,这里的DomainParticipantQos& qos参数是之前的两个函数DomainParticipantFactory::load_profiles和DomainParticipantFactory::reset_default_participant_qos产生的。
4.3.1participant的配置参数
HelloWorldPublisher::init 的第13,14行调用了DomainParticipantFactory::load_profiles和DomainParticipantFactory::reset_default_participant_qos
arduino 体验AI代码助手 代码解读复制代码 ReturnCode_t DomainParticipantFactory::load_profiles(){if (false == default_xml_profiles_loaded){SystemInfo::set_environment_file();XMLProfileManager::loadDefaultXMLFile();// Only load profile oncedefault_xml_profiles_loaded = true;// Only change default participant qos when not explicitly set by the userif (default_participant_qos_ == PARTICIPANT_QOS_DEFAULT){reset_default_participant_qos();}}return ReturnCode_t::RETCODE_OK;}void DomainParticipantFactory::reset_default_participant_qos(){// TODO (Miguel C): Change when we have full XML support for DDS QoS profilesDomainParticipantImpl::set_qos(default_participant_qos_, PARTICIPANT_QOS_DEFAULT, true);if (true == default_xml_profiles_loaded){eprosima::fastrtps::ParticipantAttributes attr;//如果有初始化的xml,就使用xml配置,否则attr 初始化为default_participant_qos_XMLProfileManager::getDefaultParticipantAttributes(attr);//default_participant_qos_初始化utils::set_qos_from_attributes(default_participant_qos_, attr.rtps);}}
在创建participant之前,需要先设置一下参数,设置配置参数,配置参数一般从两个地方设置,一个是xml配置文件,另一个是代码设置,如果有xml配置文件,就用配置文件,没有的话,使用代码设置。
上面两个函数就是设置DomainParticipantQos。
load_profiles函数主要是加载配置,如果没有配置,则通过reset_default_participant_qos 来设置默认的配置。
几个重要的配置参数
DomainParticipantQos 是比较重要的参数配置类
一般配置如下几个参数,这几个是比较重要的参数:
-
pqos.wire_protocol().builtin.discovery_config.discoveryProtocol = DiscoveryProtocol_t::SIMPLE;
DiscoveryProtocol_t::SIMPLE是发现协议,还有其他协议类型,这个在后面会详细介绍
-
pqos.wire_protocol().builtin.discovery_config.use_SIMPLE_EndpointDiscoveryProtocol = true;
这儿的意思是选择simpleedp 协议
-
pqos.wire_protocol().builtin.discovery_config.m_simpleEDP.use_PublicationReaderANDSubscriptionWriter = true;
默认是true,这个选择配置edp的端点
-
pqos.wire_protocol().builtin.discovery_config.m_simpleEDP.use_PublicationWriterANDSubscriptionReader = true;
默认是true,这个也是选择配置edp的端点
-
pqos.wire_protocol().builtin.discovery_config.leaseDuration = eprosima::fastrtps::c_TimeInfinite; //
多长时间收不到远端的消息,认为远端还活着
4.3.2创建DomainParticipant
对应的时序图中的步骤2:
ini 体验AI代码助手 代码解读复制代码 //participant_ = factory->create_participant(0, pqos); listen:null mask:nullDomainParticipant* DomainParticipantFactory::create_participant(DomainId_t did,const DomainParticipantQos& qos,DomainParticipantListener* listen,const StatusMask& mask){//从配置文件中读取初始化信息,如果没有xml文件,初始化为default信息load_profiles();const DomainParticipantQos& pqos = (&qos == &PARTICIPANT_QOS_DEFAULT) ? default_participant_qos_ : qos;DomainParticipant* dom_part = new DomainParticipant(mask);DomainParticipantImpl* dom_part_impl = new DomainParticipantImpl(dom_part, did, pqos, listen);······if (fastrtps::rtps::GUID_t::unknown() != dom_part_impl->guid()){{std::lock_guard<std::mutex> guard(mtx_participants_);using VectorIt = std::map<DomainId_t, std::vector<DomainParticipantImpl*>>::iterator;//std::map<DomainId_t, std::vector<DomainParticipantImpl*>> participants_VectorIt vector_it = participants_.find(did);if (vector_it == participants_.end()){// Insert the vectorstd::vector<DomainParticipantImpl*> new_vector;// 当map中的insert 函数插入后,返回值应该是 **pair<iterator,bool>** ,第二个参数bool值在插入成功时返回 true,失败时返回falseauto pair_it = participants_.insert(std::make_pair(did, std::move(new_vector)));vector_it = pair_it.first;}vector_it->second.push_back(dom_part_impl);}//autoenable_created_entities 的default值是trueif (factory_qos_.entity_factory().autoenable_created_entities){//DomainParticipant::enable ,返回false 创建domain_part 失败if (ReturnCode_t::RETCODE_OK != dom_part->enable()){delete_participant(dom_part);return nullptr;}}}else{delete dom_part_impl;return nullptr;}return dom_part;}
这个函数主要是创建了DomainParticipantImpl,将这个DomainParticipantImpl保存到DomainParticipantFactory的属性participants_(std::map<DomainId_t, std::vector<DomainParticipantImpl*>>)中,DomainParticipantFactory会创建1到多个DomainParticipantImpl,DomainParticipantFactory管理这些DomainParticipantImpl对象。
-
这里 new了一个DomainParticipant对象
对应的时序图中的步骤3:
-
在DomainParticipant对象的基础上new了一个DomainParticipantImpl对象
对应的时序图中的步骤4:
-
将这个DomainParticipantImpl保存到DomainParticipantFactory的属性participants_(std::map<DomainId_t, std::vector<DomainParticipantImpl*>>对象)中
-
调用DomainParticipant::enable
对应的时序图中的步骤5:
4.3.3创建DomainParticipantImpl
对应的时序图中的步骤4:
css 体验AI代码助手 代码解读复制代码 DomainParticipantImpl::DomainParticipantImpl(DomainParticipant* dp,DomainId_t did,const DomainParticipantQos& qos,DomainParticipantListener* listen): domain_id_(did), next_instance_id_(0), qos_(qos), rtps_participant_(nullptr), participant_(dp), listener_(listen), default_pub_qos_(PUBLISHER_QOS_DEFAULT), default_sub_qos_(SUBSCRIBER_QOS_DEFAULT), default_topic_qos_(TOPIC_QOS_DEFAULT), id_counter_(0)#pragma warning (disable : 4355 ), rtps_listener_(this){participant_->impl_ = this;// 初始化default_pub_qos_// DomainParticipantFactory::load_profiles() 读取xml中的值,赋值给pub_attr// 再将pub_attr 的值赋值给default_pub_qos_,完成对DomainParticipantImpl的属性default_pub_qos_的配置PublisherAttributes pub_attr;XMLProfileManager::getDefaultPublisherAttributes(pub_attr);utils::set_qos_from_attributes(default_pub_qos_, pub_attr);// 初始化default_sub_qos_SubscriberAttributes sub_attr;XMLProfileManager::getDefaultSubscriberAttributes(sub_attr);utils::set_qos_from_attributes(default_sub_qos_, sub_attr);// 初始化default_topic_qos_TopicAttributes top_attr;XMLProfileManager::getDefaultTopicAttributes(top_attr);utils::set_qos_from_attributes(default_topic_qos_, top_attr);// Pre calculate participant id and generated guid// rtpsdomain 分配一个participant_id_participant_id_ = qos_.wire_protocol().participant_id;if (!eprosima::fastrtps::rtps::RTPSDomainImpl::create_participant_guid(participant_id_, guid_)){EPROSIMA_LOG_ERROR(DOMAIN_PARTICIPANT, "Error generating GUID for participant");}/* Fill physical data properties if they are found and empty */// 从系统获取并设置3个值std::string* property_value = fastrtps::rtps::PropertyPolicyHelper::find_property(qos_.properties(), parameter_policy_physical_data_host);if (nullptr != property_value && property_value->empty()){property_value->assign(asio::ip::host_name() + ":" + std::to_string(utils::default_domain_id()));}property_value = fastrtps::rtps::PropertyPolicyHelper::find_property(qos_.properties(), parameter_policy_physical_data_user);if (nullptr != property_value && property_value->empty()){std::string username = "unknown";if (ReturnCode_t::RETCODE_OK == SystemInfo::get_username(username)){property_value->assign(username);}}property_value = fastrtps::rtps::PropertyPolicyHelper::find_property(qos_.properties(), parameter_policy_physical_data_process);if (nullptr != property_value && property_value->empty()){property_value->assign(std::to_string(SystemInfo::instance().process_id()));}}
DomainParticipantImpl的构造函数,主要是配置qos,这里面主要是配置了3个qos
publisher的qos, topic的qos 和subscriber 的qos
如果有xml配置文件就使用xml配置文件,否则使用default的qos
4.3.4关键参数 guid
这里有个关键参数 guid。每一个Entity都有一个唯一的id guid。
guid一共有16个字节,12个字节的guidPrefix,4字节的entityid,guidPrefix是paiticipant的唯一id,所有在一个pariticipant中的entity的guidPrefix都是一样的,entityid表示了在这个pariticipant中的entity的唯一id。


我们看一下这个类图,participant 和 endpoint都是Entity的子类,writer和reader也都是entity 的子类,guid都能唯一代表participant和Endpoint(Writer 和 reader)。
4.4Type
HelloWorldPublisher::init 的26行调用了TypeSupport::register_type函数,注册type
对应的时序图中的步骤6:
rust 体验AI代码助手 代码解读复制代码 ReturnCode_t TypeSupport::register_type(DomainParticipant* participant) const{return participant->register_type(*this, get_type_name());}//TypeSupport::register_type调用了DomainParticipantImpl::register_typeReturnCode_t DomainParticipantImpl::register_type(const TypeSupport type,const std::string& type_name){······//先查一下之前有没有注册过这个typeTypeSupport t = find_type(type_name);······// 将注册的type存入types_ 统一管理types_.insert(std::make_pair(type_name, type));if (type->auto_fill_type_object() || type->auto_fill_type_information()){register_dynamic_type_to_factories(type);}return ReturnCode_t::RETCODE_OK;}TypeSupport这个类主要是表示传输支持的消息结构,每个publisher 和每个subscriber如果要通信,就是配置一样的消息的数据结构,如果type 不一致就无法解析。
DomainParticipantImpl 来管理这些types。
Fastdds 数据类型,需要发送端和接收端提前协商保持完全一致,否则无法解析。
type _.register_type(participant) 主要是将type自己注册到DomainParticipantImpl的types 中去
最终调用的是DomainParticipantImpl的register_type函数
DomainParticipantImpl有一个属性:std::map<std::string, TypeSupport> types_,所有的type都存储在这个map
register_type主要是两个步骤,先find_type,在DomainParticipantImpl的属性 types_ 中通过type_name寻找TypeSupport 对象,如果找到就返回,如果没有找到就将std::make_pair(type_name, type),insert到 map中去
4.5创建publisher
HelloWorldPublisher::init 的36行调用了DomainParticipantImpl::create_publisher函数,创建publisher
对应的时序图中的步骤7:
ini 体验AI代码助手 代码解读复制代码 Publisher* DomainParticipantImpl::create_publisher(const PublisherQos& qos,PublisherListener* listener,const StatusMask& mask){return create_publisher(qos, nullptr, listener, mask);}Publisher* DomainParticipantImpl::create_publisher(const PublisherQos& qos,PublisherImpl** impl,PublisherListener* listener,const StatusMask& mask){······//TODO CONSTRUIR LA IMPLEMENTACION DENTRO DEL OBJETO DEL USUARIO.PublisherImpl* pubimpl = create_publisher_impl(qos, listener);Publisher* pub = new Publisher(pubimpl, mask);pubimpl->user_publisher_ = pub;pubimpl->rtps_participant_ = get_rtps_participant();bool enabled = get_rtps_participant() != nullptr;// Create InstanceHandle for the new publisherInstanceHandle_t pub_handle;create_instance_handle(pub_handle);pubimpl->handle_ = pub_handle;//SAVE THE PUBLISHER INTO MAPSstd::lock_guard<std::mutex> lock(mtx_pubs_);publishers_by_handle_[pub_handle] = pub;publishers_[pub] = pubimpl;······return pub;}先创建了一个PublisherImpl,然后创建了一个InstanceHandle_t,就是为PublisherImpl分配了一个InstanceHandle_t(guid)。
将publisher保存到map中,由DomainParticipantImpl 统一管理。
4.6 Topic
HelloWorldPublisher::init 的53行调用了DomainParticipantImpl::create_topic函数,创建topic
对应的时序图中的步骤8:
c 体验AI代码助手 代码解读复制代码 Topic* DomainParticipantImpl::create_topic(const std::string& topic_name,const std::string& type_name,const TopicQos& qos,TopicListener* listener,const StatusMask& mask){//Look for the correct type registrationTypeSupport type_support = find_type(type_name);······std::lock_guard<std::mutex> lock(mtx_topics_);// Check there is no Topic with the same nameif ((topics_.find(topic_name) != topics_.end()) ||(filtered_topics_.find(topic_name) != filtered_topics_.end())){EPROSIMA_LOG_ERROR(PARTICIPANT, "Topic with name : " << topic_name << " already exists");return nullptr;}InstanceHandle_t topic_handle;create_instance_handle(topic_handle);······//SAVE THE TOPIC INTO MAPStopics_by_handle_[topic_handle] = topic;topics_[topic_name] = factory;······ cond_topics_.notify_all();return topic;}先找到对应的TypeSupport,然后创建InstanceHandle_t对象topic_handle,这个InstanceHandle_t其实就是guid,就是为topic创建一个唯一的InstanceHandle_t(guid)。
接着创建topic,这个topic有一个instance_handle作为唯一标识。
将topic 保存到DomainParticipantImpl的topics_by_handle_ 这个map中去,DomainParticipantImpl统一管理这个DomainParticipantImpl中的所有topic。
std::map<InstanceHandle_t, Topic*> topics_by_handle_ 是以InstanceHandle_t为key,Topic对象为value的map。
在这里InstanceHandle_t主要由guid_ 和next_instance_id_ 组成的,guid_ 是DomainParticipantImpl的guid_ ,next_instance_id_ 是DomainParticipantImpl的属性,初始值为0。InstanceHandle_t 就是guid,然后DomainParticipantImpl管理他的所有的Entity,为这些Entity分配唯一的guid,也就是InstanceHandle_t。
ini 体验AI代码助手 代码解读复制代码 void DomainParticipantImpl::create_instance_handle(InstanceHandle_t& handle){using eprosima::fastrtps::rtps::octet;uint32_t id = ++next_instance_id_;handle = guid_;handle.value[15] = 0x01; // Vendor specific;handle.value[14] = static_cast<octet>(id & 0xFF);handle.value[13] = static_cast<octet>((id >> 8) & 0xFF);handle.value[12] = static_cast<octet>((id >> 16) & 0xFF);}这个函数创建了instance_handle(guid),也就是Topic的唯一标识。
我们看一下create_instance_handle这个函数,InstanceHandle_t主要值是16位,前12位使用GuidPrefix。后4位用next_instance_id_ 来拼接而成。这样组成了一个唯一的id。InstanceHandle_t 和 guid 是可以互相转换的,所以InstanceHandle_t也能唯一标识一个Entity,
Topic本身也是一个Entity的子类。
4.7创建datawriter
HelloWorldPublisher::init 的71行调用了create_datawriter函数
对应的时序图中的步骤9:
rust 体验AI代码助手 代码解读复制代码 DataWriter* create_datawriter(Topic* topic,const DataWriterQos& qos,DataWriterListener* listener,const StatusMask& mask){return impl_->create_datawriter(topic, qos, listener, mask);}DataWriter* PublisherImpl::create_datawriter(Topic* topic,const DataWriterQos& qos,DataWriterListener* listener,const StatusMask& mask){//Look for the correct type registrationTypeSupport type_support = participant_->find_type(topic->get_type_name());/// Preconditions// Check the type was registered.······DataWriterImpl* impl = create_datawriter_impl(type_support, topic, qos, listener);return create_datawriter(topic, impl, mask);}这里根据topic ,type_support, DataWriterQos 创建了DataWriter,保存到map中由Publisher统一管理
5.类图
DomainParticipantFactory+std::map> participants_DomainParticipantImpl+PublisherQos default_pub_qos_+std::map publishers_+SubscriberQos default_sub_qos_+std::map subscribers_+TopicQos default_topic_qos_+std::map topics_+std::map types_PublisherImpl+std::map> writers_SubscriberImpl+std::map> readers_;TopicTypeSupportDataWriterDataReader
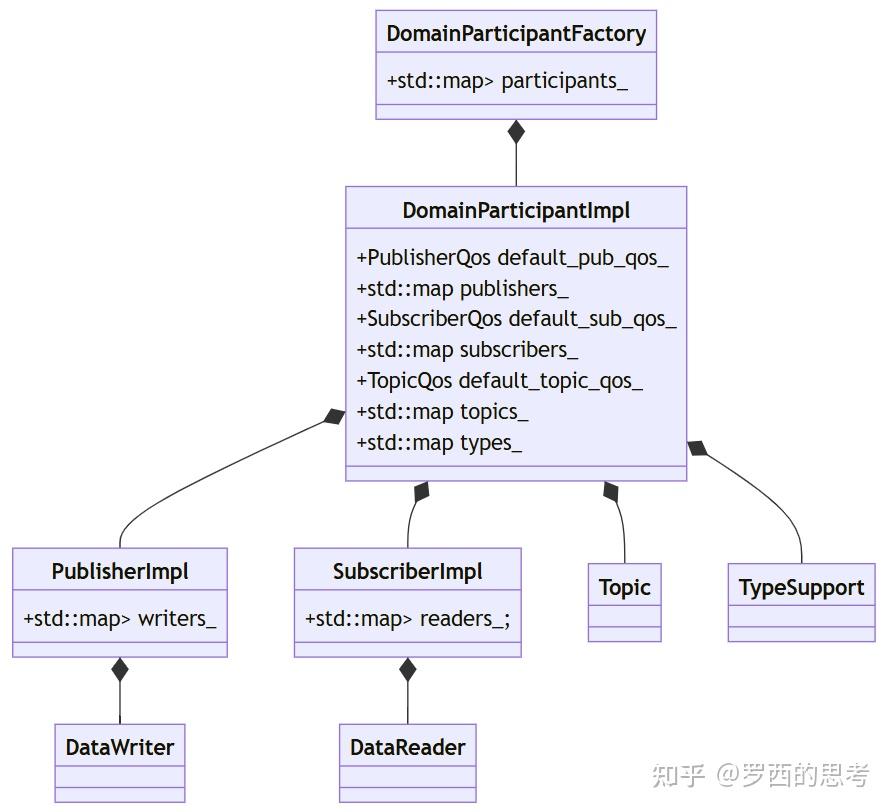
如上面类图所示:
-
DomainParticipantFactory管理所有的DomainParticipantImpl对象
-
DomainParticipantImpl管理所有的Publisher,Topic,TypeSupport,Subscriber对象
-
Publisher管理所有的DataWriter对象
DataWriter 和 RTPSWriter 是一一对应的
-
Subscriber管理所有的DataReader对象
DataReader 和 RTPSReader 是一一对应的
6.总结:
这一节我们介绍了DDS的背景,然后举了一个代码例子,主要讲了如何使用fastdds,然后根据这个例子简单的进行了代码分析,第3节是代码例子,这个例子在架构图的Application 层,第4节是基于这个代码例子深入到了DCPS层做了简单的代码分析。下面我们会在第4节的基础上进行更深入的代码分析。