android集成react native组件踩坑笔记(Activity局部展示RN的组件)
安卓原始工程,在原生页面的局部显示RN工程导出的组件View,如下,下半部分是安卓代码,上半部分是RN导出的组件,同时安卓和原始有数据交互,RN组件里有引入其他三方库,如react-native-svg

思路:
RN工程导出不bundle文件,供别的工程调用,安卓原始Activity将RN导出的组件通过addView添加到布局上
一.RN导出组件文件
1.新建组件文件
新建RN工程
npx @react-native-community/cli@latest init MyRNProject --version 0.85.1
新建MyComponent.js,组件里有基础布局,还有图表绘制布局
import React, { useState, useEffect } from 'react';
import { View, Text, DeviceEventEmitter, NativeModules, Button,AppState } from 'react-native';
import {Circle, G, Line, Path, Rect, Svg} from 'react-native-svg';// 获取 Android 原生模块(用于向原生发送数据)
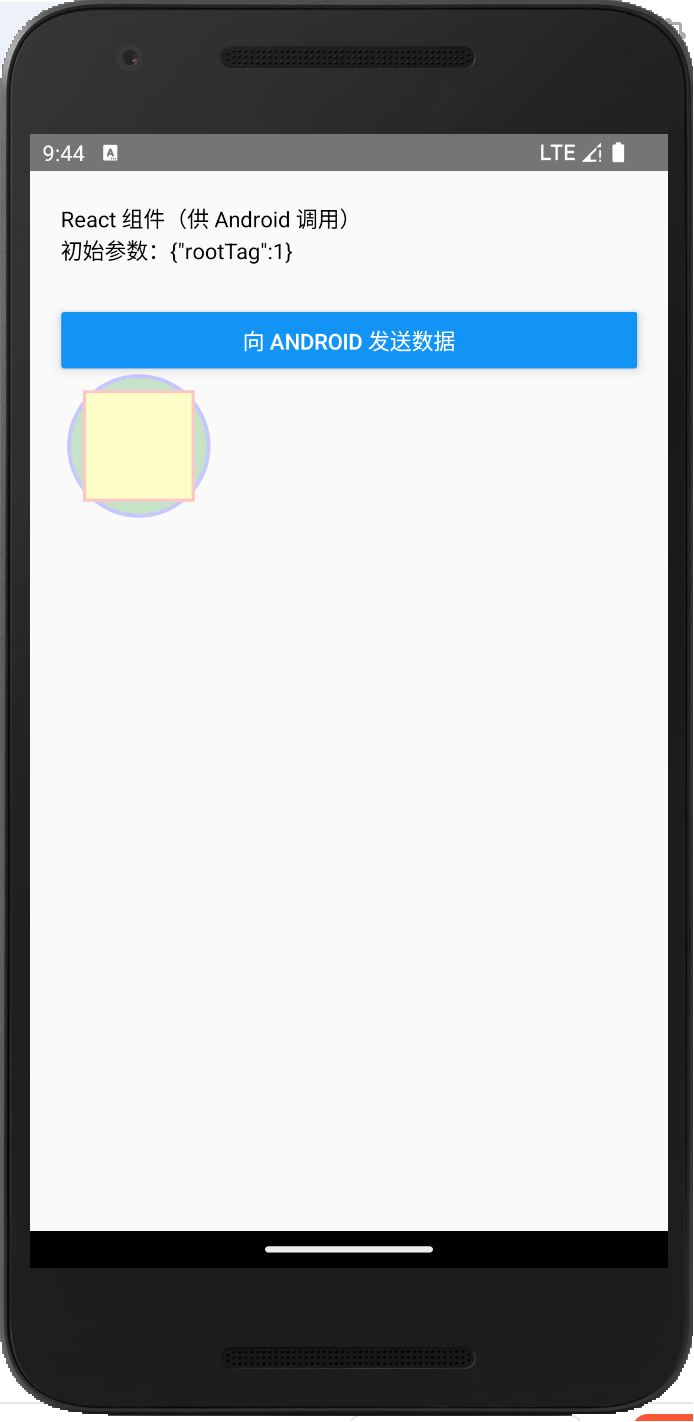
const { AndroidCommModule } = NativeModules;const MyComponent = (props) => {const [nativeData, setNativeData] = useState('');const [initialParams, setInitialParams] = useState({});// 接收 Android 传递的初始参数useEffect(() => {setInitialParams(props); // props 中包含 Android 传递的初始数据}, [props]);// 监听 Android 原生主动发送的事件useEffect(() => {const listener = DeviceEventEmitter.addListener('NativeToReactEvent', // 事件名需与 Android 端一致(data) => {setNativeData(`收到原生数据:${data.message}(状态码:${data.code})`);});return () => listener.remove(); // 组件卸载时移除监听}, []);// 向 Android 原生发送数据const sendToNative = () => {AndroidCommModule.receiveFromReact('来自 React 的消息',200,(response) => { // 接收原生的回调console.log('原生处理结果:', response);});};return (<View style={{ flex: 1, padding: 20 }}><Text>React 组件(供 Android 调用)</Text><Text>初始参数:{JSON.stringify(initialParams)}</Text><Text style={{ marginTop: 10 }}>{nativeData}</Text><Button title="向 Android 发送数据" onPress={sendToNative} /><SvgOpacity/></View>);
};function SvgOpacity() {return (<Svg height="100" width="100" opacity="0.2"><Circlecx="50"cy="50"r="45"stroke="blue"strokeWidth="2.5"fill="green"/><Rectx="15"y="15"width="70"height="70"stroke="red"strokeWidth="2"fill="yellow"/></Svg>);
}export default MyComponent;2.修改index.js文件
/*** @format*/import { AppRegistry } from 'react-native';
import App from './App';
import { name as appName } from './app.json';AppRegistry.registerComponent(appName, () => App);
3.导出组件
导入react native和react-native-svg,注意此处用RN的版本为0.81.5,用最新版本会有问题
npm install react-native
npm install react-native-svg
导出组件文件index.android.bundle
npx react-native bundle --platform android --dev true --entry-file index.js --bundle-output android/app/src/main/assets/index.android.bundle --assets-dest android/app/src/main/res/
4.测试运行
npx react-native run-android
在安卓上运行该demo,结果如下:
二.安卓集成RN导出的bundle组件文件
1.安卓工程初始化RN
执行下面命令,将会在安卓工程生成package.json文件,并生成node_modules文件夹,在node_modules下面会有react-native-svg的原生工程,该工程是RN依赖的三方原生库,安卓自己工程需要引入该三方库
npm init
npm install react-native
npm install react-native-svg
2.引入RN的三方原生库
在安卓工程的settings.gradle文件下面,新增
//RN图表原生库
include ':react-native-svg'
project(':react-native-svg').projectDir = new File(rootProject.projectDir, 'node_modules/react-native-svg/android')
在App的build.gradle引入RN自身的库和三方库,引入该库
//RN官方的支持RN和原生交互的库
implementation("com.facebook.react:hermes-android:0.81.5")
implementation("com.facebook.react:react-android:0.81.5")//RN三方原生库:图表
implementation project(':react-native-svg')
3.页面加入RN组件
在Activity里面加入:
//初始化SO
SoLoader.init(getActivity(), true);mReactInstanceManager = ReactInstanceManager.builder().setApplication(getActivity().getApplication()).setInitialLifecycleState(LifecycleState.RESUMED).setCurrentActivity(getActivity()).addPackage(new MainReactPackage()).addPackage(new CustomReactPackage()) // 添加你的 React Native package.addPackage(new SvgPackage()) // 添加你的 React Native package.setUseDeveloperSupport(false) // 是否启用开发者模式.setBundleAssetName("index.android.bundle") // 你的 bundle 文件名//.setJSBundleFile("file:///assets/index.android.bundle").build();// 2. 创建 ReactRootView 并加载 React 组件
mReactRootView = new ReactRootView(getActivity());// 传递初始参数给 React 组件(可选)
Bundle initialParams = new Bundle();
initialParams.putString("userId", "android_123");
initialParams.putInt("version", 100);
mReactRootView.startReactApplication(mReactInstanceManager,"MyComponent", // 必须与 React 端注册的组件名称一致initialParams
);// 3. 初始化通信模块(用于向 React 发送数据)
mReactDataModule = new ReactDataModule((ReactApplicationContext) mReactInstanceManager.getCurrentReactContext());// 4. 示例:通过按钮向 React 发送数据
mReactDataModule.sendToReact("Android 原生主动发送的数据", 1001);// 将按钮添加到布局(实际项目中建议用 XML 布局)
binding.ccvHomeLine.addView(mReactRootView);
新建数据交互文件ReactDataModule.Java
package com.trade.bb.model.react;import androidx.annotation.Nullable;import com.facebook.react.bridge.Arguments;
import com.facebook.react.bridge.Callback;
import com.facebook.react.bridge.ReactApplicationContext;
import com.facebook.react.bridge.ReactContextBaseJavaModule;
import com.facebook.react.bridge.ReactMethod;
import com.facebook.react.bridge.WritableMap;
import com.facebook.react.modules.core.DeviceEventManagerModule;
import com.xys.baselayer.logger.LogUtil;// 自定义原生模块
public class ReactDataModule extends ReactContextBaseJavaModule {private static final Class<ReactDataModule> TAG = ReactDataModule.class;private ReactApplicationContext reactContext;public ReactDataModule(ReactApplicationContext reactContext) {super(reactContext);this.reactContext = reactContext;}// 模块名称(React 端通过 NativeModules.AndroidCommModule 调用)@Overridepublic String getName() {return "AndroidCommModule";}// 向 React 发送事件(主动推送数据)public void sendToReact(String message, int code) {if (reactContext == null || !reactContext.hasActiveCatalystInstance()) {return;}WritableMap params = Arguments.createMap();params.putString("message", message);params.putInt("code", code);// 发送事件(事件名需与 React 端监听的一致)reactContext.getJSModule(DeviceEventManagerModule.RCTDeviceEventEmitter.class).emit("NativeToReactEvent", params);}// 接收 React 发送的数据(供 React 调用)@ReactMethodpublic void receiveFromReact(String message, int code, Callback callback) {// 处理 React 传递的数据String result = "已收到 React 数据:" + message + "(状态码:" + code + ")";LogUtil.e(TAG,"receiveFromReact:"+"已收到 React 数据:" + message + "(状态码:" + code + ")");// 回调返回结果给 Reactcallback.invoke(result);}
}
新建交互代理CustomReactPackage.java
package com.trade.bb.model.react;import com.facebook.react.ReactPackage;
import com.facebook.react.bridge.NativeModule;
import com.facebook.react.bridge.ReactApplicationContext;
import com.facebook.react.uimanager.ViewManager;
import java.util.ArrayList;
import java.util.Collections;
import java.util.List;public class CustomReactPackage implements ReactPackage {@Overridepublic List<NativeModule> createNativeModules(ReactApplicationContext reactContext) {List<NativeModule> modules = new ArrayList<>();// 注册自定义通信模块modules.add(new ReactDataModule(reactContext));return modules;}@Overridepublic List<ViewManager> createViewManagers(ReactApplicationContext reactContext) {return Collections.emptyList(); // 不注册自定义视图}
}
在gradle.properties文件里配置RN支持最新的架构模式
#RN配置:是否才有新架构
newArchEnabled=true
hermesEnabled=true
异常处理:引入的react-native-svg的build.gradle文件修改,有2处,在isNewArchitectureEnabled判断的地方,不要采用新架构的支持,不然会报错
if (isNewArchitectureEnabled()) {apply plugin: "com.facebook.react"
}sourceSets.main {java {if (!isNewArchitectureEnabled()) {srcDirs += ["src/paper/java",]}}
}
修改后:
if (isNewArchitectureEnabled()) {//apply plugin: "com.facebook.react"
}sourceSets.main {java {if (isNewArchitectureEnabled()) {srcDirs += ["src/paper/java",]}}
}
OK,完成!
三.报错汇总
1.RN找不到com.facebook.react’
A problem occurred evaluating project ‘:react-native-svg’. > Plugin with id ‘com.facebook.react’ not found.
react-native-svg库的报错,不用引入com.facebook.react的,注释掉即可
if (isNewArchitectureEnabled()) {//apply plugin: "com.facebook.react"
}
2.找不到RNSVGCircle
IllegalViewOperationException: No ViewManager found for class RNSVGCircle
确认在初始化的时候加入了SvgPackage
mReactInstanceManager = ReactInstanceManager.builder().setApplication(getActivity().getApplication()).setInitialLifecycleState(LifecycleState.RESUMED).setCurrentActivity(getActivity()).addPackage(new MainReactPackage()).addPackage(new CustomReactPackage()) // 添加你的 React Native package.addPackage(new SvgPackage()) // 添加你的 React Native package.setUseDeveloperSupport(false) // 是否启用开发者模式.setBundleAssetName("index.android.bundle") // 你的 bundle 文件名//.setJSBundleFile("file:///assets/index.android.bundle").build();
3.找不到SafeAreaContextPackage
/Users/haijun/Documents/soft/develop/ReactNativeProjects/RNDemo3/android/app/build/generated/autolinking/src/main/java/com/facebook/react/PackageList.java:14: 错误: 程序包com.th3rdwave.safeareacontext不存在
import com.th3rdwave.safeareacontext.SafeAreaContextPackage;
com.th3rdwave.safeareacontext 对应的 npm 包是 react-native-safe-area-context,需要先安装它:
npm install react-native-safe-area-context --save
4.“MyComponent” has not been registered,组件没有注册
{ [Invariant Violation: “MyComponent” has not been registered. This can happen if:
* Metro (the local dev server) is run from the wrong folder. Check if Metro is running, stop it and restart it in the current project.
* A module failed to load due to an error andAppRegistry.registerComponentwasn’t called.] name: ‘Invariant Violation’, framesToPop: 1 }
2025-10-31 18:05:53.210 9562-9661 AndroidRuntime com.trade.bb E FATAL EXCEPTION: mqt_native_modules (Ask Gemini)
Process: com.trade.bb, PID: 9562
com.facebook.react.common.JavascriptException: Invariant Violation: “MyComponent” has not been registered. This can happen if:
* Metro (the local dev server) is run from the wrong folder. Check if Metro is running, stop it and restart it in the current project.
* A module failed to load due to an error andAppRegistry.registerComponentwasn’t called., stack:
查询RN里的组件名称是否对应上,组件名称为“MyComponent”,需要下面下面个的对应上:
安卓的Activity
mReactRootView.startReactApplication(mReactInstanceManager,"MyComponent", // 必须与 React 端注册的组件名称一致initialParams);
RN的index.js
import { AppRegistry } from 'react-native';
import App from './App';
import { name as appName } from './app.json';AppRegistry.registerComponent(appName, () => App);
RN的app.json
{"name": "MyComponent","displayName": "MyComponent"
}
5.ReactInstanceManager.createReactContext 不支持
java.lang.UnsupportedOperationException: ReactInstanceManager.createReactContext is unsupported.
在最新的RN的库0.82.1上面,已经禁用了这种调用方式,但是没有确定的说明新的调用方式,先用上一个版本库0.81.5
6.Initial lifecycle state was not set
Initial lifecycle state was not set
或
AppState’ could not be found. Verify that a module by this name is registered in the native binary.
ReactInstanceManager初始化的时候加入下面代码
.setInitialLifecycleState(LifecycleState.RESUMED)