C++实现单层时间轮
概念
时间轮(Time Wheel)是一种高效的定时任务调度算法,核心思想是通过模拟 “时钟轮盘” 的结构,批量管理大量定时任务,降低任务添加、删除和触发的时间复杂度。它广泛应用于需要处理高并发定时任务的场景(如网络框架的超时管理、分布式系统的定时任务调度等)。
(来源豆包)
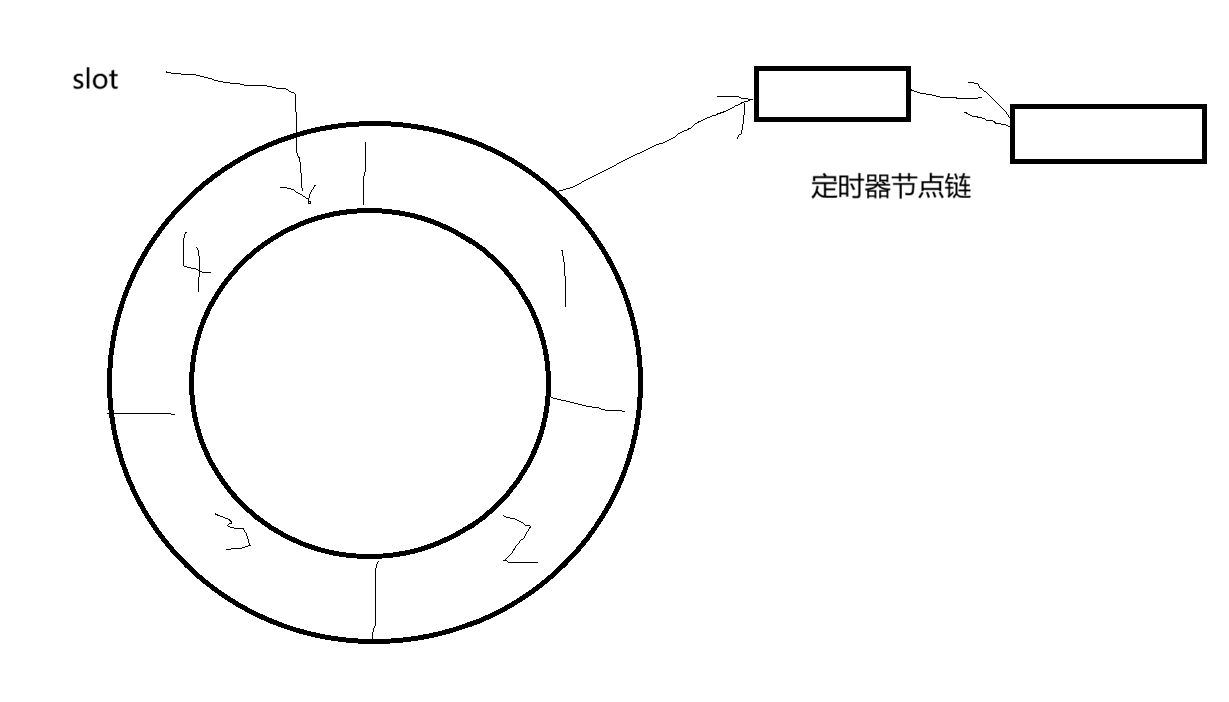
大概就是这样一个结构,每个槽位(slot)对应一个时间间隔,然后中心有指针指向当前对应的槽位,每过一个时间间隔就移动,触发对应槽位上的定时器节点链上的所有到期任务。
核心组件
1. 槽位(Slot)
时间轮被分为固定数量的槽位
每个槽位对应一个时间段
槽位内用链表存储到期时间相同的任务
2. Tick
时间轮的最小时间单位
每个tick,时间轮指针前进一格
current_tick记录当前时间轮的位置
3. 指针
指向当前正在处理的槽位,每经过tick时间就移动到下一个槽位。
工作流程
(太概念的我也说不清楚,直入代码主题吧!)
- 当添加一个定时任务(延迟时间为delay),计算他应该放在的槽位index=(now_ptr_index+delay/ sum(slot))
- 中心指针每过t秒移动一格子,到达一个槽位的时候,触发挂在上面的所有任务列表(如果有重复任务就执行后重新计算对应挂载的位置)
代码
首先引入任务节点,形状应该是一个单向链表,里面挂载要触发的任务,使用function来管理回调函数,智能指针来管理指向下一位。
// 时间轮任务节点
struct TimerTask{uint64_t id;uint64_t expire_time; //到期时间std::function<void()> callback;std::shared_ptr<TimerTask> next;TimerTask(uint64_t task_id,uint64_t e_time,std::function<void()> cb):id(task_id),expire_time(e_time),callback(std::move(cb)),next(nullptr){}
};
然后开始搭起时间轮的类结构,初始化一下需要的内容,为了线程安全,这里使用原子类来标记时间轮的状态,如下面代码注释解释
// 时间轮实现
class TimeWheel{
public:TimeWheel():wheel(WHEEL_SIZE),current_tick(0),next_task_id(1),running(false){}~TimeWheel() {;}// 获取当前活跃任务数量size_t get_active_task_count() const {return task_map.size();}// 获取当前tickuint64_t get_current_tick() const {return current_tick;}
private:static const int WHEEL_SIZE = 256;// 时间轮槽数static const int TICK_MS = 10; //每个TICK的毫秒数std::vector<std::shared_ptr<TimerTask>> wheel; // 时间轮槽位uint64_t current_tick;uint64_t next_task_id;std::atomic<bool> running; // 运行状态std::thread worker_thread; // 工作线程};
有了基础的属性之后,我们就要来考虑下一步了,我们需要启动时间轮,说到启动,那就应该有一个关闭,那就先来完成这一部分:
启动的时候要修改running的状态,然后启用工作线程;关闭同理,如果线程正在执行,就等待他执行完。
下一步看到loop函数空空可能就要去补充函数了,但是我们没有任何任务呢,所以下一步先去完成增加任务的相关函数。
~TimeWheel() {stop();}// 启动void start(){if(!running.load()){running.store(true);worker_thread = std::thread(&TimeWheel::worker_loop,this);std::cout<<" timewheel start "<<std::endl;}}// 停止void stop(){if(running.load()){running.store(false);if(worker_thread.joinable()){worker_thread.join();}std::cout<<" timewheel stop"<<std::endl;}}// 工作线程函数void worker_loop(){}补充了任务添加和取消任务的函数,由于取消任务是使用task_id ,所以再引入一个umap来做id和任务的映射,取消的时候注销他的回调函数就行了,不必真的来调整任务链表的结构。
// 添加定时任务uint64_t add_timer(uint32_t delay_ms,std::function<void()> callback){uint64_t expire_tick = current_tick + (delay_ms/TICK_MS) ;uint64_t task_id = next_task_id++;auto task =std::make_shared<TimerTask>(task_id,expire_tick,std::move(callback));//计算槽位int slot = expire_tick % WHEEL_SIZE;// 插入对应槽位的任务链表头task->next = wheel[slot];wheel[slot] =task;task_map[task_id] = task;return task_id;}//取消定时任务bool cancel_timer(uint64_t task_id){auto it=task_map.find(task_id);if(it!=task_map.end()){it->second->callback= nullptr;task_map.erase(it);return true;}return false;}然后就看回loop了,但是想想loop里面在做什么,其实只是根据时间来走step而已,所以我们要先完成step的部分,来到一个槽位的时候去执行应该执行的任务,然后重新注册没有过期的任务。
// 推进一个tickvoid step(){int slot = current_tick % WHEEL_SIZE;auto& head = wheel[slot];// 处理所有任务auto current =head;head = nullptr;while(current){auto next=current->next;// 任务到期就执行,否则就重新插回if(current->expire_time<=current_tick){if(current->callback){try{current->callback();}catch(const std::exception& e){std::cerr<<"Timer task exception : "<<e.what()<<std::endl;}}task_map.erase(current->id);}else{int new_slot = current->expire_time%WHEEL_SIZE;current->next =wheel[new_slot];wheel[new_slot]=current;}current=next;}current_tick++;}最后再完成我们的最后一块拼图:LOOP。对于这个函数我们只要获取时间、计算要走多少个tick,然后调用STEP就可以了。
uint64_t get_current_time_ms(){auto now = std::chrono::steady_clock::now();auto duration = now.time_since_epoch();return std::chrono::duration_cast<std::chrono::milliseconds>(duration).count();}// 工作线程函数void worker_loop(){uint64_t last_time =get_current_time_ms();while(running.load()){uint64_t current_time = get_current_time_ms();uint64_t elapsed = current_time-last_time;uint64_t ticks_to_advance = elapsed / TICK_MS;for(uint64_t i=0;i<ticks_to_advance;++i){step();}last_time = current_time;std::this_thread::sleep_for(std::chrono::milliseconds(1));}}然后补充一点main函数里面的测试语句:
int main()
{TimeWheel timer_wheel;std::cout << "=== Time Wheel Demo ===" << std::endl;// 启动时间轮timer_wheel.start();// 给时间轮一点时间启动std::this_thread::sleep_for(std::chrono::milliseconds(100));// 添加一些测试任务std::cout << "Adding timer tasks..." << std::endl;// 1秒后执行的任务auto task1 = timer_wheel.add_timer(1000, []() {std::cout << "任务1执行: 1秒定时器触发!" << std::endl;});// 2秒后执行的任务auto task2 = timer_wheel.add_timer(2000, []() {std::cout << "任务2执行: 2秒定时器触发!" << std::endl;});// 3秒后执行的任务auto task3 = timer_wheel.add_timer(3000, []() {std::cout << "任务3执行: 3秒定时器触发!" << std::endl;});// 500毫秒后执行的任务timer_wheel.add_timer(500, []() {std::cout << "任务4执行: 500毫秒定时器触发!" << std::endl;});std::cout << "当前活跃任务数: " << timer_wheel.get_active_task_count() << std::endl;// 等待2.5秒std::this_thread::sleep_for(std::chrono::milliseconds(2500));// 取消第3个任务std::cout << "取消任务3..." << std::endl;timer_wheel.cancel_timer(task3);std::cout << "当前活跃任务数: " << timer_wheel.get_active_task_count() << std::endl;// 再等待2秒std::this_thread::sleep_for(std::chrono::seconds(2));// 停止时间轮timer_wheel.stop();std::cout << "演示结束" << std::endl;return 0;
}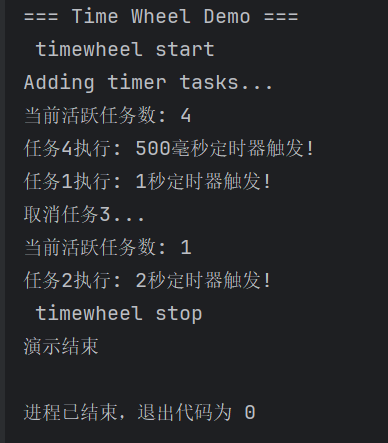
如图顺利完成测试,那么节说明就到这里了,如果有什么问题随时可以留言给我,😘。