Chainlit + FasiAPI+ LlamaIndex 实现RAG(一)
Chainlit是一个开源的Python库,专门用于简化语言模型应用的开发和部署。它帮助开发者快速创建AI应用,例如聊天机器人,并且可以在短时间内开发出类似于ChatGPT的用户界面。可以Llama Index等框架无缝集成,本文章将介绍使用chainlit继承llamindex来打造私有化知识数据库,实现数据文件的RAG
Chainlit 的基本安装和使用
使用python安装 pip install chainlit
安装完成,项目下新建一个文件夹rag_system,文件夹下新建一个文件ui.py,里面写入最基本的代码
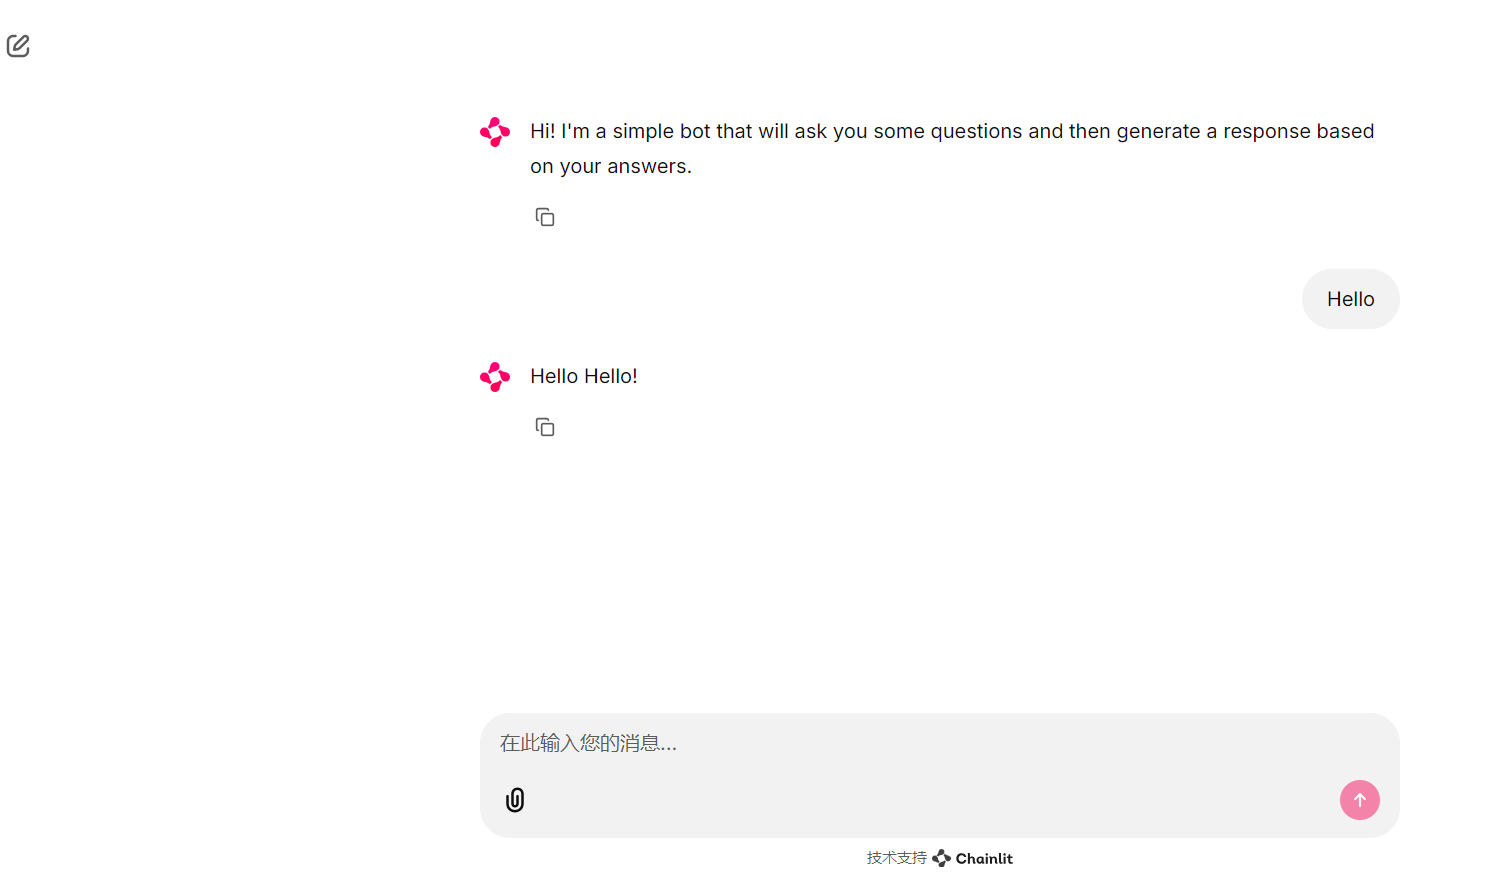
@cl.on_chat_start
async def start():await cl.Message(content="Hi! I'm a simple bot that will ask you some questions and then generate a response based on your answers.").send()
@cl.on_message
async def main(message: cl.Message):await cl.Message(content="Hello " + message.content + "!").send()
下面和FastAPI集成,文件夹rag_system下新建app.py
from fastapi import FastAPI
from chainlit.utils import mount_chainlitapp = FastAPI()@app.get("/app")
def read_main():return {"message": "Hello World from main app"}mount_chainlit(app=app, target="my_cl_app.py", path="/chainlit")if __name__ == '__main__':import uvicornuvicorn.run(app, host="0.0.0.0", port=8000)
右键运行 app.py, 访问http://localhost:8000/chainlit/就能看到chainlit UI 就会启动了
接下来设置Authentication。新建环境变量文件.env,使用这个命令chainlit create-secret
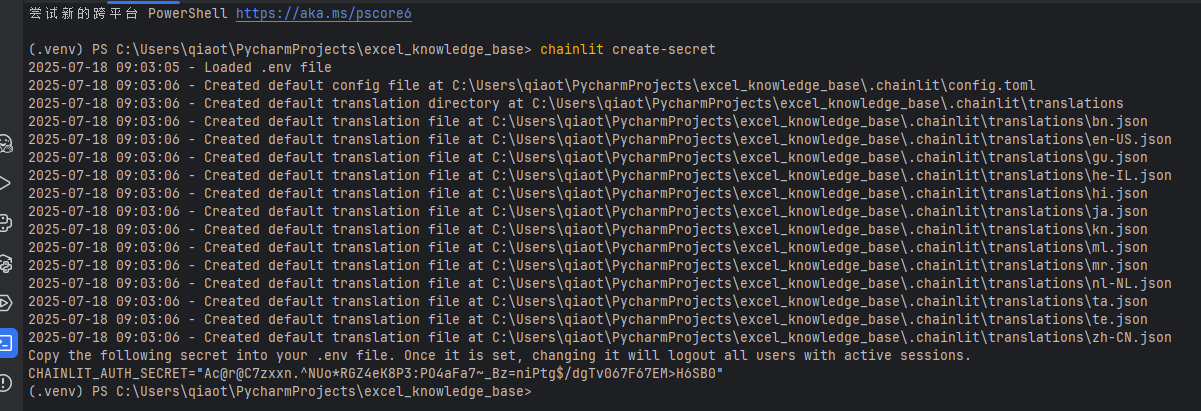
会生成一个CHAINLIT_AUTH_SECRET=*****,把这一个键值对放在环境变量的文件里面。
在ui.py下加上如下代码,如果有需要可以对接第三方的认证代码
@cl.password_auth_callback
def auth_callback(username: str, password: str):# Fetch the user matching username from your database# and compare the hashed password with the value stored in the databaseif (username, password) == ("admin", "admin"):return cl.User(identifier="admin", metadata={"role": "admin", "provider": "credentials"})else:return None
设置chat_profile,这里的profile就是说你的和大模型问答基于什么模型,或者知识库。
@cl.set_chat_profiles
async def chat_profile(current_user: cl.User):profiles = [cl.ChatProfile(name="default",markdown_description=f"大模型对话",icon="https://picsum.photos/200"),cl.ChatProfile(name="GPT-3.5",markdown_description="The underlying LLM model is **GPT-3.5**.",icon="https://picsum.photos/200",),cl.ChatProfile(name="GPT-4",markdown_description="The underlying LLM model is **GPT-4**.",icon="https://picsum.photos/250",)]return profile
在app.py里面添加加载环境变量的代码load_dotenv(),这个需要安装包pip install python-dotenv
from dotenv import load_dotenve
load_dotenv()
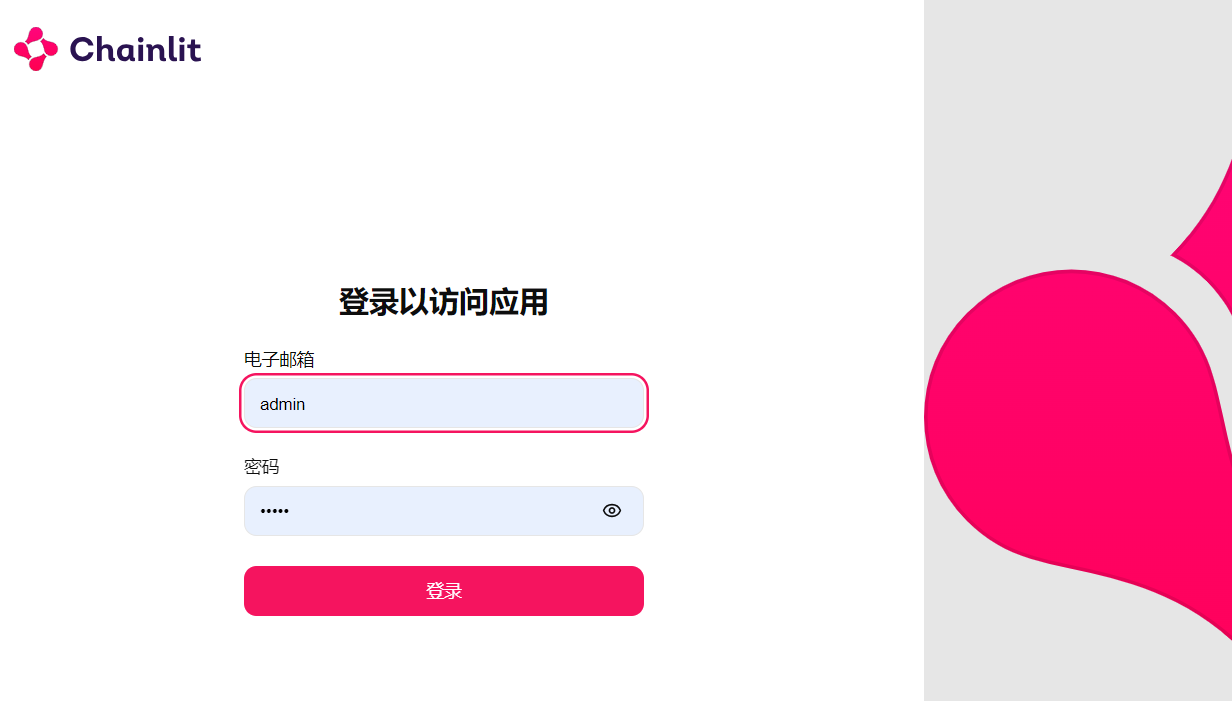
启动后就可以看到登录界面
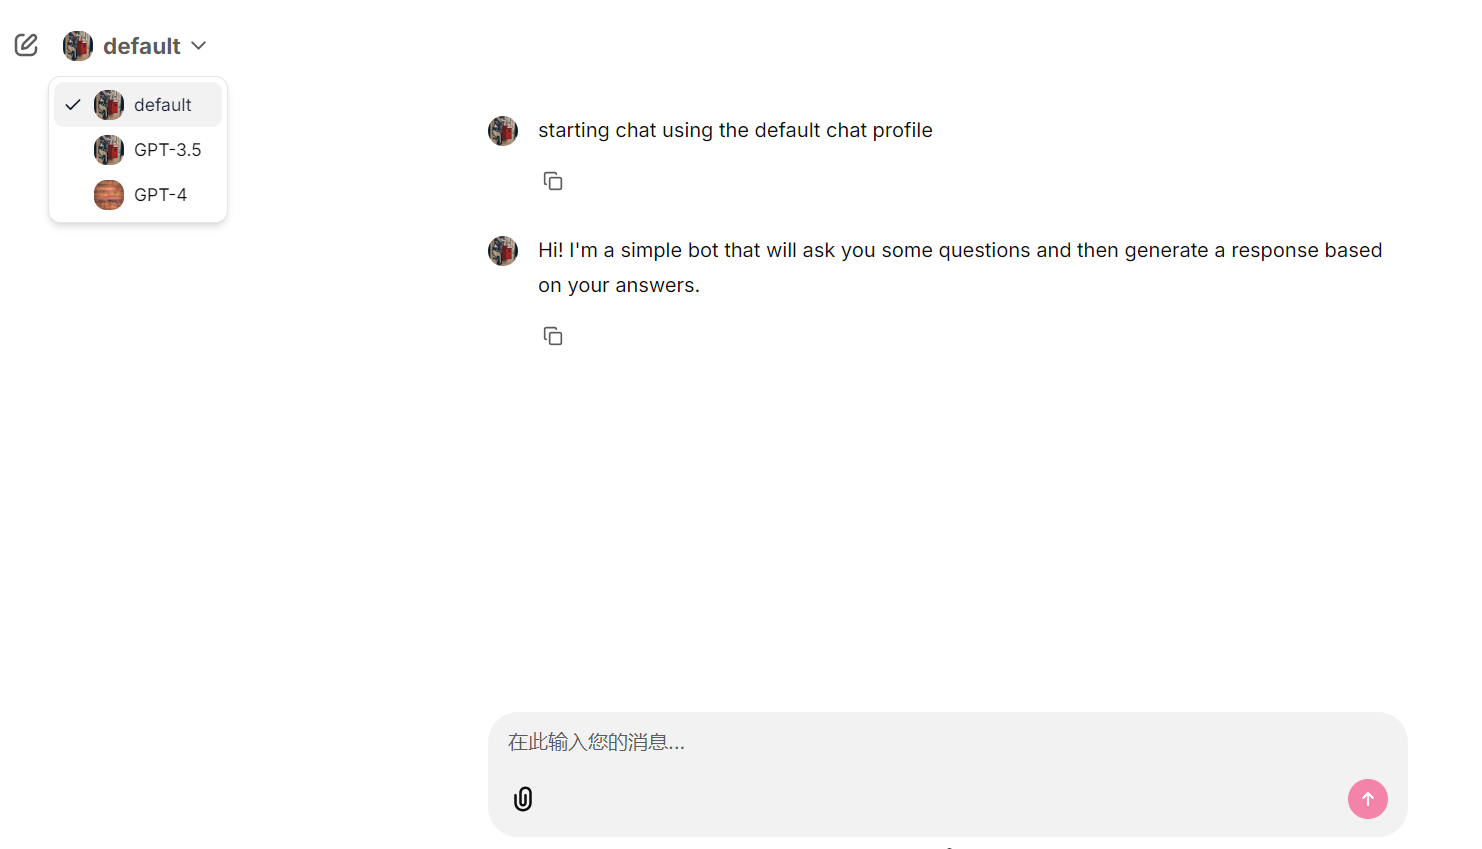
登录之后在最左侧就可以看到设置的profile
下面实现一个简单的和大模型对话的功能
新建utils/settings.py实现大模型的初始化,这里使llama_index的的调用大模型的方法。
import os
from typing import Dictfrom llama_index.llms.deepseek import DeepSeek
from llama_index.llms.openai import OpenAI as LLamaIndexOpenAIchat_profile_engines = ['GPT','DeepSeek']#  需要支持新的模型参考如下格式添加即可
from llama_index.llms.openai.utils import ALL_AVAILABLE_MODELS, CHAT_MODELS
gemini: Dict[str, int] = {"gemini-2.5-flash": 1048576,
}
ALL_AVAILABLE_MODELS.update(gemini)
CHAT_MODELS.update(gemini)def get_profile_llm(chat_profile):if chat_profile == 'GPT':return llama_index_llm(model='gpt-4.1-nano')elif chat_profile == 'DeepSeek':return deepseek_llm()else:return llama_index_llm()# -------------------------LLM Settings  End-------------------------def llama_index_llm(model=os.getenv("LLM_MODEL_NAME")):return LLamaIndexOpenAI(model=model,api_key=os.getenv("API_KEY"),api_base=os.getenv("API_BASE_URL"),)
def deepseek_llm(**kwargs):return DeepSeek(model='deepseek-chat',api_key=os.getenv("API_KEY"),api_base=os.getenv("API_BASE_URL"))
我这里使用的API_KEY和API_BASE_URL是那种中转的API,所以base_url写的都是一样的。
Chainlit和大模型的对话就是使用SimpleChatEngine,去生成一个chat_engine,然后使用chainlit的方法cl.make_async(chat_engine.stream_chat)(message.content)去获取和大模型对话的结果,然后再使用流式输出,输出大模型返回结果。
根据llama_index的SimpleChatEngine.from_defaults()源码可知,我们需要设置一个全局的llm = llm or Settings.llm
class SimpleChatEngine(BaseChatEngine):"""Simple Chat Engine.Have a conversation with the LLM.This does not make use of a knowledge base."""def __init__(self,llm: LLM,memory: BaseMemory,prefix_messages: List[ChatMessage],callback_manager: Optional[CallbackManager] = None,) -> None:self._llm = llmself._memory = memoryself._prefix_messages = prefix_messagesself.callback_manager = callback_manager or CallbackManager([])@classmethoddef from_defaults(cls,chat_history: Optional[List[ChatMessage]] = None,memory: Optional[BaseMemory] = None,memory_cls: Type[BaseMemory] = ChatMemoryBuffer,system_prompt: Optional[str] = None,prefix_messages: Optional[List[ChatMessage]] = None,llm: Optional[LLM] = None,**kwargs: Any,) -> "SimpleChatEngine":"""Initialize a SimpleChatEngine from default parameters."""llm = llm or Settings.llm
所以更改ui.py中的代码
@cl.on_chat_start
async def start():chat_profile = cl.user_session.get("chat_profile")await cl.Message(content=f"目前的模型是{chat_profile}").send()llm = get_profile_llm(chat_profile)# 设置llama_index 全局llmSettings.llm = llmmemory = ChatMemoryBuffer.from_defaults(token_limit=1024)chat_engine = SimpleChatEngine.from_defaults(chat_memory=memory)cl.user_session.set("chat_engine", chat_engine)@cl.on_message
async def main(message: cl.Message):msg = cl.Message(content="", author="Assistant")# 获取enginechat_engine = cl.user_session.get("chat_engine")res = await cl.make_async(chat_engine.stream_chat)(message.content)# 流式界面输出for token in res.response_gen:await msg.stream_token(token)@cl.password_auth_callback
def auth_callback(username: str, password: str):# Fetch the user matching username from your database# and compare the hashed password with the value stored in the databaseif (username, password) == ("admin", "admin"):return cl.User(identifier="admin", metadata={"role": "admin", "provider": "credentials"})else:return None@cl.set_chat_profiles
async def chat_profile(current_user: cl.User):profiles = [cl.ChatProfile(name='default',markdown_description=f"和大模型对话",icon="https://picsum.photos/200",)]for profile in chat_profile_engines:profiles.append(cl.ChatProfile(name=profile,markdown_description=f"The underlying LLM model is **{profile}**.",icon="https://picsum.photos/200",))return profiles
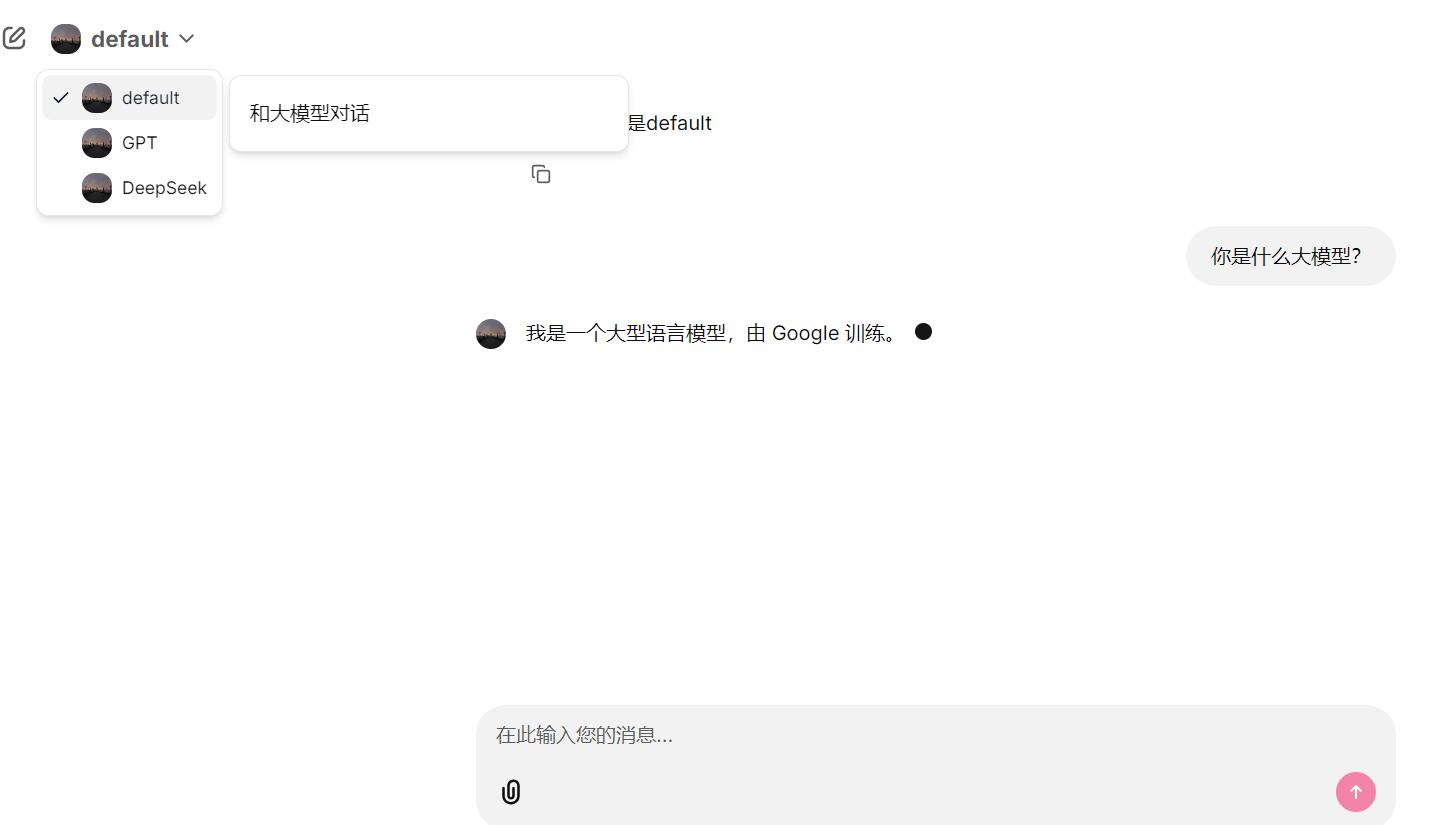
至此,重新运行项目,就能看到有三个chat profile是,分别可以切换chat-gpt,gemini,和deepseek, default的是Gemini
和大模型对话这一步已经完成了,让我们接着实现一下聊天数据的持久化