【实习总结】C++ 通过pugi::xml库对xml文件进行操作
目录
相关背景
pugi::xml简概
将配置信息写入xml文件
读取xml文件中的配置信息
相关背景
当我们需要将某些配置信息写入项目目录下的xml文件,或者再程序启动时,加载项目下已有的的配置信息(.xml),此时,我们可以使用轻量级C++ XML处理库pugi::xml,来对xml文件进行操作。
pugi::xml简概
首先我们通过如下链接,下载pugi::xml源码的压缩包
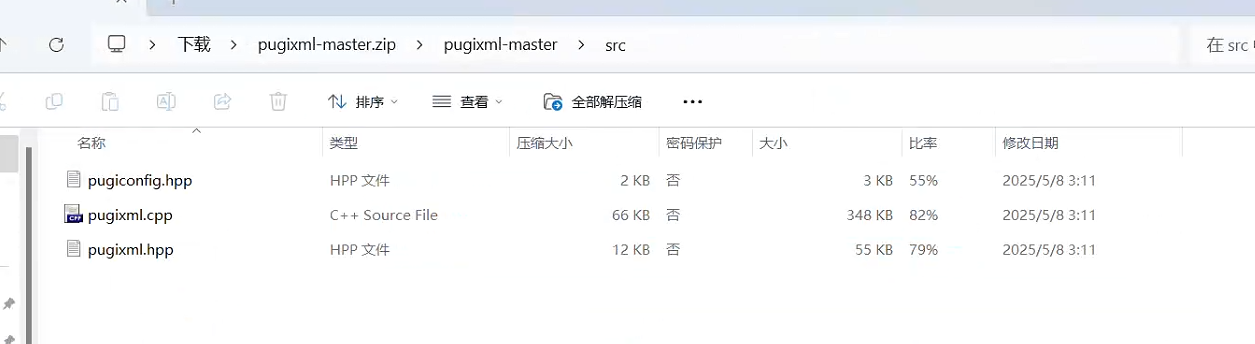
项目首页 - pugixml:Light-weight, simple and fast XML parser for C++ with XPath support - GitCode![]() https://gitcode.com/gh_mirrors/pu/pugixml/?utm_source=artical_gitcode&index=top&type=card&webUrl&isLogin=1解压之后,将源码中的src目录下,三个文件,复制到工程中即可,三个文件如下:
https://gitcode.com/gh_mirrors/pu/pugixml/?utm_source=artical_gitcode&index=top&type=card&webUrl&isLogin=1解压之后,将源码中的src目录下,三个文件,复制到工程中即可,三个文件如下:
在项目中引用头文件即可正常使用
#include "pugixml.hpp "
常见节点类型
pugi::node_element // 普通元素节点 <element>
pugi::node_text // 文本节点
pugi::node_comment // 注释节点 <!-- comment -->
pugi::node_declaration // XML 声明 <?xml ...?>
pugi::node_cdata // CDATA 节点 <![CDATA[...]]>
pugi::node_pi // 处理指令 <?target data?>
prepend_child() // 在 最前面 添加子节点
append_child() //在 最后面 添加子节点
将配置信息写入xml文件
1、构建存放xml文件的文件路径
CString csXmlFile;
/*获取项目根目录路径*/
/*#define GetProjectRootMgr() ((CEditorApp*)AfxGetApp())->m_prjRootMgr*/
csXmlFile = GetProjectRootMgr().getProjectDir().c_str();
/*拼接xml配置文件名*/
csXmlFile += L"\\BACnetMSTPServerConfig.xml";
这里需要注意的是 GetProjectRootMgr()是我们事先定义好的宏,用来获取项目的根目录,详情如下:
#define GetProjectRootMgr() ((CEditorApp*)AfxGetApp())->m_prjRootMgr
这个宏定义各部分的作用如下:
AfxGetApp() :获取当前MFC应用程序实例
(CEditorApp*) :将应用程序实例转换为具体的 CEditorApp 类型
->m_prjRootMgr :访问该应用程序对象的项目根管理器成员变量
2、创建xml文档对象,并尝试加载现有的配置文件
/*创建xml文档对象*/
pugi::xml_document xmlDoc;
/*尝试加载现有的配置文件*/
pugi::xml_parse_result result = xmlDoc.load_file(csXmlFile);
xmlDoc.load_file尝试加载我们所构建的文件路径对应的文件,它的返回值是xml_parse_result,这是pugixml库中用于表示XML解析结果的结构体。
struct xml_parse_result
{xml_parse_status status;    // 解析状态ptrdiff_t offset;          // 错误位置偏移量xml_encoding encoding;     // 文档编码// 转换为bool,检查是否成功operator bool() const;// 获取错误描述const char* description() const;
};
这个结构体的成员含义如下:
1)status(解析状态)
xml_parse_status是一个枚举类型,常用值如下:
| 状态值 | 含义 |
|---|---|
| status_ok | 解析成功 |
| status_file_not_found | 文件未找到 |
| status_io_error | I/O错误 |
| status_out_of_memory | 内存不足 |
2)offset(错误位置)
当解析失败时,指示错误发生的字节偏移量,成功时通常为0。
3、进行判断,如果不存在现有的配置文件,则添加xml声明头,并创建根节点
if (result.status == pugi::status_file_not_found) {/*添加声明*/pugi::xml_node declNode = xmlDoc.prepend_child(pugi::node_declaration);declNode.append_attribute(L"version").set_value(L"1.0");declNode.append_attribute(L"encoding").set_value(L"UTF-8");xmlDoc.root().append_child(L"Bacnet_MSTP_Server");xmlDoc.save_file(csXmlFile);result = xmlDoc.load_file(csXmlFile);
}
当配置文件不存在时 :
-
添加XML声明头: <?xml version="1.0" encoding="UTF-8"?>
-
创建根节点 <Bacnet_MSTP_Server>
-
保存文件并重新加载
4、检查xml是否加载成功
if (result.status != pugi::status_ok) {return -1;
}
成功则继续
5、清理和重置配置节点(可根据需求)
xml_node nodeBACnetMFTP, nodeServerMFTP;nodeBACnetMFTP = xmlDoc.root().child(L"Bacnet_MSTP_Server");nodeBACnetMFTP.remove_attributes();nodeBACnetMFTP.remove_children();nodeBACnetMFTP.append_attribute(L"Enabled").set_value(1);-
获取Bacnet_MSTP_Server根节点
-
清除所有现有属性和子节点
-
添加 Enabled="1" 属性
效果如下:
![]()
6、服务器配置信息保存(添加子节点)
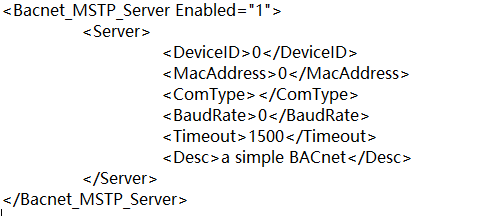
/*nodeBACnetMFTP在第五步的时候有赋值*/nodeServerMFTP = nodeBACnetMFTP.append_child(L"Server");// 创建子节点而不是属性pugi::xml_node nodeDeviceID = nodeServerMFTP.append_child(L"DeviceID");nodeDeviceID.text().set(m_serverInfo.nDataBit);pugi::xml_node nodeMacAddress = nodeServerMFTP.append_child(L"MacAddress");nodeMacAddress.text().set(m_serverInfo.nMacAdd);pugi::xml_node nodeComType = nodeServerMFTP.append_child(L"ComType");nodeComType.text().set(m_serverInfo.wsConnectType.data());pugi::xml_node nodeBaudRate = nodeServerMFTP.append_child(L"BaudRate");nodeBaudRate.text().set(m_serverInfo.nBaud);pugi::xml_node nodeTimeout = nodeServerMFTP.append_child(L"Timeout");nodeTimeout.text().set(m_serverInfo.nTimeout);pugi::xml_node nodeDesc = nodeServerMFTP.append_child(L"Desc");if (m_serverInfo.bMSTP) {nodeDesc.text().set(L"MSTP Server");}else {nodeDesc.text().set(L"a simple BACnet");}效果如下:
7、保存文件
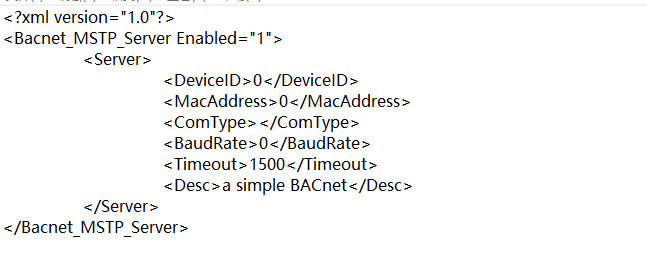
最后,将文件保存
unsigned int nFlag = pugi::format_indent | pugi::format_write_hex_char | pugi::format_save_file_text;
if (!xmlDoc.save_file(csXmlFile, L"\t")) {return -2;
}
return 0;-
设置XML格式化标志(缩进、十六进制字符、文本格式)
-
使用制表符缩进保存文件
-
保存失败返回 -2 ,成功返回 0
最终结果如下:
读取xml文件中的配置信息
1、构建xml文件路径
与写入xml文件一样,在读取之前需要先构建要读取的xml文件路径
CString csXmlFile;
csXmlFile = GetProjectRootMgr().getProjectDir().c_str();
csXmlFile += L"\\BACnetMSTPServerConfig.xml";
这里同样在项目目录下,构建完文件路径之后,与写入是不同的是,我们需要判断是否存在这个配置文件,如果不存在,则不需要读取加载了。
if (!PathFileExists(csXmlFile)) { return -1;
}
2、加载xml配置文件
如果xml配置文件已经存在,则创建文档对象,并尝试加载
pugi::xml_document xmlDoc;
pugi::xml_parse_result result = xmlDoc.load_file(csXmlFile, pugi::parse_default | pugi::parse_ws_pcdata);
if (result.status != pugi::status_ok) { return -2;
}-
pugi::parse_default
默认解析选项 ,包含:
- parse_cdata - 解析 CDATA 节点
- parse_escapes - 处理转义字符(如 < , > )
- parse_wconv_attribute - 属性值的空白字符转换
- parse_eol - 行尾字符标准化
-
pugi::parse_ws_pcdata
- 保留文本节点中的空白字符
- 默认情况下,pugi::xml 会忽略纯空白的文本节点
- 添加此选项后,空白字符(空格、制表符、换行符)会被保留
3、提取数据
根节点数据
获取根节点
pugi::xml_node nodeBACnet = xmlDoc.root().first_child();
if (!nodeBACnet) { return -3;
}
获取根节点属性
int nEnabled = 0;
m_listObjects.clear();
if (nodeBACnet) { nEnabled = nodeBACnet.attribute(L"Enabled").as_int();
根节点的子节点数据
解析服务器(Server)信息
pugi::xml_node nodeServer = nodeBACnet.child(L"Server");
m_serverInfo.wsName = nodeServer.attribute(L"Name").as_string();
当一个节点有很多子节点的话,我们可以通过循环
pugi::xml_node nodeObjects = nodeBACnet.child(L"Objects");
m_nNum = 0;
if (nodeObjects) {for (pugi::xml_node nodeObject : nodeObjects.children(L"Object")) {BACNETSERVER_OBJECT_INFO_T tempObjectInfo;tempObjectInfo.wsObjectName = nodeObject.attribute(L"Name").as_string();tempObjectInfo.wsDesc = nodeObject.attribute(L"Desc").as_string();tempObjectInfo.nType = nodeObject.attribute(L"Type").as_int();tempObjectInfo.nInstance = nodeObject.attribute(L"Instance").as_int();tempObjectInfo.wsAddr = nodeObject.attribute(L"Addr").as_string();tempObjectInfo.nUnits = nodeObject.attribute(L"Units").as_int();pugi::xml_node nodeMultistateText = nodeObject.child(L"MultistateText");if (nodeMultistateText) {for (pugi::xml_node nodeState : nodeMultistateText.children(L"State")){BACNETSERVER_MULTISTATETEXT_INFO_T stateInfo;stateInfo.nNumber = nodeState.attribute(L"Number").as_int();stateInfo.wsText = nodeState.text().as_string();tempObjectInfo.vecMultiStateText.emplace_back(stateInfo);}}m_nNum++;/*读取完一条,存储起来*/m_listObjects.emplace_back(tempObjectInfo);}
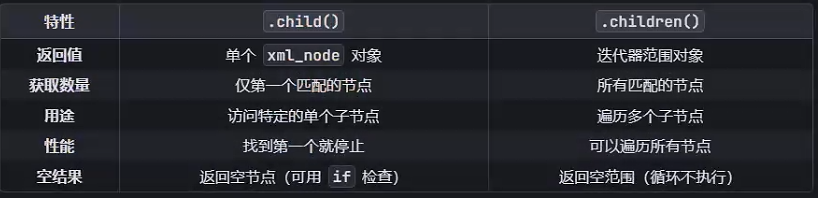
}这里要注意.child()和.children()的区别