Android Jetpack Compose开发纯自定义表盘【可用于体重,温度计等项目】
嗯,几天没写博客,又来了分享知识咯,博主也是菜鸡一个,有错误大家评论提出来,手下留情。
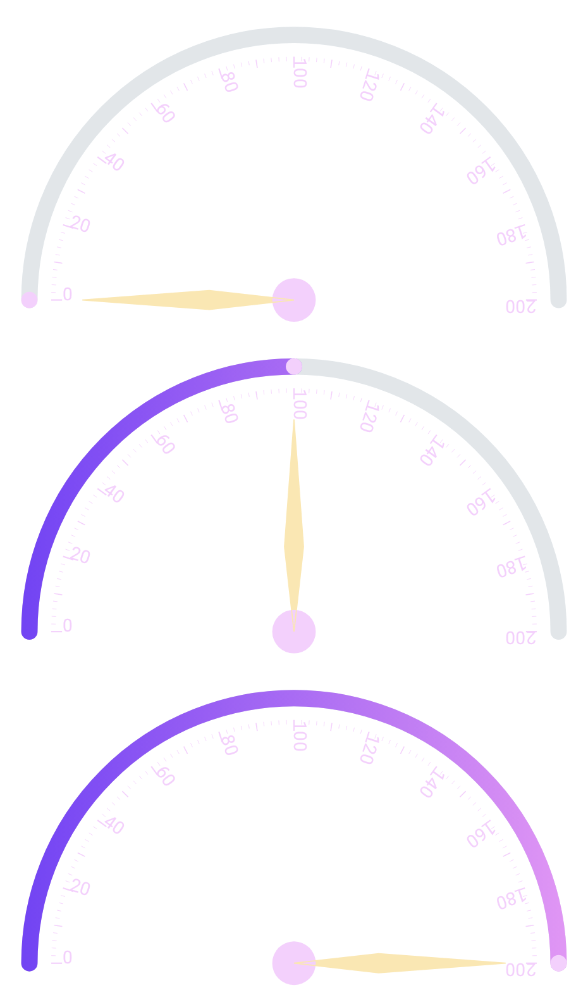
先上图:
开发环境:
Mac OS 15.0.1
Android Studio Jellyfish | 2023.3.1 Patch 2
当前程序环境
compileOptions {sourceCompatibility JavaVersion.VERSION_11targetCompatibility JavaVersion.VERSION_11}kotlinOptions {jvmTarget = '11'}packaging {resources {excludes += '/META-INF/{AL2.0,LGPL2.1}'}}// 跟下面俩条件挂钩 buildFeatures {compose truebuildConfig = true}// 可选 开启 viewBinding 视图绑定viewBinding {enabled = true}// 可选 开启 dataBindingdataBinding {enabled = true}composeOptions {kotlinCompilerExtensionVersion '1.5.1'}
废话不讲,直接给代码大家。
@Composable
fun WeightGauge(weight: Float,modifier: Modifier = Modifier
) {// 状态var centerX by remember { mutableStateOf(0f) }var centerY by remember { mutableStateOf(0f) }var radius by remember { mutableStateOf(0f) }// 计算角度 (0-180度)val angle = (weight / 100f) * 180fBox(modifier = modifier) {Canvas(modifier = Modifier.fillMaxSize()) {// 保存中心点和半径centerX = size.width / 2fcenterY = size.heightradius = min(size.width / 2f, size.height) * 0.9f// 绘制灰色背景弧drawArc(color = Color(0xFFE1E6EA),startAngle = 180f,sweepAngle = 180f,useCenter = false,topLeft = Offset(centerX - radius, centerY - radius),size = Size(radius * 2, radius * 2),style = Stroke(width = 30f, cap = StrokeCap.Round))// 绘制彩色进度弧【渐变颜色】val gradientBrush = Brush.horizontalGradient(colors = listOf(Color(0xFF7832FD), // 深紫色Color(0xFFF293FA), // 淡粉色// Color(0xFF81C784)  // 可选更多颜色))// 绘制彩色进度弧drawArc(brush = gradientBrush,startAngle = 180f,sweepAngle = angle,useCenter = false,topLeft = Offset(centerX - radius, centerY - radius),size = Size(radius * 2, radius * 2),style = Stroke(width = 30f, cap = StrokeCap.Round))// 绘制刻度线 - 钟表式刻度// 总共101个刻度(0-100)for (i in 0..100) {val tickAngle = 180f - (i.toFloat() / 100f) * 180f// 确定刻度类型: 长刻度(10的倍数)、中等刻度(5的倍数)、短刻度(其他)val tickType = when {i % 10 == 0 -> 0 // 长刻度i % 5 == 0 -> 1  // 中等刻度else -> 2         // 短刻度}// 根据刻度类型设置长度和宽度val tickLength = when (tickType) {0 -> 20f  // 长刻度1 -> 15f  // 中等刻度else -> 8f // 短刻度}val strokeWidth = when (tickType) {0 -> 2.5f  // 长刻度1 -> 1.8f  // 中等刻度else -> 1f // 短刻度}val startX =centerX + (radius - 40f) * cos(Math.toRadians(tickAngle.toDouble())).toFloat()val startY =centerY - (radius - 40f) * sin(Math.toRadians(tickAngle.toDouble())).toFloat()val endX =centerX + (radius - 40f - tickLength) * cos(Math.toRadians(tickAngle.toDouble())).toFloat()val endY =centerY - (radius - 40f - tickLength) * sin(Math.toRadians(tickAngle.toDouble())).toFloat()drawLine(color = Color(0xFFFBCEFF),  // 线条颜色start = Offset(startX, startY),end = Offset(endX, endY),strokeWidth = strokeWidth)// 只为10的倍数的刻度添加数值【 绘制文本数值 】if (i % 10 == 0) {val textX =centerX + (radius - 70f) * cos(Math.toRadians(tickAngle.toDouble())).toFloat()val textY =centerY - (radius - 70f) * sin(Math.toRadians(tickAngle.toDouble())).toFloat()rotate(180f - tickAngle, Offset(textX, textY)) {drawContext.canvas.nativeCanvas.drawText((i*2).toString(),  // 这个值是表盘数值textX,textY,android.graphics.Paint().apply {color = android.graphics.Color.parseColor("#FFFBCEFF")textSize = 12.sp.toPx()textAlign = android.graphics.Paint.Align.CENTER})}}}// 计算指针角度和末端点位置val pointerAngle = 180f - angleval radians = Math.toRadians(pointerAngle.toDouble())val pointerArcEndX = centerX + radius * cos(radians).toFloat()val pointerArcEndY = centerY - radius * sin(radians).toFloat()// 在指针末端绘制一个小圆点drawCircle(color = Color(0xFFFBCEFF),radius = 15f,center = Offset(pointerArcEndX, pointerArcEndY))// 绘制固定宽度的菱形指针// 计算指针的四个关键点val pointerLength = radius * 0.8f // 指针长度val pointerWidth = 35f // 指针最宽处宽度// 指针末端(靠近弧线的尖端)val tipX = centerX + pointerLength * cos(radians).toFloat()val tipY = centerY - pointerLength * sin(radians).toFloat()// 计算垂直于指针方向的单位向量val perpRadians = radians + PI / 2val perpCos = cos(perpRadians).toFloat()val perpSin = sin(perpRadians).toFloat()// 指针中部(最宽处)距离中心的比例val midRatio = 0.4fval midX = centerX + pointerLength * midRatio * cos(radians).toFloat()val midY = centerY - pointerLength * midRatio * sin(radians).toFloat()// 指针两侧的宽度点val halfWidth = pointerWidth / 2val side1X = midX + halfWidth * perpCosval side1Y = midY - halfWidth * perpSinval side2X = midX - halfWidth * perpCosval side2Y = midY + halfWidth * perpSin// 指针起点(中心圆处)val baseX = centerXval baseY = centerY// 创建菱形路径val diamondPath = Path().apply {moveTo(tipX, tipY) // 弧线端尖点lineTo(side1X, side1Y) // 一侧宽度点lineTo(baseX, baseY) // 中心端点lineTo(side2X, side2Y) // 另一侧宽度点close()}// 绘制菱形指针填充drawPath(path = diamondPath,color = Color(0xFFFEE7AC), // 浅粉色填充style = Fill)// 绘制中心圆drawCircle(color = Color(0xFFFBCEFF), // 浅粉色radius = 40f,center = Offset(centerX, centerY))// 绘制指针边框drawPath(path = diamondPath,color = Color(0xFFFEE7AC), // 边框色style = Stroke(width = 2f))}}
}
这个代码可以直接放到Jetpack Compose项目运行,大家根据需求更改,代码注释写的很清楚了,比如改变指针颜色,指针轮廓颜色,大中小刻度颜色、宽度,半圆弧度的渐变颜色,刻度文字,半圆最大值【(i*2).toString(), // 这个值是表盘数值】等
@Preview
@Composable
fun BodyWeightSelectionSetPagePreview() {// 创建可变的 weight 状态,初始值为 50fColumn(modifier = Modifier.fillMaxSize()) {WeightGauge(weight = 0f,  modifier = Modifier.height(200.dp))Spacer(modifier = Modifier.height(21.dp))WeightGauge(weight = 50f,  modifier = Modifier.height(200.dp))Spacer(modifier = Modifier.height(21.dp))WeightGauge(weight = 100f,  modifier = Modifier.height(200.dp))}
}
要是使用了mvvm模式,就这样// 获取状态
val weightValue by viewModel.weightValue.observeAsState(50f)
博主幸劳,转载记得标注原出处链接,支持原创。