【51单片机】4. 模块化编程与LCD1602Debug
1. 什么是模块化编程
传统编程会将所有函数放在main.c中,如果使用的模块多,一个文件内会有很多代码,不利于组织和管理
模块化编程则是将各个模块的代码放在不同的.c文件里,在.h文件里提供外部可调用函数声明,其他.c文件想使用其中的代码时,只需要#include "XXX.h"即可
模块化编程有助于极大提高代码可阅读性、可维护性和可移植性
2. 模块化编程框架
假如我们将延迟函数Delay模块化,则代码如下:
在Delay.c文件中:
void Delay(unsigned int ms)		//@11.0592MHz
{unsigned char i, j;while (ms){_nop_();i = 2;j = 199;do{while (--j);} while (--i);ms--;}
}
在Delay.h文件中
#ifndef __DELAY_H__
#define __DELAY_H__void Delay(unsigned int ms);#endif
在main.c中,就可以通过include来引用了:
#include "Delay.h"void main()
{Delay(100);
}
注意事项:
-
.c文件放函数和变量的定义 -
.h文件放可被外部调用的函数、变量的声明 -
任何自定义的变量和函数在调用前必须有定义或声明
-
使用到的自定义函数
.c文件必须添加到工程参与编译 -
使用到的
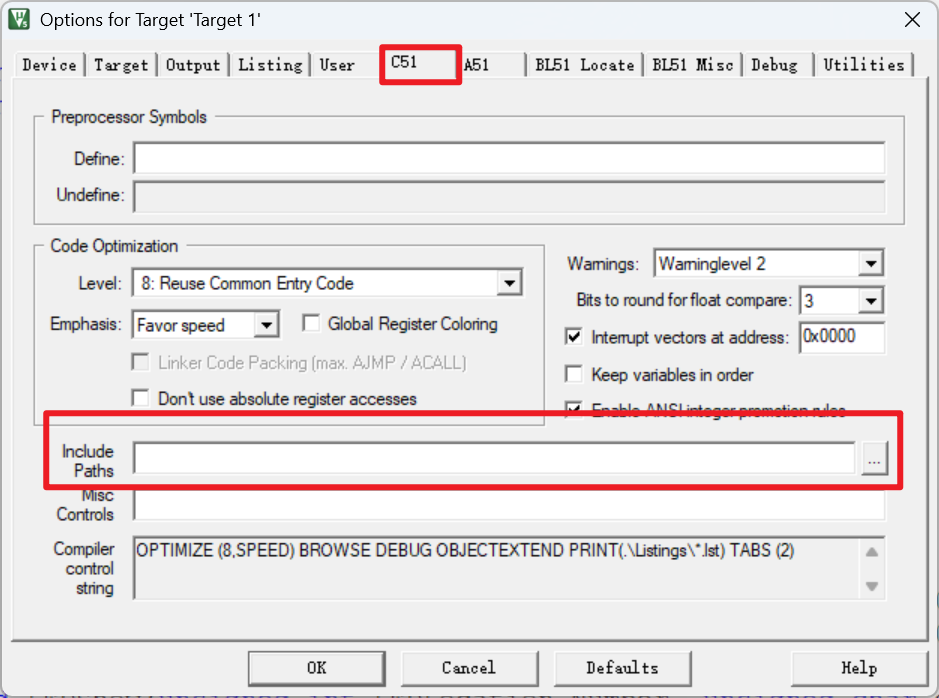
.h文件必须要放在编译器可寻找到的地方(工程文件夹根目录、安装目录、自定义) -
自定义如下:
3. 常见预编译及意义
C语言预编译以#开头,其作用是在真正编译开始之前对代码做一些处理(预编译)
#include <REGX52.H>:将REGX52.H文件内容搬至此处
#ifndef __XX_H__:如果没有定义__XX_H__
#endif:与#ifndef和#if匹配,组成“括号”
#define ABC:定义ABC
#define PI 3.14:定义PI,并将PI替换为3.14
其他类似的包括#ifdef, #if, #else, #elif, #undef等等
4. 模块化编程调整
我原本写了一串代码如下,现需要将其模块化
#include <REGX52.H>
#include <INTRINS.H>void Delay(unsigned int ms)		//@11.0592MHz
{unsigned char i, j;while (ms){_nop_();i = 2;j = 199;do{while (--j);} while (--i);ms--;}
}int LEDNum[] = {0x3F, 0x06, 0x5B, 0x4F, 0x66, 0x6D, 0x7D, 0x07, 0x7F, 0x6F};
int LEDDPNum[] = {0xBF, 0x86, 0xDB, 0xcF, 0xE6, 0xED, 0xFD, 0x87, 0xFF, 0xEF};void LEDShow(unsigned int LEDLocation,Number, unsigned char dp)
{switch(LEDLocation){case 1: P2_4 = 1; P2_3 = 1; P2_2 = 1; break;case 2: P2_4 = 1; P2_3 = 1; P2_2 = 0; break;case 3: P2_4 = 1; P2_3 = 0; P2_2 = 1; break;case 4: P2_4 = 1; P2_3 = 0; P2_2 = 0; break;case 5: P2_4 = 0; P2_3 = 1; P2_2 = 1; break;case 6: P2_4 = 0; P2_3 = 1; P2_2 = 0; break;case 7: P2_4 = 0; P2_3 = 0; P2_2 = 1; break;case 8: P2_4 = 0; P2_3 = 0; P2_2 = 0; break;}if (dp)P0 = LEDDPNum[Number];else	P0 = LEDNum[Number];Delay(1);P0 = 0x00;
}void birthday1()
{LEDShow(1,2,0);LEDShow(2,0,0);LEDShow(3,2,0);LEDShow(4,5,1);LEDShow(5,0,0);LEDShow(6,6,1);LEDShow(7,0,0);LEDShow(8,7,0);
}void birthday2()
{LEDShow(1,2,0);LEDShow(2,0,0);LEDShow(3,2,0);LEDShow(4,5,1);LEDShow(5,0,0);LEDShow(6,6,1);LEDShow(7,0,0);LEDShow(8,8,0);
}void birthday3()
{LEDShow(1,2,0);LEDShow(2,0,0);LEDShow(3,2,0);LEDShow(4,5,1);LEDShow(5,0,0);LEDShow(6,6,1);LEDShow(7,1,0);LEDShow(8,1,0);
}int main(void)
{unsigned char showNum = 0;while (1){if (P3_1 == 1){Delay(20);if (showNum == 3) showNum = 0;while (P3_1 == 1){if (showNum == 0) birthday1();else if (showNum == 1) birthday2();else birthday3();}showNum++;Delay(20);}}
}
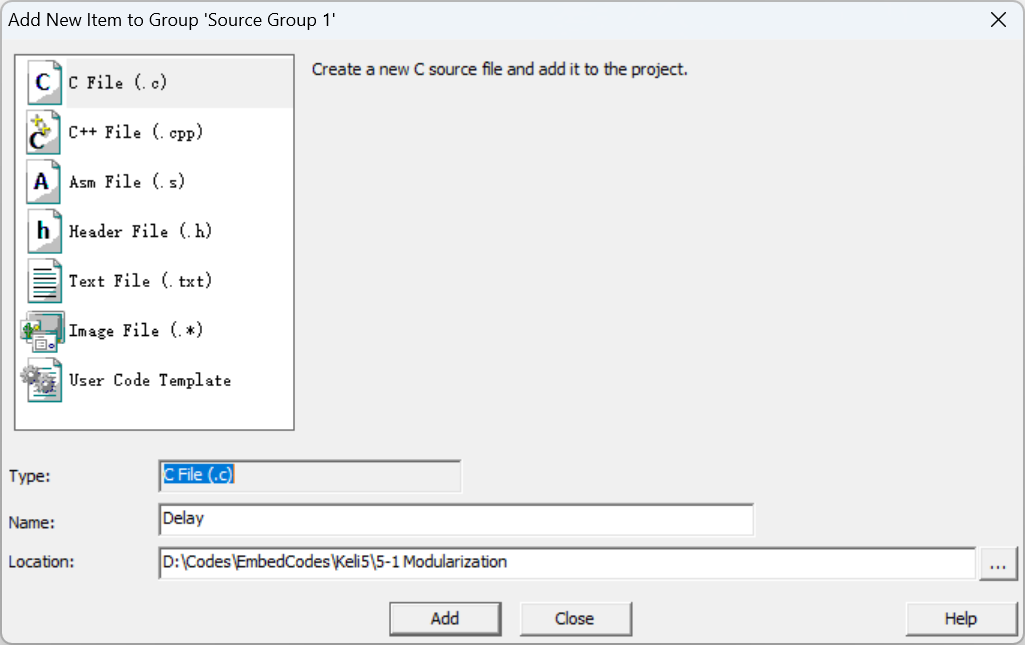
第一步:右键【Source Group 1】→【Add New Item to Source Group 1…】,创建Delay.c
第二步:将Delay函数放入Delay.h中:
#include <INTRINS.H>void Delay(unsigned int ms)		//@11.0592MHz
{unsigned char i, j;while (ms){_nop_();i = 2;j = 199;do{while (--j);} while (--i);ms--;}
}
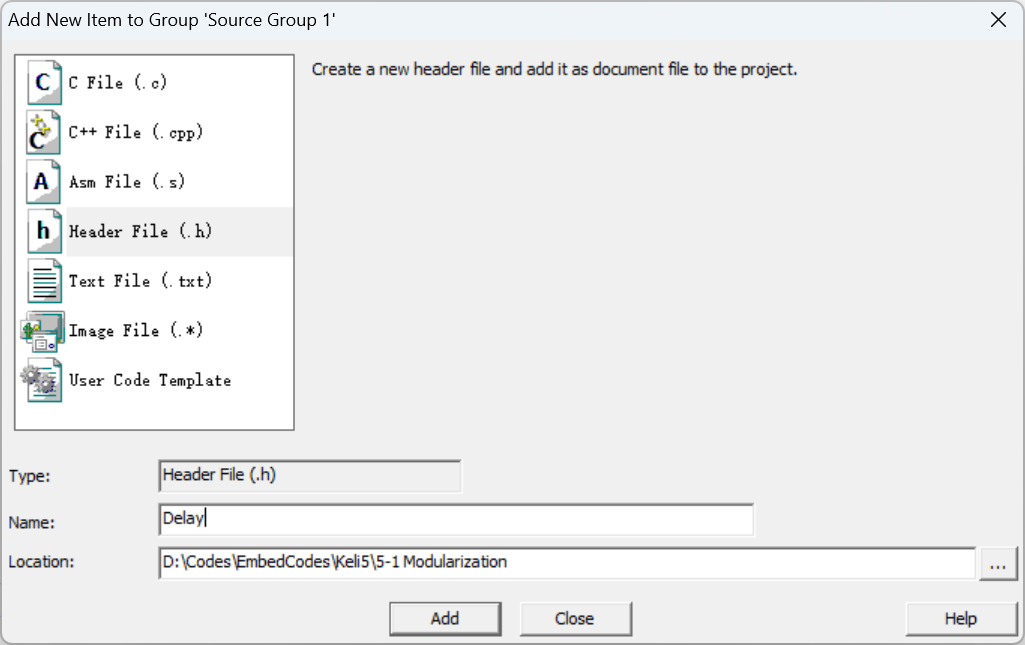
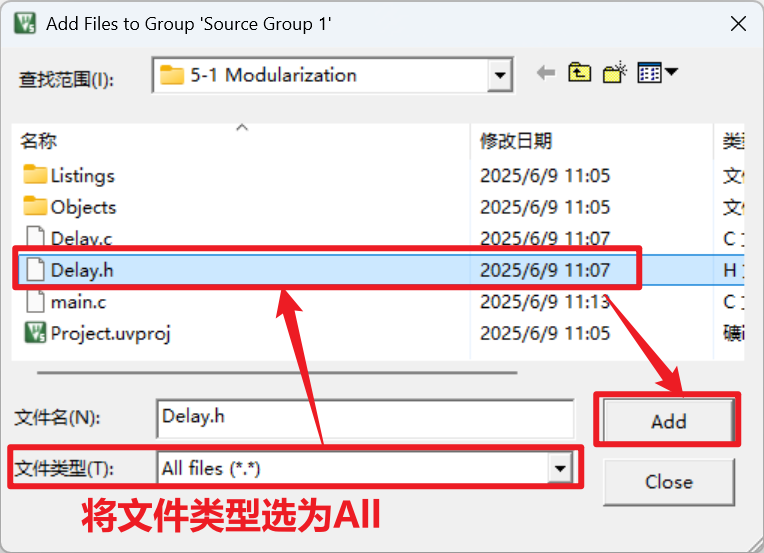
第三步:同第一步创建出Delay.h
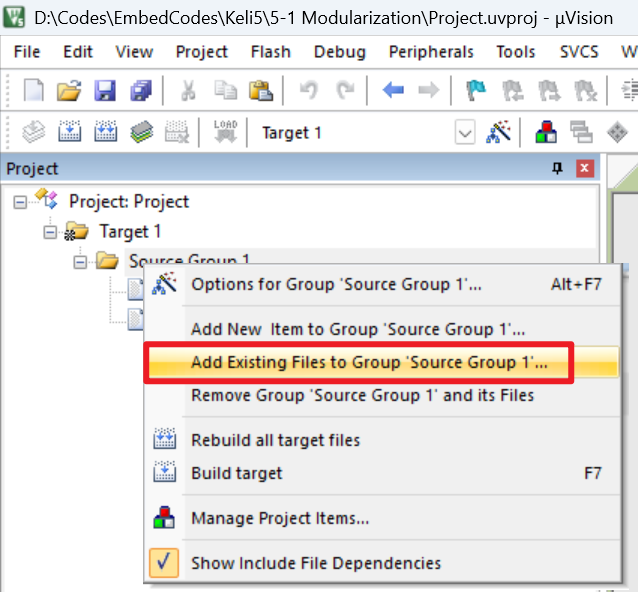
创建完后发现虽然打开了Delay.h的窗口,但是左侧栏中没有显示Delay.h,需要如下操作显示:
写代码:
#ifndef __DELAY_H__ // 如果没定义Delay.h
#define __DELAY_H__ // 定义Delay.hvoid Delay(unsigned int ms);#endif // 结束if
第四步:照葫芦画瓢将LEDShow的相关函数搬过来创建LEDShow.c和LEDShow.h
LEDShow.c如下:
#include <REGX52.H>
#include "Delay.h"int LEDNum[] = {0x3F, 0x06, 0x5B, 0x4F, 0x66, 0x6D, 0x7D, 0x07, 0x7F, 0x6F};
int LEDDPNum[] = {0xBF, 0x86, 0xDB, 0xcF, 0xE6, 0xED, 0xFD, 0x87, 0xFF, 0xEF};void LEDShow(unsigned int LEDLocation,Number, unsigned char dp)
{switch(LEDLocation){case 1: P2_4 = 1; P2_3 = 1; P2_2 = 1; break;case 2: P2_4 = 1; P2_3 = 1; P2_2 = 0; break;case 3: P2_4 = 1; P2_3 = 0; P2_2 = 1; break;case 4: P2_4 = 1; P2_3 = 0; P2_2 = 0; break;case 5: P2_4 = 0; P2_3 = 1; P2_2 = 1; break;case 6: P2_4 = 0; P2_3 = 1; P2_2 = 0; break;case 7: P2_4 = 0; P2_3 = 0; P2_2 = 1; break;case 8: P2_4 = 0; P2_3 = 0; P2_2 = 0; break;}if (dp)P0 = LEDDPNum[Number];else	P0 = LEDNum[Number];Delay(1);P0 = 0x00;
}
LEDShow.h如下:
#ifndef __LEDSHOW_H__
#define __LEDSHOW_H__void LEDShow(unsigned int LEDLocation,Number, unsigned char dp);#endif
第五步:修改主函数,此时可以将Delay和LEDShow相关头文件引入,删去原本相关的代码,精简如下:
#include <REGX52.H>
#include "Delay.h"
#include "LEDShow.h"void birthday1()
{LEDShow(1,2,0);LEDShow(2,0,0);LEDShow(3,2,0);LEDShow(4,5,1);LEDShow(5,0,0);LEDShow(6,6,1);LEDShow(7,0,0);LEDShow(8,7,0);
}void birthday2()
{LEDShow(1,2,0);LEDShow(2,0,0);LEDShow(3,2,0);LEDShow(4,5,1);LEDShow(5,0,0);LEDShow(6,6,1);LEDShow(7,0,0);LEDShow(8,8,0);
}void birthday3()
{LEDShow(1,2,0);LEDShow(2,0,0);LEDShow(3,2,0);LEDShow(4,5,1);LEDShow(5,0,0);LEDShow(6,6,1);LEDShow(7,1,0);LEDShow(8,1,0);
}int main(void)
{unsigned char showNum = 0;while (1){if (P3_1 == 1){Delay(20);if (showNum == 3) showNum = 0;while (P3_1 == 1){if (showNum == 0) birthday1();else if (showNum == 1) birthday2();else birthday3();}showNum++;Delay(20);}}
}
编译烧录后效果如下:
5. LCD1602 Debug
江科大提供有LCD1602的头文件,可以直接导入到项目里(这部分目前还没学),导入后如下:

其次需要将LCD1602插到板子右上角(可以看结果图插的位置,插反会报警,报警记得断开电源),然后看电路图:
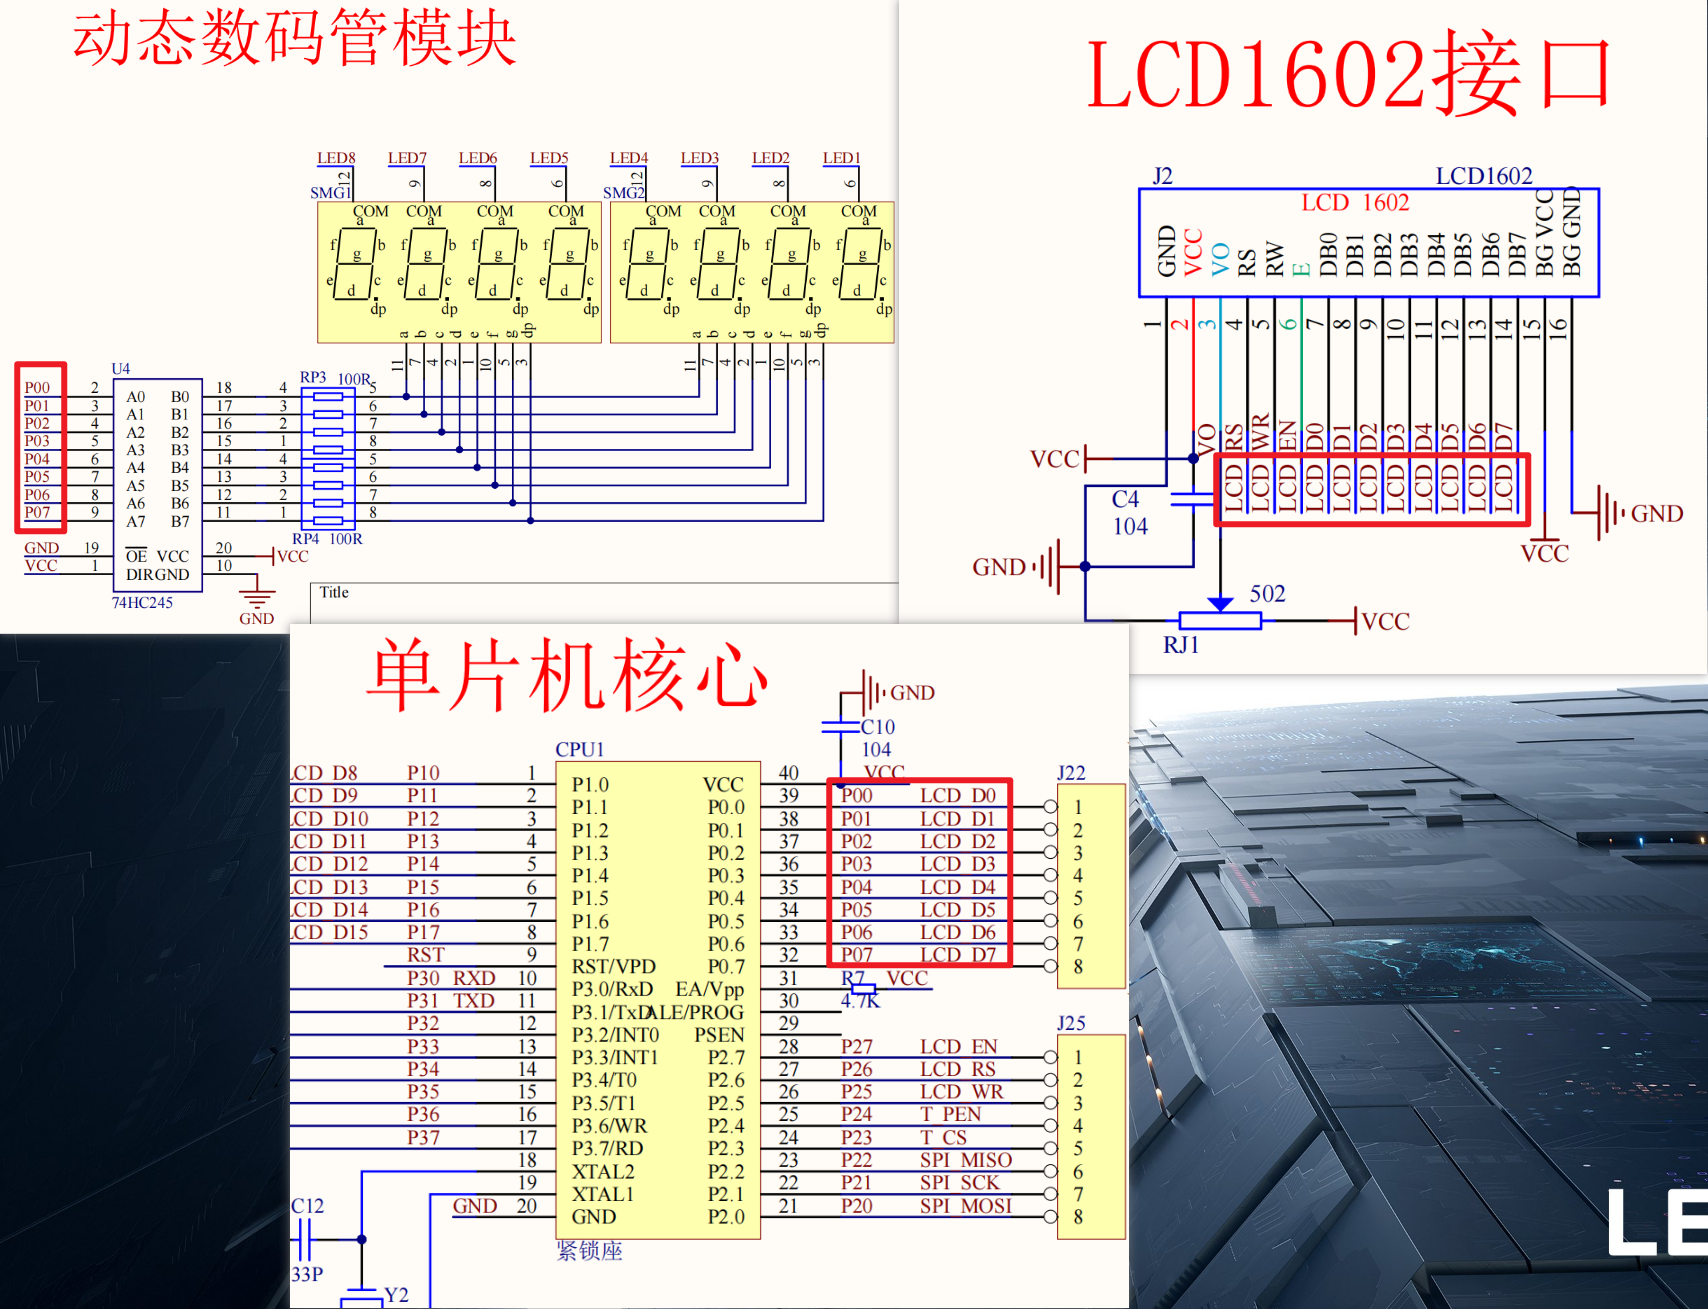
动态数码管模块&LCD1602&单片机核心的接口有些冲突,所以会导致插了LCD1602后动态数码管乱闪的问题。
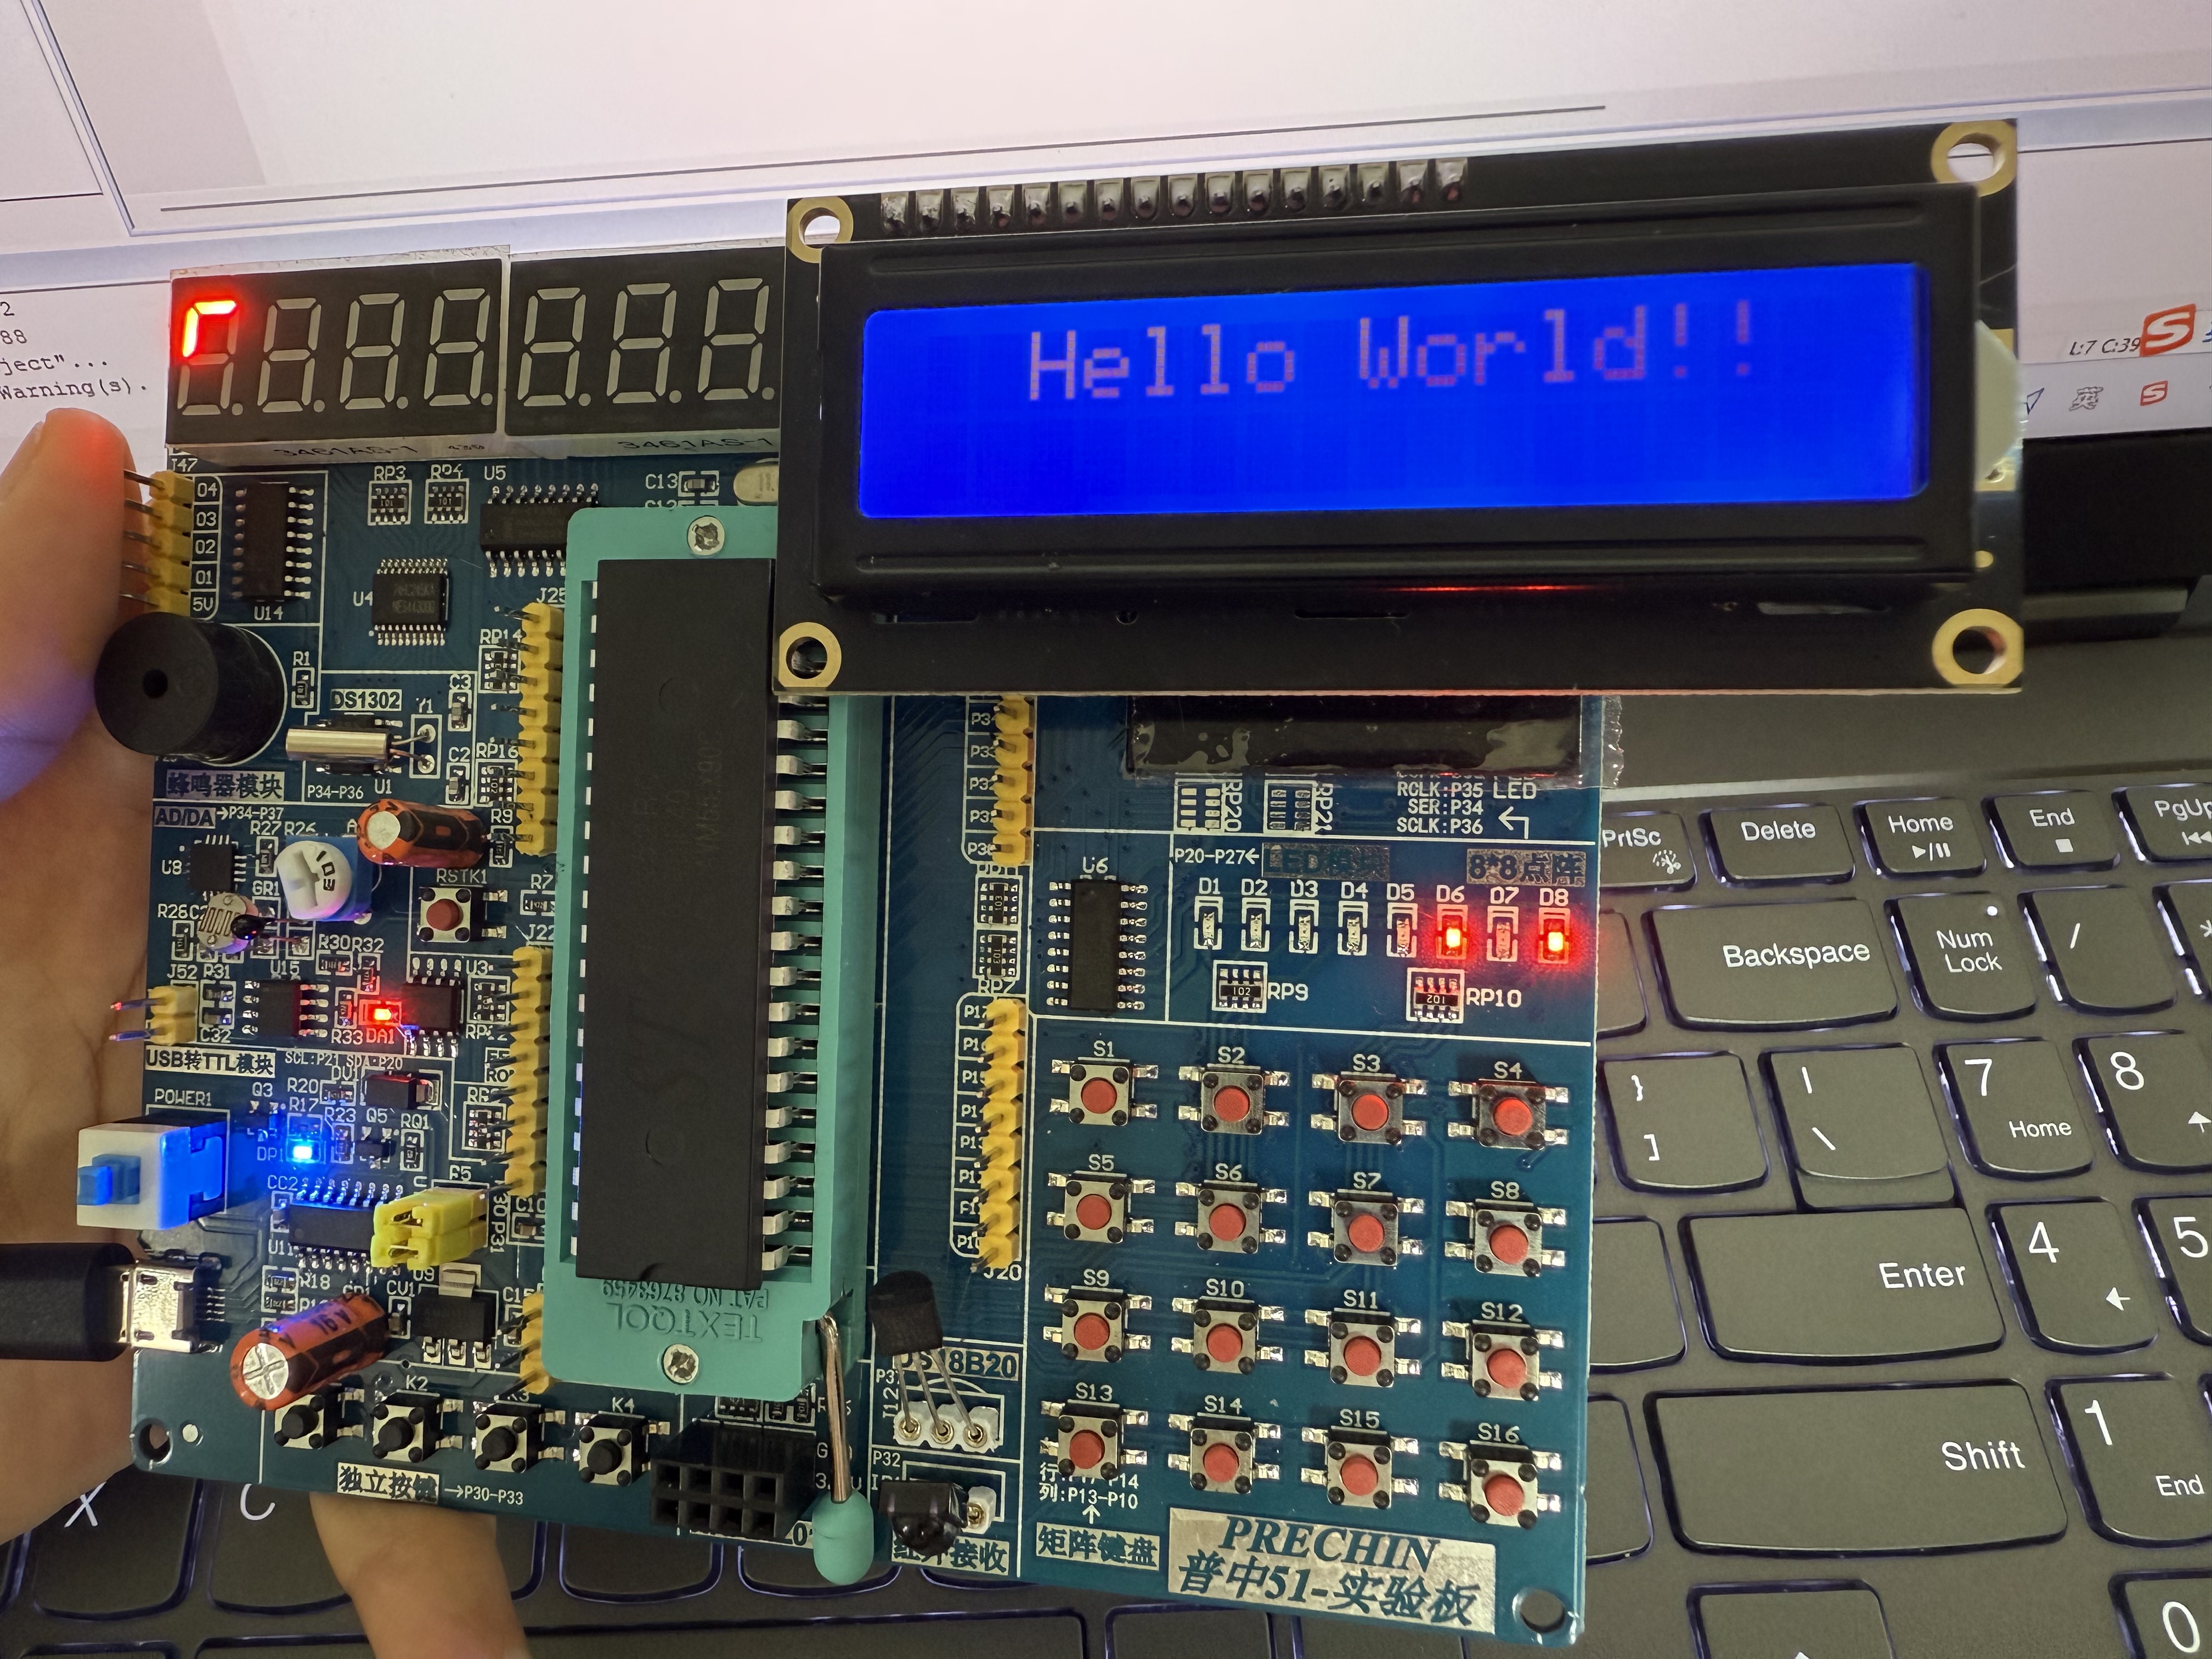
之后就可以根据提供的函数,在LCD1602上打印想要的东西了,具体的注释在.c文件里边有,我这里打印了一个字符串:
#include "LCD1602.h"void main()
{LCD_Init();// LCD_ShowChar(1,1,'A');LCD_ShowString(1,3,"Hello World!!");while (1){}
}
效果如下:
附:编译器无法识别中文
可以通过修改编码模式解决:
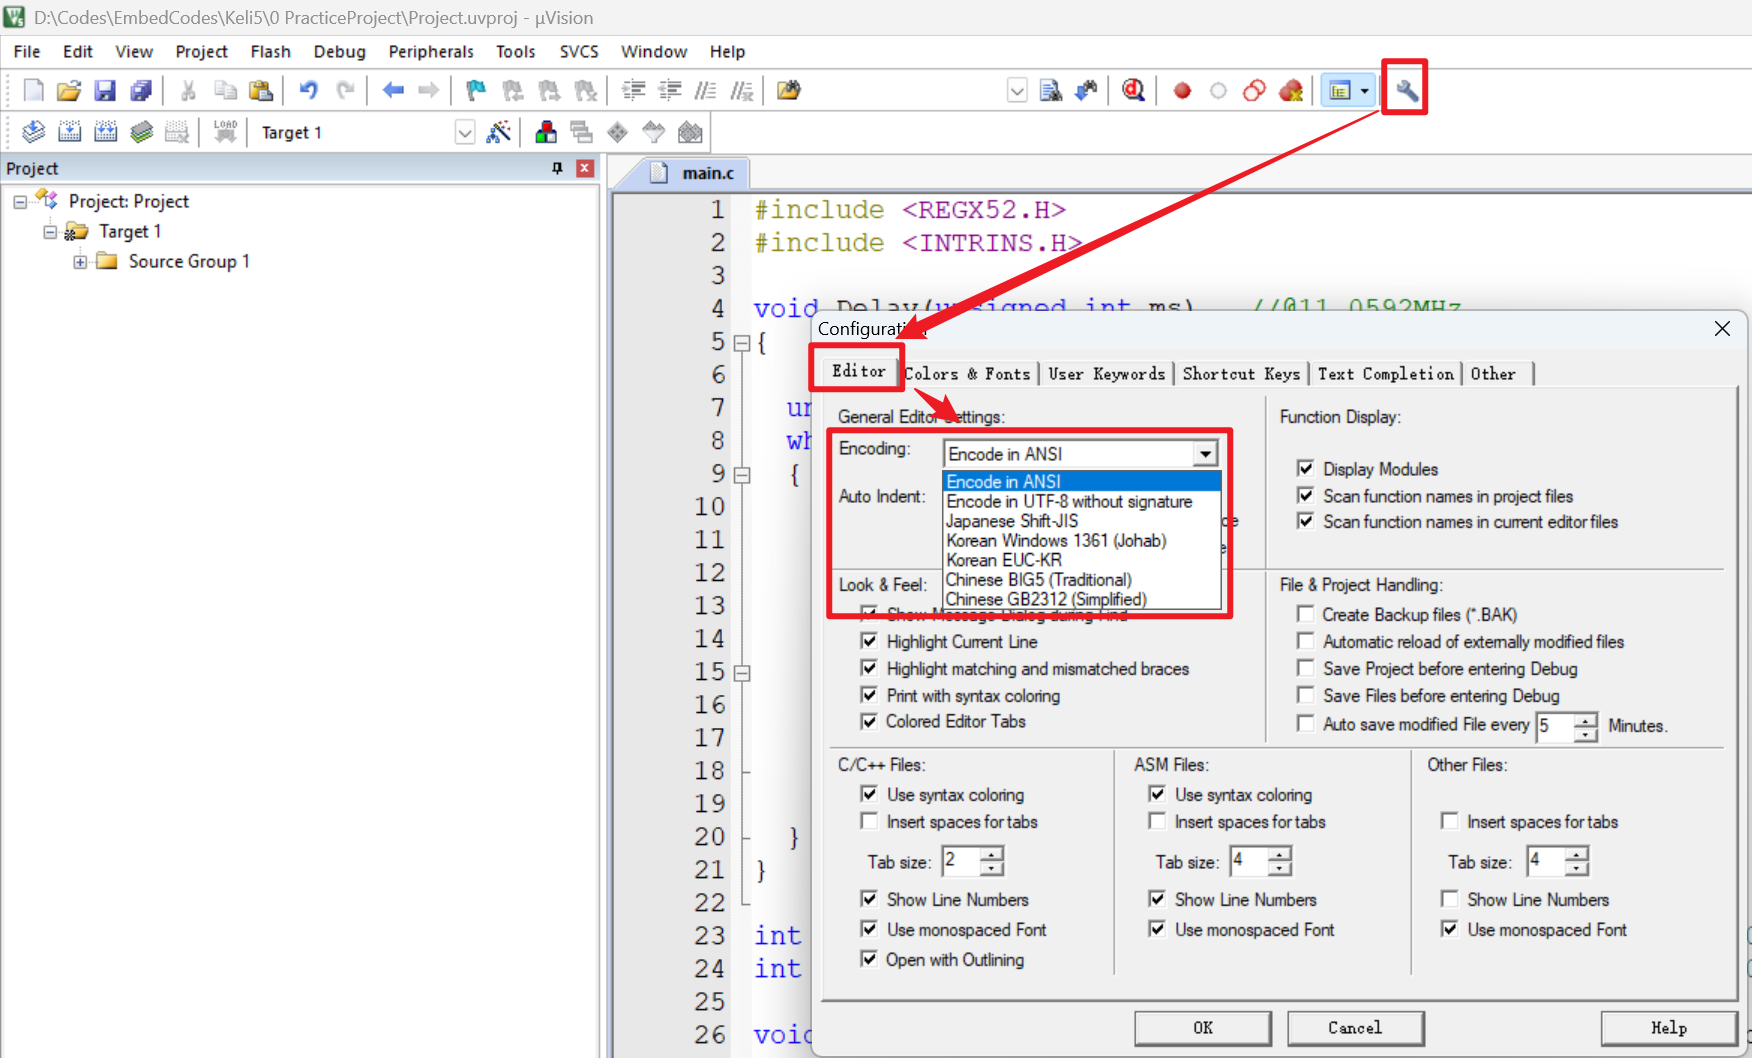
-
GB2312能识别中文但会导致字体改变
-
UTF-8由于有自己的一套编码格式,以前写的一些英文注解可能也无法识别?