【数据结构】5. 双向链表
文章目录
- 一、链表的分类
- 1、双向链表的结构
- 二、双向链表的实现
- 0、准备工作
- 1、初始化
- 2、打印
- 3、尾插
- 4、头插
- 5、尾删
- 6、头删
- 7、查找
- 8、在指定位置之后插入数据
- 9、删除指定位置
- 10、销毁
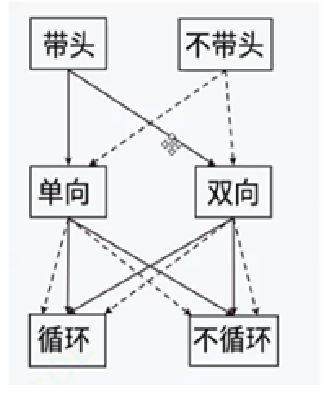
一、链表的分类
链表总共分为8种,具体的分组方式如图所示:
-
带头指的是链表中的哨兵位,这个哨兵位也就是头结点,哨兵位存在的意义是 遍历循环链表避免死循环。
-
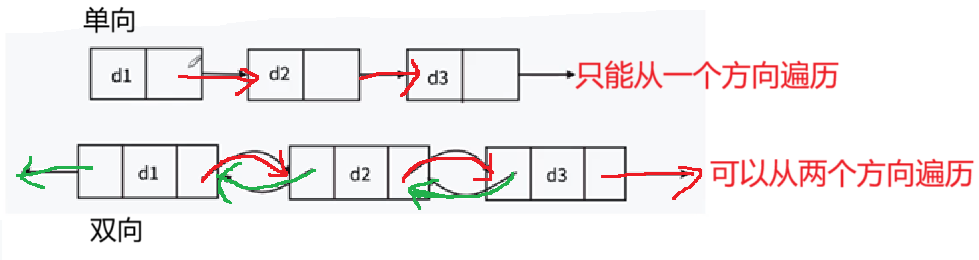
单向和双向的区别如图:
-
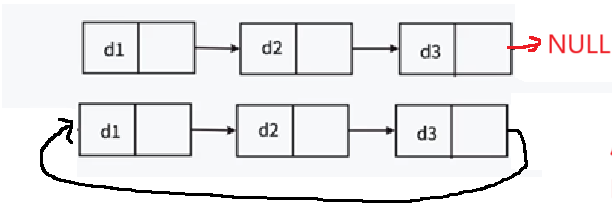
循环主要是看尾结点的next指针是否指向NULL。如图:
我们前面所学的单链表其实就是:不带头单向不循环链表。
1、双向链表的结构
双向链表的结构如图所示:

可以看到双向链表其实是:带头双向循环链表。
二、双向链表的实现
0、准备工作
实现双向链表前需要我们创建三个文件。
List.h:节点的定义,方法的声明。
List.c:方法的实现。
test.c:方法的测试。
接着再在List.h文件中定义我们双向链表节点的结构体,以及方法的声明和包含的头文件。
#pragma once
#include<stdio.h>
#include<stdlib.h>//malloc
#include<assert.h>//双向链表节点的结构体
typedef int LTDataType;
typedef struct ListNode
{LTDataType data;struct ListNode* next;//后继指针struct ListNode* prev;//前驱指针
}LTNode;//双向链表的初始化
void LTInit(LTNode** pphead);//双向链表的销毁
void LTDesTroy(LTNode* phead);//双向链表的打印
void LTPrint(LTNode* phead);//不能改变哨兵位的地址,因此传一级指针
//尾插
void LTPushBack(LTNode* phead, LTDataType x);//头插
void LTPushFront(LTNode* phead, LTDataType x);//尾删
void LTPopBack(LTNode* phead);//头删
void LTPopFront(LTNode* phead);//查找
LTNode* LTFind(LTNode* phead, LTDataType x);//在指定位置之后插入数据
void LTInsert(LTNode* pos, LTDataType x);//删除指定位置
void LTErase(LTNode* pos);
接下来就在List.c文件中来实现具体的方法。
实现方法前需要包含头文件#include"List.h"。
1、初始化
双向链表的初始化其实就是给双向链表创建一个哨兵位。
因此我们先要实现一个申请节点的函数:
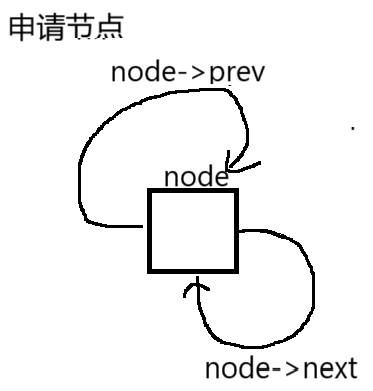
申请节点函数:
LTNode* LTBuyNode(LTDataType x)
{LTNode* node = (LTNode*)malloc(sizeof(LTNode));if (node == NULL){perror("malloc failed");return 1;}node->data = x;node->next = node->prev = node;return node;
}
接下来再来实现双向链表的初始化:
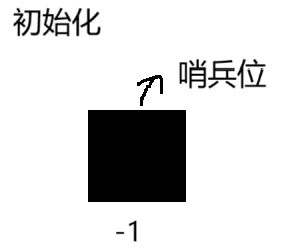
初始化函数:
void LTInit(LTNode** pphead)
{*pphead = LTBuyNode(-1);
}
我们在test.c文件中测试方法前,要先包含头文件#include"List.h"。
现在开始测试:
void test()
{LTNode* plist = NULL;LTInit(&plist);
}int main()
{test();return 0;
}
我们打开调试,观察监视窗口:

发现已经初始化成功!
2、打印
为了方便我们观察方法的正确性,我们可以创建一个函数用来打印链表的内容(除哨兵位的所有节点)。
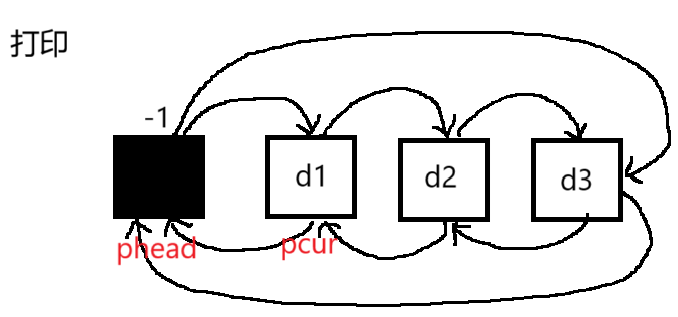
打印函数:
void LTPrint(LTNode* phead)
{LTNode* pcur = phead->next;while (pcur != phead){printf("%d->", pcur->data);pcur = pcur->next;}printf("\n");
}
3、尾插
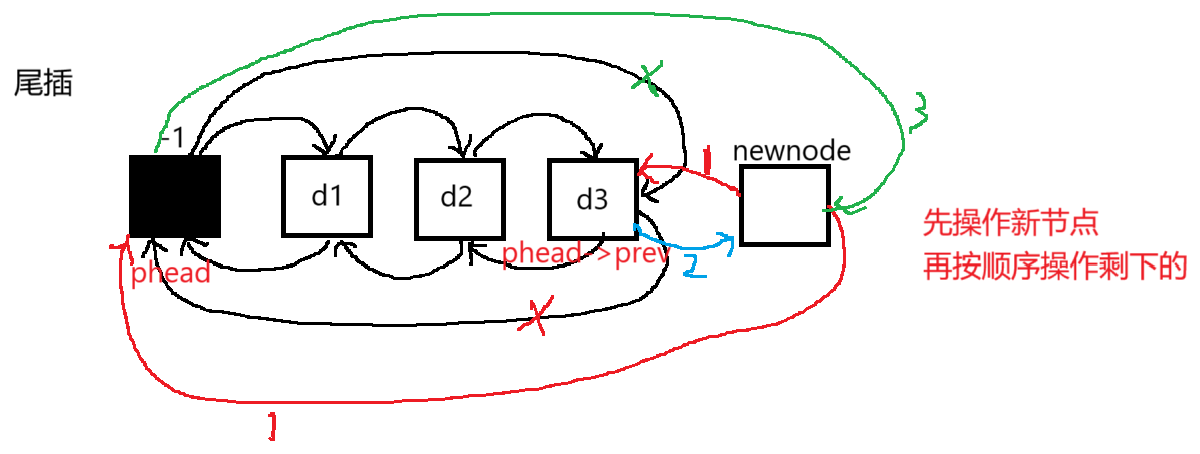
尾插函数:
void LTPushBack(LTNode* phead, LTDataType x)
{assert(phead);LTNode* newnode = LTBuyNode(x);newnode->prev = phead->prev;newnode->next = phead;phead->prev->next = newnode;phead->prev = newnode;}
再进行测试:
void test()
{LTNode* plist = NULL;LTInit(&plist);LTPushBack(plist, 1);LTPushBack(plist, 2);LTPushBack(plist, 3);LTPushBack(plist, 4);LTPrint(plist);
}int main()
{test();return 0;
}
运行结果:

4、头插
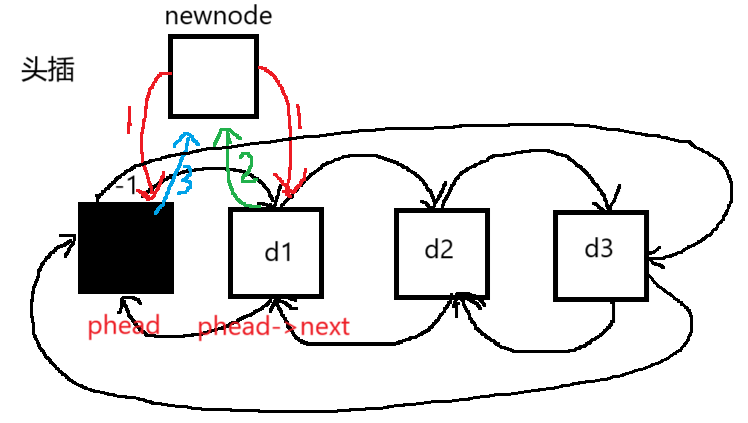
头插函数:
void LTPushFront(LTNode* phead, LTDataType x)
{assert(phead);LTNode* newnode = LTBuyNode(x);newnode->next = phead->next;newnode->prev = phead;phead->next->prev = newnode;phead->next = newnode;
}
再进行测试:
void test()
{LTNode* plist = NULL;LTInit(&plist);LTPushFront(plist, 1);LTPushFront(plist, 2);LTPushFront(plist, 3);LTPushFront(plist, 4);LTPrint(plist);
}int main()
{test();return 0;
}
运行结果:

5、尾删
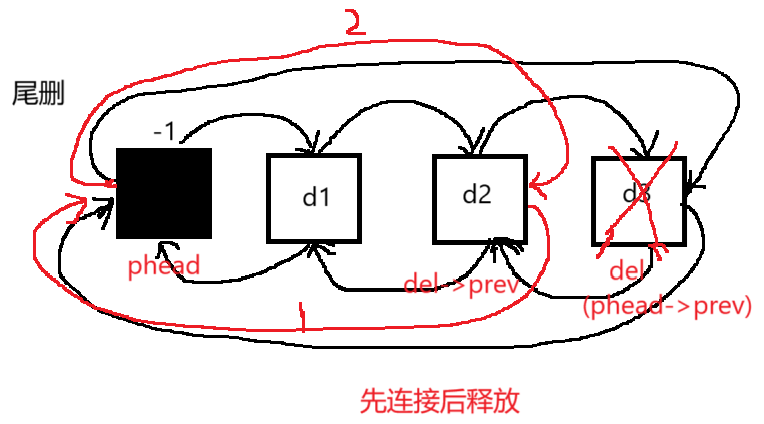
void LTPopBack(LTNode* phead)
{LTNode* del = phead->prev;del->prev->next = phead;phead->prev = del->prev;free(del);del = NULL;
}
再进行测试:
void test()
{LTNode* plist = NULL;LTInit(&plist);LTPushBack(plist, 1);LTPushBack(plist, 2);LTPushBack(plist, 3);LTPushBack(plist, 4);LTPopBack(plist);LTPrint(plist);
}int main()
{test();return 0;
}
运行结果:

6、头删
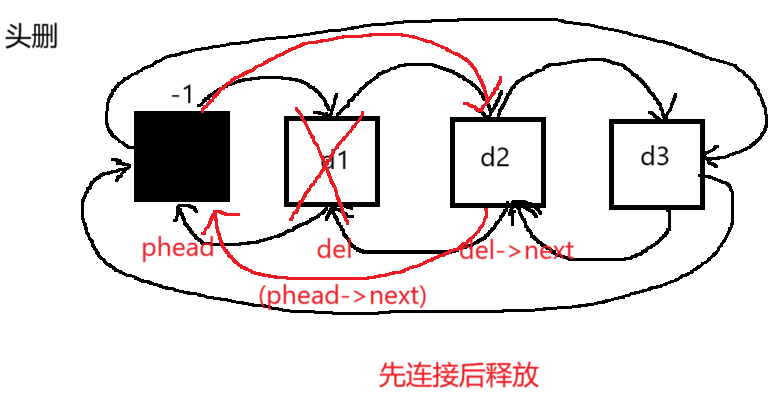
头删函数:
void LTPopFront(LTNode* phead)
{LTNode* del = phead->next;phead->next = del->next;del->next->prev = phead;free(del);del = NULL;
}
再进行测试:
void test()
{LTNode* plist = NULL;LTInit(&plist);LTPushBack(plist, 1);LTPushBack(plist, 2);LTPushBack(plist, 3);LTPushBack(plist, 4);LTPopFront(plist);LTPrint(plist);
}int main()
{test();return 0;
}
运行结果:

7、查找
查找思路:遍历除了哨兵位的所有节点,如果节点对应的数据等于要查找的数据,那就返回节点的地址,否则返回 NULL。
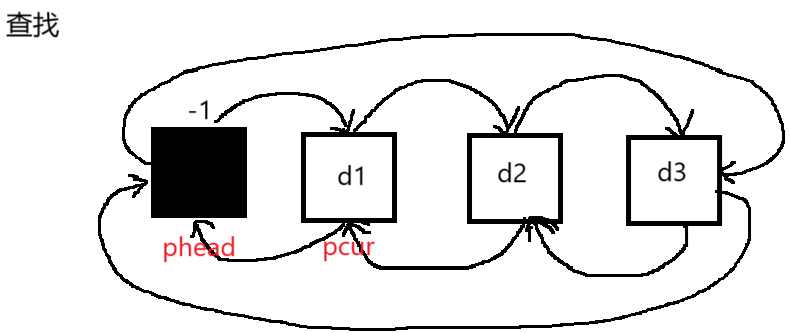
查找函数:
LTNode* LTFind(LTNode* phead, LTDataType x)
{LTNode* pcur = phead->next;while (pcur != phead){if (x == pcur->data){return pcur;}pcur = pcur->next;}//没有找到return NULL;
}
再进行测试:
void test()
{LTNode* plist = NULL;LTInit(&plist);LTPushBack(plist, 1);LTPushBack(plist, 2);LTPushBack(plist, 3);LTPushBack(plist, 4);int find = LTFind(plist, 2);if (find == NULL){printf("没有找到\n");}else{printf("找到了\n");}}int main()
{test();return 0;
}
运行结果:

8、在指定位置之后插入数据
注:指定位置指的是节点对应的地址,一般需要搭配查找函数一起使用。
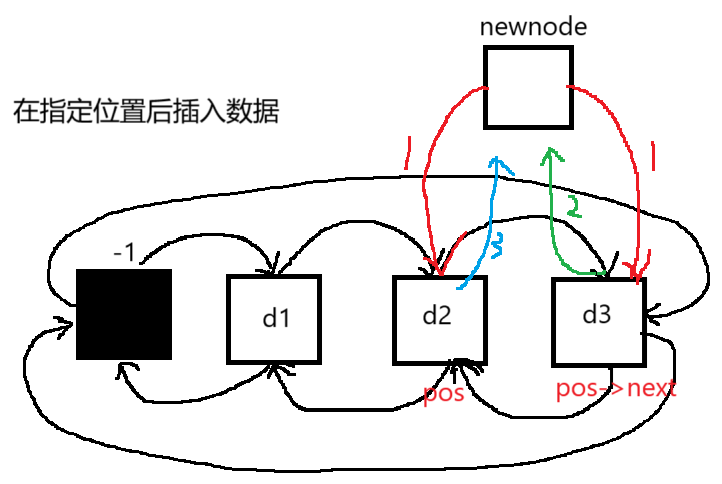
在指定位置后插入函数:
void LTInsert(LTNode* pos, LTDataType x)
{assert(pos);LTNode* newnode = LTBuyNode(x);newnode->prev = pos;newnode->next = pos->next;pos->next->prev = newnode;pos->next = newnode;
}
再进行测试:
void test()
{LTNode* plist = NULL;LTInit(&plist);LTPushBack(plist, 1);LTPushBack(plist, 2);LTPushBack(plist, 3);LTPushBack(plist, 4);int find = LTFind(plist, 2);LTInsert(find, 10);LTPrint(plist);
}int main()
{test();return 0;
}
运行结果:

9、删除指定位置
注:指定位置也指的是节点对应的地址,要搭配查找函数一起使用。
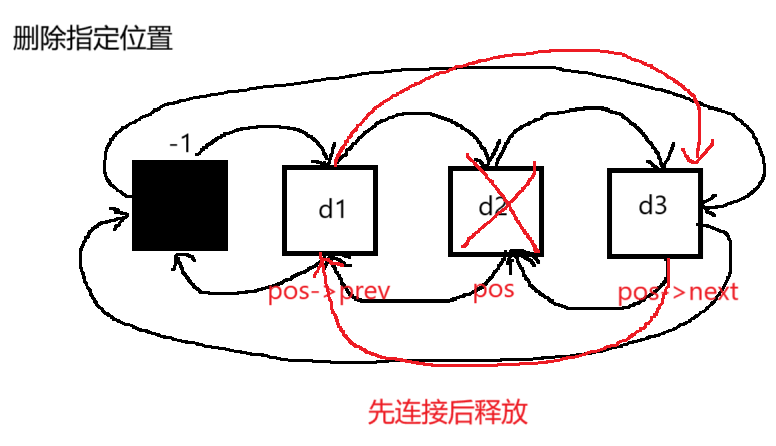
删除指定位置函数:
void LTErase(LTNode* pos)
{pos->prev->next = pos->next;pos->next->prev = pos->prev;free(pos);pos = NULL;
}
再进行测试:
void test()
{LTNode* plist = NULL;LTInit(&plist);LTPushBack(plist, 1);LTPushBack(plist, 2);LTPushBack(plist, 3);LTPushBack(plist, 4);int find = LTFind(plist, 2);LTErase(find);LTPrint(plist);
}int main()
{test();return 0;
}
10、销毁
思路:要先记录后一个节点,再销毁当前的节点。
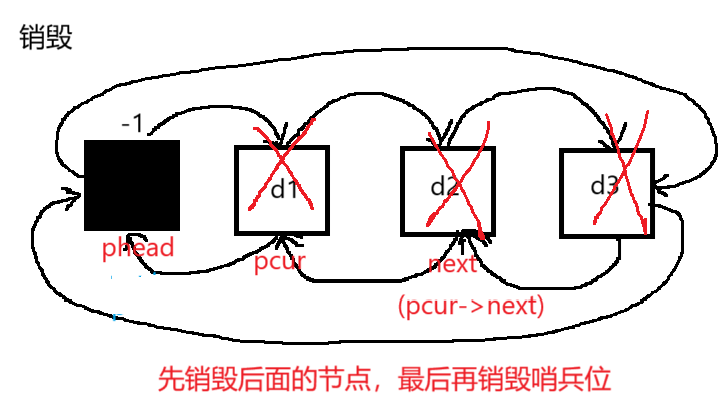
销毁函数:
void LTDesTroy(LTNode* phead)
{LTNode* pcur = phead->next;while (pcur != phead){LTNode* next = pcur->next;free(pcur);pcur = next;}free(phead);phead = NULL;
}
再进行测试:
void test()
{LTNode* plist = NULL;LTInit(&plist);LTPushBack(plist, 1);LTPushBack(plist, 2);LTPushBack(plist, 3);LTPushBack(plist, 4);printf("销毁前:");LTPrint(plist);LTDesTroy(plist);printf("销毁后:");LTPrint(plist);
}int main()
{test();return 0;
}
运行结果: