《100天精通Python——基础篇 2025 第21天:多线程性能剖析与 GIL 深入解析》
目录
- 一、多线程性能剖析
- 1.1 Python多线程回顾
- 1.2 综合案例:图片下载器
- 1.3 线程池
- 二、深入剖析Python解释器GIL
- 2.1 GIL的存在
- 2.1.1 Python解释器概述
- 2.1.2 初探Python GIL
- 2.2 GIL的细节、作用、影响
- 2.2.1 Python GIL的作用
- 2.2.2 GIL与Python历代版本
- 2.2.3 Python多线程切换的过程
- 2.3 解释型语言GIL概况一览
一、多线程性能剖析
本小节主要内容,如下图所示:
希望通过本小节的学习,能够深入地理解线程、进程、IO密集型、CPU密集型、多核CPU、上下文切换等概念。
1.1 Python多线程回顾
打印线程 id:
# -*- coding: utf-8 -*-
# @Time    : 2025-05-25 3:56
# @Author  : bb_bcxlc
# @File    : thread_demo.py
# @Software: PyCharm
# @Blog: https://blog.csdn.net/xw1680import threading
import timedef loop():while True:print('hello python thread.')print('thread id: {}'.format(threading.get_native_id()))time.sleep(1)if __name__ == '__main__':loop()
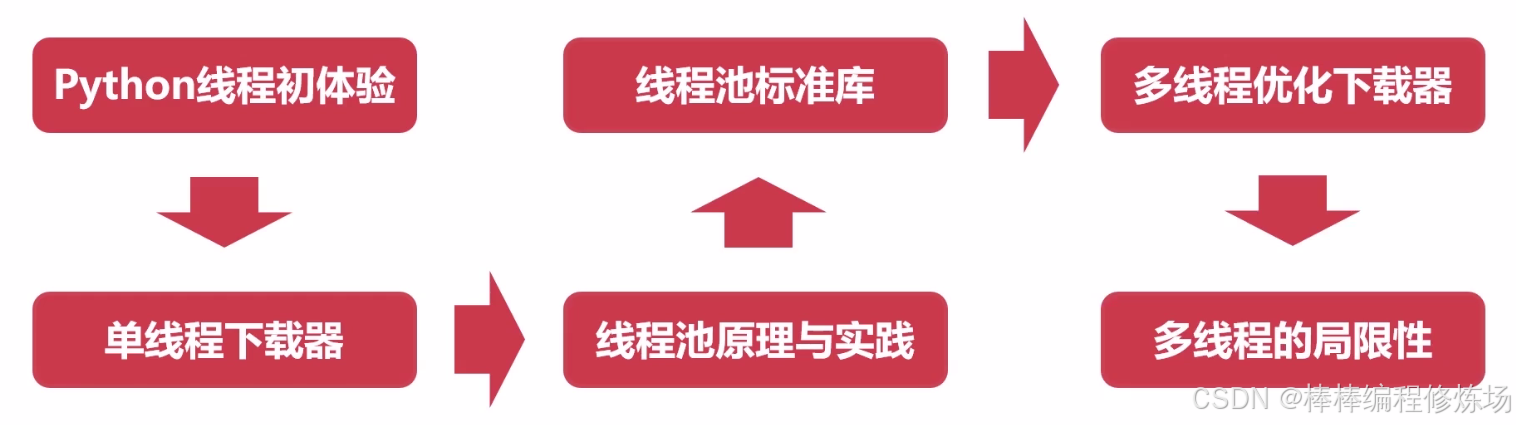
程序运行如下图所示:
此时在另外一个终端,使用命令查看进程:
# 发现进程的id与之前终端的线程id是一样的都是: 6706
# 在之前我们已经说过,如果进程中没有额外的启动其他进程,那么默认只有一个线程,该线程为该进程的主线程
# 在linux系统中,主线程的id与进程id是一样的
[root@VM-16-6-centos pythonCode]# ps -ef | grep python3
root      6706  5263  0 04:06 pts/0    00:00:00 python3 thread_demo.py
root      6727  5584  0 04:06 pts/1    00:00:00 grep --color=auto python3
# 查看该进程下面有哪些线程
# 发现在该进程中确实只有一个线程
[root@VM-16-6-centos pythonCode]# ps -T -p 6706PID  SPID TTY          TIME CMD6706  6706 pts/0    00:00:00 python3
在用一个简单的生产者与消费者模型回顾多线程:
# -*- coding: utf-8 -*-
# @Time    : 2025-05-25 4:25
# @Author  : bb_bcxlc
# @File    : thread_demo2.py
# @Software: PyCharm
# @Blog: https://blog.csdn.net/xw1680import threading
import timecnt = 0def producer():global cntwhile True:cnt += 1time.sleep(1)print('I"m producer,native_id={},cnt={}'.format(threading.get_native_id(), cnt))def consumer():global cntwhile True:if cnt <= 0:time.sleep(1)continuetime.sleep(1)cnt -= 1print('I"m consumer,native_id={},cnt={}'.format(threading.get_native_id(), cnt))if __name__ == '__main__':print('thread active count = %d' % threading.active_count())time.sleep(1)threading.Thread(target=producer).start()time.sleep(1)print('thread active count = %d' % threading.active_count())time.sleep(1)threading.Thread(target=consumer).start()print('thread active count = %d' % threading.active_count())
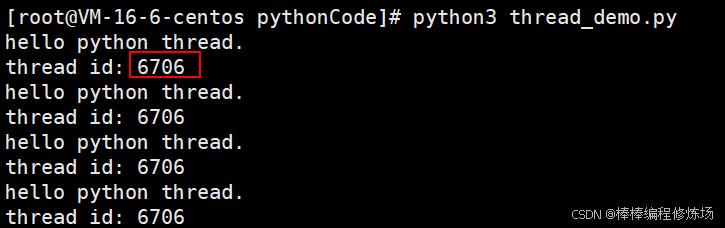
程序运行结果如下图所示:
同样在另外一个终端,使用命令查看进程:
[root@VM-16-6-centos pythonCode]# ps -ef | grep python3
root     15345  5263  0 04:34 pts/0    00:00:00 python3 thread_demo2.py
root     15405  5584  0 04:34 pts/1    00:00:00 grep --color=auto python3
# 发现确实和我们代码运行的结果是一致的,三个线程
[root@VM-16-6-centos pythonCode]# ps -T -p 15345PID  SPID TTY          TIME CMD
15345 15345 pts/0    00:00:00 python3
15345 15350 pts/0    00:00:00 python3
15345 15359 pts/0    00:00:00 python3
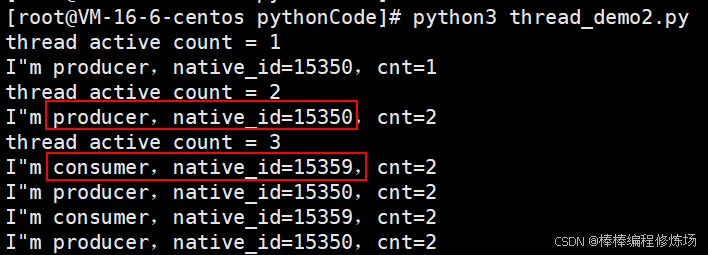
前面举的两个例子可以用下图简单表示:
1.2 综合案例:图片下载器
接下来我们来看图片下载器这样的一个综合案例,该案例总共分为 4 个模块,如下图所示:
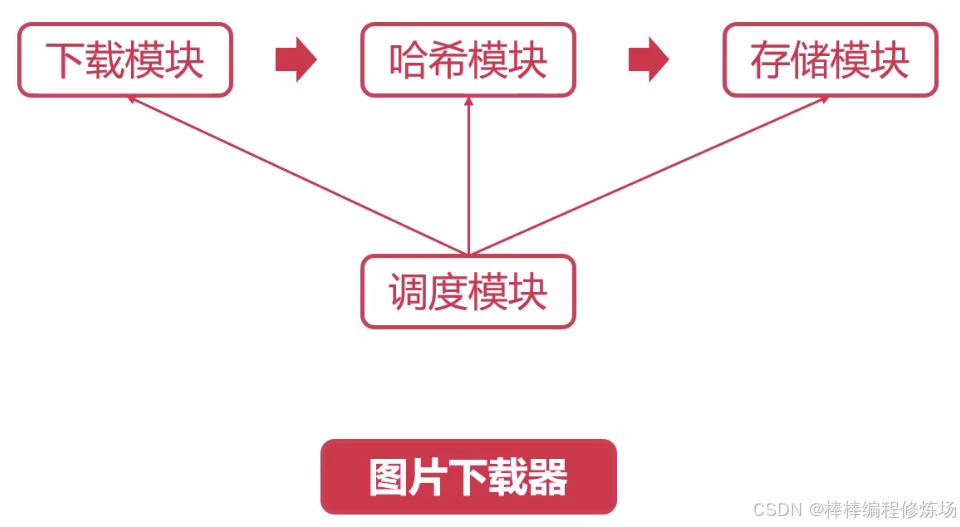
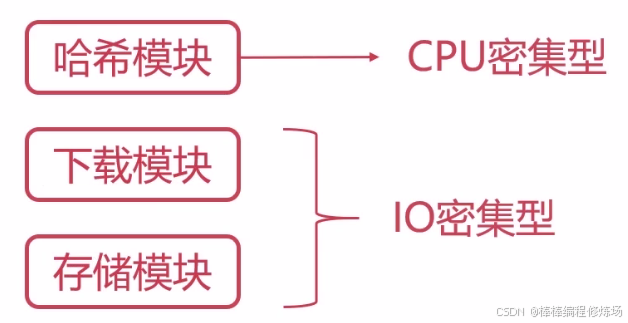
简单介绍一下每个模块的功能,下载模块:主要用于从网络上下载图片,哈希模块:对图片内容进行哈希,存储模块:主要将下载的图片写入本地磁盘,调度模块:用来调度前面三个模块。简单来说,就是由下载模块去网上下载图片,然后由哈希模块来计算图片的哈希,然后呢在由存储模块来进行图片的存储,通过这个案例可以加强模块化的编程能力,更重要的是可以巩固我们前面所学习到的关于线程、进程等理论的一些知识。对于下载模块与存储模块,都是属于 IO 密集型的任务,那么对于哈希模块则属于计算密集型的任务,我们可以看下能不能从这个案例中发现一些问题,继续深究下去。
在 Pycharm 中来看一下该案例的目录结构:
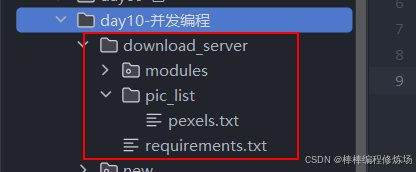
download_server 下的 modules 用于存储模块,如:下载器模块,文件夹下的 requirements.txt,是该案例以及后续我们学习进程,协程所需要用到的第三方模块,内容如下:
prettytable
requests
aiohttp
aiofiles
scipy
pillow
numpy# 可以使用以下命令进行安装:
pip/pip3 install -r requirements.txt
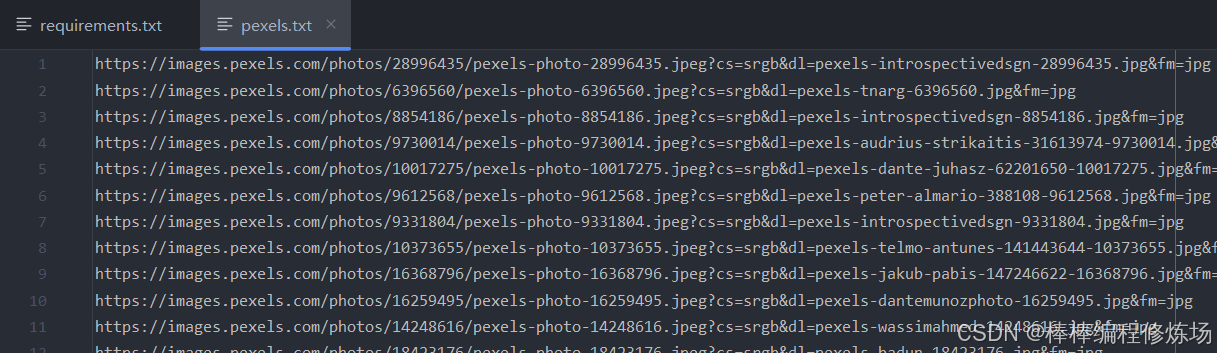
download_server 文件夹下还有一个文件夹名为 pic_list,里面有一个 pexels.txt 文件,存储着100张 pexels 免费商用素材图片,如下图所示:
该案例你可以自行找图片链接,也可以从以下链接中提取上图所示的100张 pexels 免费商用素材图片以及 requirements.txt 文件:
通过网盘分享的文件:图片下载器
链接: https://pan.baidu.com/s/1Cla7ke2CnQG0CxPbP3Z9Rw?pwd=1jzh 提取码: 1jzh
--来自百度网盘超级会员v9的分享
单线程下载模块的实现: 在 modules 目录下新建 downloader.py 文件,代码如下:
# -*- coding: utf-8 -*-
# @Time    : 2025-05-25 5:36
# @Author  : bb_bcxlc
# @File    : downloader.py
# @Software: PyCharm
# @Blog: https://blog.csdn.net/xw1680import requests
from PIL import ImageFile
import numpy as np
from const import CalcTypeclass Downloader(object):"""下载器模块"""def __init__(self):self.calc_type = CalcType.SingleThreaddef set_calc_type(self, calc_type):self.calc_type = calc_typedef _process_download(self, pic_url):print('downloading pic: {}'.format(pic_url))# 实现图片具体的下载逻辑response = requests.get(pic_url)content = response.content# 图片转numpy数组parser = ImageFile.Parser()parser.feed(content)img = parser.close()img = np.array(img)return imgdef _process_single_thread(self, pic_url_list):img_list = []for pic_url in pic_url_list:# 图片下载img = self._process_download(pic_url)img_list.append(img)return img_listdef process(self, pic_url_list):if self.calc_type == CalcType.SingleThread:return self._process_single_thread(pic_url_list)pass
在 download_server 文件夹下新建 const.py,里面定义了枚举类 CalcType,用于任务的计算类型,代码如下:
# -*- coding: utf-8 -*-
# @Time    : 2025-05-25 5:47
# @Author  : bb_bcxlc
# @File    : const.py
# @Software: PyCharm
# @Blog: https://blog.csdn.net/xw1680from enum import Enumclass CalcType(Enum):"""计算类型"""SingleThread = 0MultiThread = 1MultiProcess = 2PyCoroutine = 3
在 download_server 文件夹下新建 utils.py,里面定义了 get_pic_list() 函数用于从文本文件中读取图片链接,返回图片链接列表,代码如下:
# -*- coding: utf-8 -*-
# @Time    : 2025-05-25 5:59
# @Author  : bb_bcxlc
# @File    : utils.py
# @Software: PyCharm
# @Blog: https://blog.csdn.net/xw1680import osdef get_pic_list():"""用于获取图片链接列表"""file_path = os.path.join('pic_list/pexels.txt')with open(file_path, 'r', encoding='utf-8') as f:return [line.strip() for line in f]
在 download_server 文件夹下新建 scheduler.py,用于各个模块的调度,代码如下:
# -*- coding: utf-8 -*-
# @Time    : 2025-05-25 5:55
# @Author  : bb_bcxlc
# @File    : scheduler.py
# @Software: PyCharm
# @Blog: https://blog.csdn.net/xw1680from modules.downloader import Downloader
import utilsclass Scheduler(object):"""调度模块"""def __init__(self):self.downloader = Downloader()def process(self):# 1.加载图片下载列表pic_list = utils.get_pic_list()# 2.初始化下载器模块self.downloader.process(pic_list)if __name__ == '__main__':scheduler = Scheduler()scheduler.process()
接下来我们去实现哈希模块,在 modules 下新建 hasher.py 文件,在其中定义一个 Hasher 类,在实现这个类的时候,为了与之前的下载模块保持结构一致,发现我们也要在类中定义 _process_single_thread、set_calc_type、process 等方法,故我们可以把这些公共的抽出来,定义一个基础的模块,在 modules 下新建 common.py 文件,在其中定义 BaseModule 类,具体实现如下:
# -*- coding: utf-8 -*-
# @Time    : 2025-05-25 7:01
# @Author  : bb_bcxlc
# @File    : common.py
# @Software: PyCharm
# @Blog: https://blog.csdn.net/xw1680from const import CalcTypeclass BaseModule(object):"""抽象模块"""def __init__(self):self.calc_type = CalcType.SingleThreaddef set_calc_type(self, calc_type):self.calc_type = calc_typedef _process(self, pic_url):raise NotImplementedErrordef _process_single_thread(self, pic_url_list):raise NotImplementedErrordef process(self, pic_url_list):if self.calc_type == CalcType.SingleThread:return self._process_single_thread(pic_url_list)else:pass
重新改造下载器模块:
# -*- coding: utf-8 -*-
# @Time    : 2025-05-25 5:36
# @Author  : bb_bcxlc
# @File    : downloader.py
# @Software: PyCharm
# @Blog: https://blog.csdn.net/xw1680import requests
from PIL import ImageFile
import numpy as np
from .common import BaseModuleclass Downloader(BaseModule):"""下载器模块"""def __init__(self):super(Downloader, self).__init__()def _process(self, pic_url):print('downloading pic: {}'.format(pic_url))# 实现图片具体的下载逻辑response = requests.get(pic_url)content = response.content# 图片转numpy数组parser = ImageFile.Parser()parser.feed(content)img = parser.close()img = np.array(img)return imgdef _process_single_thread(self, pic_url_list):img_list = []for pic_url in pic_url_list:# 图片下载img = self._process(pic_url)img_list.append(img)return img_list
hasher.py 实现如下:
# -*- coding: utf-8 -*-
# @Time    : 2025-05-25 7:00
# @Author  : bb_bcxlc
# @File    : hasher.py
# @Software: PyCharm
# @Blog: https://blog.csdn.net/xw1680import hashlibfrom .common import BaseModule
from scipy import signal
from PIL import Image, ImageFileclass Hasher(BaseModule):"""哈希模块"""def __init__(self):super(Hasher, self).__init__()def _process(self, pic):# 为了模拟计算型任务,这里使用卷积处理图片cov = [[[0.1], [0.05], [0.1]]]pic = signal.convolve(pic, cov)# print(type(pic))pic = Image.fromarray(pic.astype('uint8')).convert('RGB')# 哈希return hashlib.md5(str(pic).encode('utf-8')).hexdigest()def _process_single_thread(self, pics):pic_md5_list = []for pic in pics:pic_md5 = self._process(pic)pic_md5_list.append(pic_md5)return pic_md5_list
在 scheduler.py 文件中调度下载器模块与哈希模块,从 pexels.txt 文件中读取一张图片的链接进行测试,看程序是否正常运行:
# -*- coding: utf-8 -*-
# @Time    : 2025-05-25 5:55
# @Author  : bb_bcxlc
# @File    : scheduler.py
# @Software: PyCharm
# @Blog: https://blog.csdn.net/xw1680from modules.downloader import Downloader
import utils
from modules.hasher import Hasherclass Scheduler(object):"""调度模块"""def __init__(self):self.downloader = Downloader()  # 初始化下载器self.hasher = Hasher()  # 初始化哈希def process(self):# 1.加载图片下载列表 ---一张图片进行测试pic_list = utils.get_pic_list()[:1]# 2.调度下载器模块pics = self.downloader.process(pic_list)# print(pics)# 3.调度哈希模块pic_md5_list = self.hasher.process(pics)print(pic_md5_list)if __name__ == '__main__':scheduler = Scheduler()scheduler.process()
程序执行结果如下:
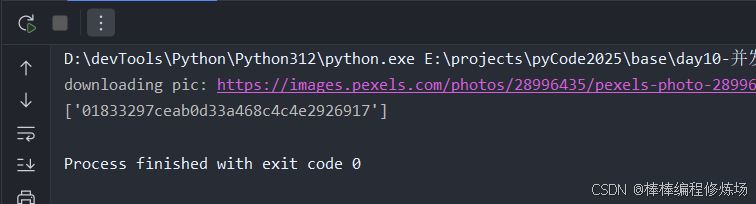
发现执行结果和我们预期一致。在 modules 下新建存储模块 storager.py,具体实现如下:
# -*- coding: utf-8 -*-
# @Time    : 2025-05-25 7:50
# @Author  : bb_bcxlc
# @File    : storager.py
# @Software: PyCharm
# @Blog: https://blog.csdn.net/xw1680from .common import BaseModule
from PIL import Imageclass Storager(BaseModule):"""存储模块"""def _process(self, item):content, pic_path = itemcontent = Image.fromarray(content.astype('uint8')).convert('RGB')content.save(pic_path)def _process_single_thread(self, item_list):for item in item_list:self._process(item)
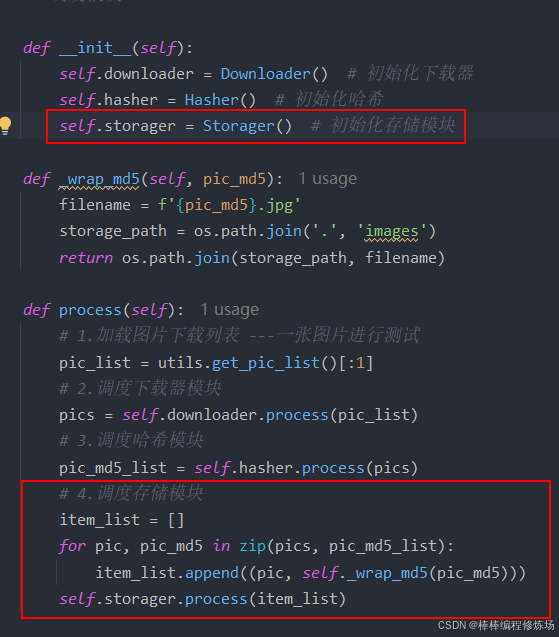
然后在调度模块中,初始化以及调度存储模块,如下图所示:
执行程序发现图片是可以正常下载的。接下来,我们添加功能,去评估各个模块执行的时间,首先在 utils.py 文件中新增计时器类 Timer,如下所示:
class Timer(object):"""计时器"""def __init__(self):self.val = 0def tick(self):self.val = time.time()def tock(self):return round(time.time() - self.val, 6)
优化调度模块,完成后如下:
# -*- coding: utf-8 -*-
# @Time    : 2025-05-25 5:55
# @Author  : bb_bcxlc
# @File    : scheduler.py
# @Software: PyCharm
# @Blog: https://blog.csdn.net/xw1680from modules.downloader import Downloader
import utils
from modules.hasher import Hasher
from modules.storager import Storager
import os
import prettytable as ptclass Scheduler(object):"""调度模块"""def __init__(self):self.downloader = Downloader()  # 初始化下载器self.hasher = Hasher()  # 初始化哈希self.storager = Storager()  # 初始化存储模块def _wrap_md5(self, pic_md5):filename = f'{pic_md5}.jpg'storage_path = os.path.join('.', 'images')return os.path.join(storage_path, filename)def process(self):# 统计时间time_statistics = dict()time_statistics['network_time'] = []time_statistics['cpu_time'] = []time_statistics['disk_time'] = []timer = utils.Timer()# 1.加载图片下载列表 ---一张图片进行测试pic_list = utils.get_pic_list()# 2.调度下载器模块timer.tick()pics = self.downloader.process(pic_list)time_statistics['network_time'].append(timer.tock())# 3.调度哈希模块timer.tick()pic_md5_list = self.hasher.process(pics)time_statistics['cpu_time'].append(timer.tock())# 4.调度存储模块item_list = []for pic, pic_md5 in zip(pics, pic_md5_list):item_list.append((pic, self._wrap_md5(pic_md5)))timer.tick()self.storager.process(item_list)time_statistics['disk_time'].append(timer.tock())return time_statisticsdef statistics(self, log):table = pt.PrettyTable(['类型', '单线程总耗时'])network_row = ['network']cpu_row = ['cpu']disk_row = ['disk']network_row.append(log['network_time'])cpu_row.append(log['cpu_time'])disk_row.append(log['disk_time'])table.add_row(network_row)table.add_row(cpu_row)table.add_row(disk_row)print(table)if __name__ == '__main__':scheduler = Scheduler()time_statistics = scheduler.process()scheduler.statistics(time_statistics)
根据实际情况我只测试了25张图片,我用笔记本电脑和云服务器分别跑了一下,运行结果如下:
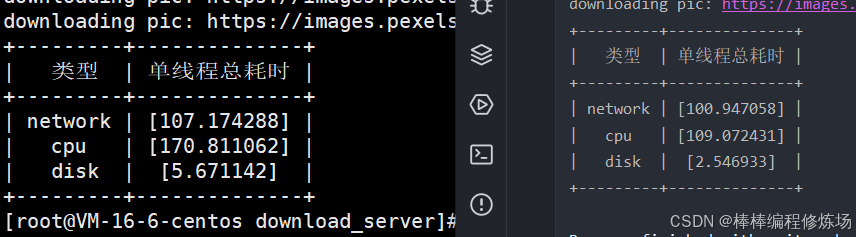
模块性能分析----并行化运行的可行性
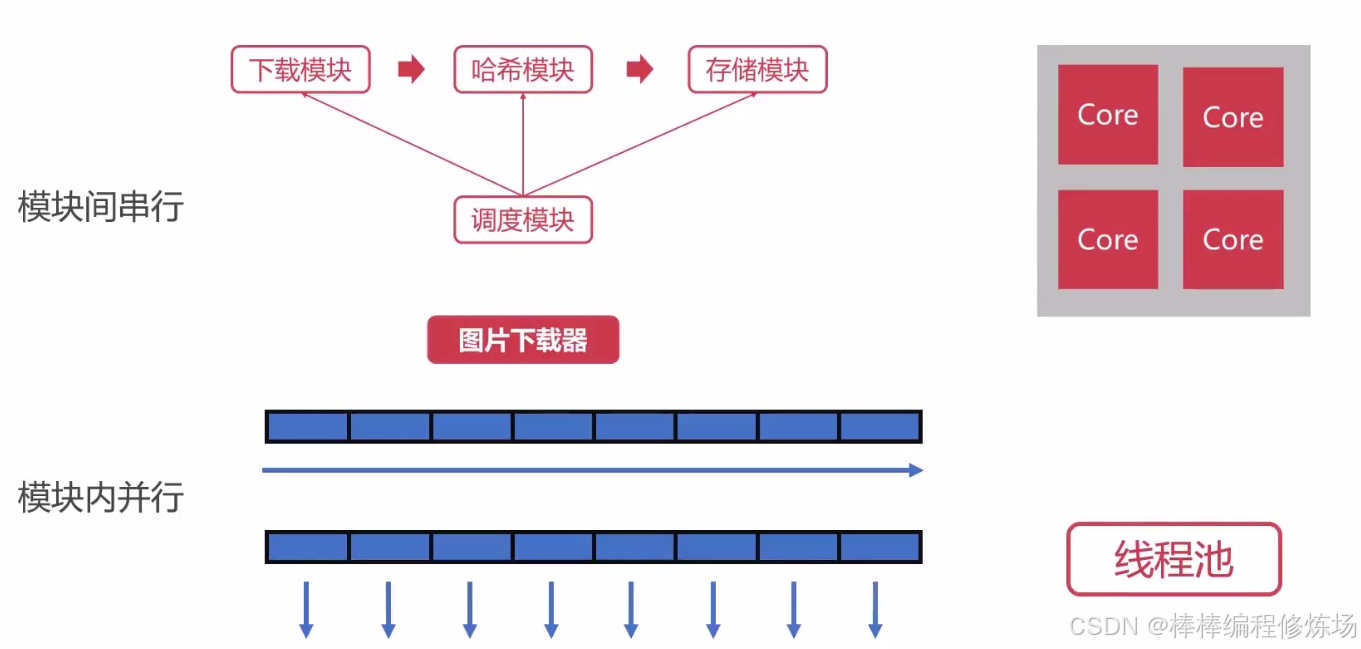
从之前开始设计案例的时候,我们就知道模块之间是有依赖关系的,但是单个模块内却并无联系,从上图可知,我们在设计下载模块的时候,图片是一张一张进行下载的,但是两张图片之间是没有依赖关系的,所以我们可以考虑使用多线程实现并发下载,对下载器模块进行优化,在优化之前我们先学习一个新的技术线程池。
1.3 线程池
什么是线程池? 线程池是存放多个线程的容器,CPU 调度线程执行完任务后不会销毁线程,而是将线程放回线程池中重复进行利用。
为什么要使用线程池? 线程池是使用线程的最佳实践
- 降低资源消耗: 创建和销毁线程需要时间和资源,使用线程池可以复用已有线程,避免频繁地创建和销毁。
- 提高响应速度: 任务来时,无需等待新线程创建,立即可以使用线程池中的空闲线程执行任务。
- 架构解耦: 线程创建和业务处理解耦,更加优雅
线程池内部是如何实现的? 线程池的核心思想是:预先创建一组线程,反复利用这些线程执行任务,从而避免频繁创建和销毁线程的高开销。它内部采用了经典的 "生产者-消费者" 模型,主要围绕三个关键点展开:任务提交、任务调度、线程执行。大概的实现思路:
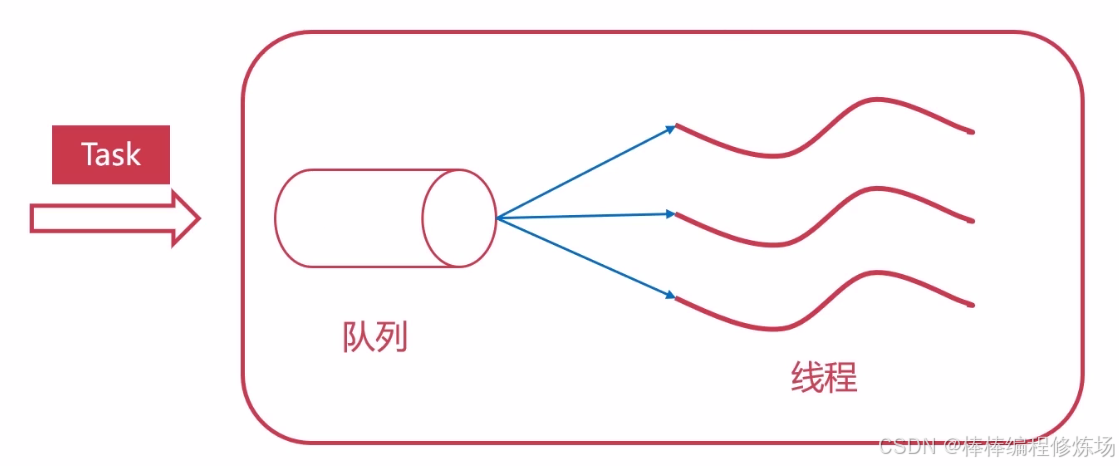
① 初始化阶段: 当线程池被创建时,它会预先启动一定数量的工作线程(通常由用户指定最大线程数)。这些线程并不会立即执行任何任务,而是处于等待状态,阻塞地等待任务到来。② 任务提交: 当用户调用 submit() 或其他接口向线程池提交一个任务时,这个任务(通常是一个函数和它的参数)会被封装成一个 "任务对象",然后被放入线程池内部的任务队列中(例如先进先出队列)。③ 线程调度与执行: 这时,线程池中某个空闲的工作线程会被唤醒,它从任务队列中取出一个任务对象并执行。这个过程是阻塞-唤醒机制:如果任务队列为空,工作线程会阻塞等待。如果任务队列不为空,线程就执行任务。执行完成后,它不会终止,而是重新回到队列前继续等待下一个任务。这个机制使线程得以循环复用,而不是每次都新建和销毁。④ 线程安全与同步机制: 由于任务队列可能同时被多个线程访问(提交者放任务,工作线程取任务),线程池内部通过线程同步机制(如互斥锁 Lock、条件变量 Condition 或线程安全队列 Queue)来确保并发操作不会出错。生产者提交任务时,会加锁并通知阻塞的消费者线程。消费者线程获取任务前,会先加锁并检查队列是否为空。⑤ 线程数量控制: 线程池通常会设置一个最大线程数。当所有工作线程都在忙,而任务还在不断提交时,线程池会:把新任务排队等待。或者如果排队满了,根据策略(如拒绝、丢弃、抛异常)来处理。有些线程池还支持动态扩展线程数量,例如根据当前负载自动增加线程,但数量总是受限于最大线程数。⑥ 关闭线程池: 当线程池被关闭(如调用 shutdown()),线程池会:拒绝接收新任务;等待所有任务执行完;然后优雅地终止所有工作线程。线程池的关闭过程也必须通过同步控制,确保不会中途打断未完成的任务。超简单的线程池实现:
# -*- coding: utf-8 -*-
# @Time    : 2025-05-25 15:43
# @Author  : bb_bcxlc
# @File    : simple_thread_pool.py
# @Software: PyCharm
# @Blog: https://blog.csdn.net/xw1680import threading
import time
import loggingFORMAT = '%(asctime)s - %(thread)d - %(message)s'logging.basicConfig(format=FORMAT, level=logging.INFO)class SimpleThreadPool(object):def process(self):while True:if len(self.queue) == 0:time.sleep(1)continuetask = self.queue.pop()task()def __init__(self, size):self.pool = [threading.Thread(target=self.process) for i in range(size)]self.queue = []def submit(self, task):self.queue.append(task)def start(self):for thread in self.pool:thread.start()def _task_a():for j in range(2):logging.info('this is _task_a,j = {}'.format(j))time.sleep(1)if __name__ == '__main__':pool = SimpleThreadPool(10)pool.start()for i in range(10):pool.submit(_task_a)
线程池标准库 ThreadPoolExecutor 简单使用:
# -*- coding: utf-8 -*-
# @Time    : 2025-05-25 16:13
# @Author  : bb_bcxlc
# @File    : thread_pool_executor_demo.py
# @Software: PyCharm
# @Blog: https://blog.csdn.net/xw1680from concurrent.futures import ThreadPoolExecutor
import time
import threadingimport loggingFORMAT = '%(asctime)s - %(thread)d - %(message)s'logging.basicConfig(format=FORMAT, level=logging.INFO)def task():for i in range(2):time.sleep(1)logging.info('this is a task,thread_id = {},i = {}'.format(threading.get_native_id(), i))return time.time()if __name__ == '__main__':executor = ThreadPoolExecutor(max_workers=10)futures = []for i in range(10):future = executor.submit(task)# 会等待上个任务执行完成,相当于串行执行了# print(future.result())futures.append(future)for future in futures:print(future.result())
用线程池对之前的图片下载器案例进行优化改进,common.py 模块中 BaseModule 类增加 _process_multi_thread() 方法实现,如下图:

在 modules 目录下新建 executors.py 文件,用来定义使用不同的技术来加速下载器模块等的执行工具,在这里有线程池,后续会有进程池、协程等,目前的代码如下:
# -*- coding: utf-8 -*-
# @Time    : 2025-05-25 17:40
# @Author  : bb_bcxlc
# @File    : executors.py
# @Software: PyCharm
# @Blog: https://blog.csdn.net/xw1680from concurrent.futures import ThreadPoolExecutorMAX_WORKERS = 10
thread_pool_executor = ThreadPoolExecutor(max_workers=MAX_WORKERS)
使用 executors 模块中的线程池为下载器模块、哈希模块以及存储模块进行加速,更改代码如下:
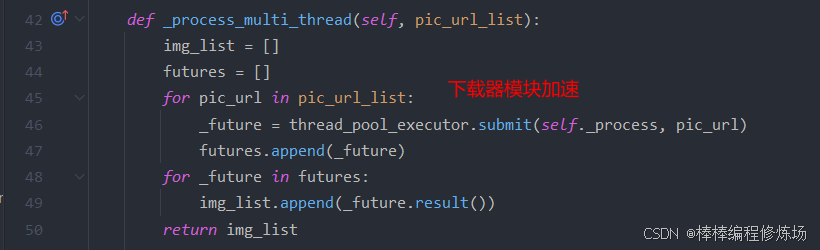
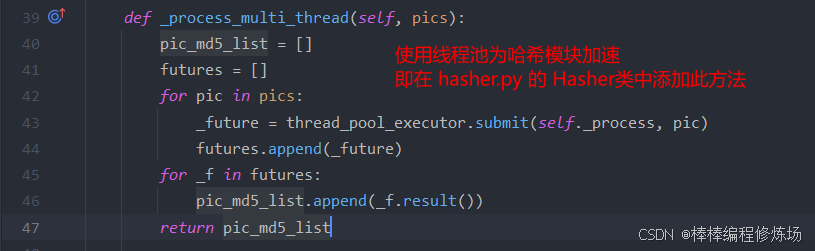
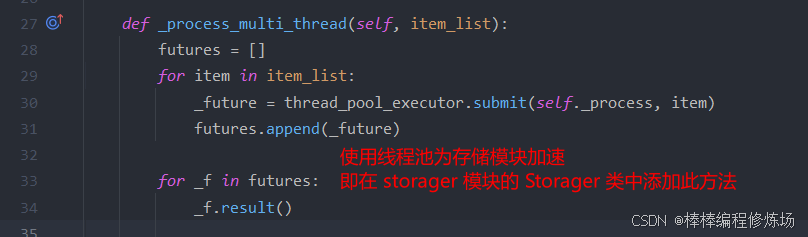
注意在为模块加速时一定要先导入 thread_pool_executor:
from .executors import thread_pool_executor
scheduler.py 中的代码如下:
# -*- coding: utf-8 -*-
# @Time : 2025-05-25 5:55
# @Author : bb_bcxlc
# @File : scheduler.py
# @Software: PyCharm
# @Blog: https://blog.csdn.net/xw1680from modules.downloader import Downloader
import utils
from modules.hasher import Hasher
from modules.storager import Storager
import os
import prettytable as pt
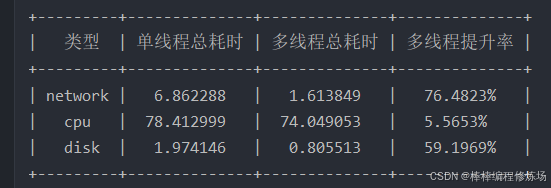
from const import CalcTypeclass Scheduler(object):"""调度模块"""def __init__(self):self.downloader = Downloader() # 初始化下载器self.hasher = Hasher() # 初始化哈希self.storager = Storager() # 初始化存储模块def _wrap_md5(self, pic_md5):filename = f'{pic_md5}.jpg'storage_path = os.path.join('.', 'images')return os.path.join(storage_path, filename)def set_calc_type(self, calc_type):self.downloader.set_calc_type(calc_type)self.hasher.set_calc_type(calc_type)self.storager.set_calc_type(calc_type)def process(self):# 统计时间time_statistics = dict()time_statistics['network_time'] = []time_statistics['cpu_time'] = []time_statistics['disk_time'] = []timer = utils.Timer()# 1.加载图片下载列表 ---一张图片进行测试pic_list = utils.get_pic_list()# 2.调度下载器模块timer.tick()pics = self.downloader.process(pic_list)time_statistics['network_time'].append(timer.tock())# 3.调度哈希模块timer.tick()pic_md5_list = self.hasher.process(pics)time_statistics['cpu_time'].append(timer.tock())# 4.调度存储模块item_list = []for pic, pic_md5 in zip(pics, pic_md5_list):item_list.append((pic, self._wrap_md5(pic_md5)))timer.tick()self.storager.process(item_list)time_statistics['disk_time'].append(timer.tock())return time_statisticsdef statistics(self, sing_thread_log, multi_thread):table = pt.PrettyTable(['类型', '单线程总耗时', '多线程总耗时', '多线程提升率'])network_row = ['network']cpu_row = ['cpu']disk_row = ['disk']# 获取单线程各个模块执行时间single_network_time = sing_thread_log['network_time'][0]single_cpu_time = sing_thread_log['cpu_time'][0]single_disk_time = sing_thread_log['disk_time'][0]network_row.append(single_network_time)cpu_row.append(single_cpu_time)disk_row.append(single_disk_time)# 获取多线程各个模块执行时间multi_network_time = multi_thread['network_time'][0]multi_cpu_time = multi_thread['cpu_time'][0]multi_disk_time = multi_thread['disk_time'][0]network_row.append(multi_network_time)cpu_row.append(multi_cpu_time)disk_row.append(multi_disk_time)# 转换率network_time_increase_rate = '%.4f%%' % ((single_network_time - multi_network_time)/ single_network_time * 100)cpu_time_increase_rate = '%.4f%%' % ((single_cpu_time - multi_cpu_time) / single_cpu_time * 100)disk_time_increase_rate = '%.4f%%' % ((single_disk_time - multi_disk_time) / single_disk_time* 100)network_row.append(network_time_increase_rate)cpu_row.append(cpu_time_increase_rate)disk_row.append(disk_time_increase_rate)table.add_row(network_row)table.add_row(cpu_row)table.add_row(disk_row)print(table)if __name__ == '__main__':scheduler = Scheduler()# 单线程运行scheduler.set_calc_type(CalcType.SingleThread)single_time = scheduler.process()# 多线程运行scheduler.set_calc_type(CalcType.MultiThread)multi_time = scheduler.process()# 合并时间数据scheduler.statistics(single_time, multi_time)
由于 pexels 网站的图片数据测起来不是很流畅,我更改了测试数据,图片链接获取:
通过网盘分享的文件:cover.txt
链接: https://pan.baidu.com/s/1FgzyOcB_jGlNGxIshUV9qg?pwd=gqk5 提取码: gqk5
--来自百度网盘超级会员v9的分享
由于我云服务器的配置,我只跑了前70张图片,在 Windows 下执行结果:
云服务器下执行结果:
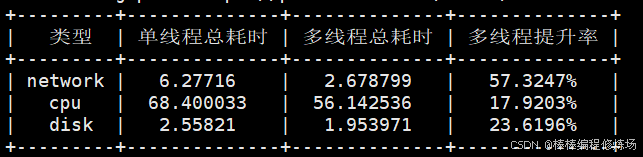
从上面的执行结果来看,多线程对下载模块有明显加速作用,对哈希模块加速作用不是太大,对存储模块也有明显的加速作用。大家可以根据以下几个方面再次去进行测试修改:
# 1.重新整理程序判断统计逻辑是否有错
# 2.CPU 核数
## 2.1 测试: 线程数不变,CPU 核数增加
## 2.2 测试: 线程数增加,CPU 核数不变
# 3.线程数过多,相互竞争消耗
多线程加速为什么对哈希模块生效没有那么明显?Python 的多线程是为多线程 不管 CPU 核数是多少,Python 都是并发的在运行,而不是并行地运行,那么就又引出 2 个很有价值的问题:
- 既然 Python 的多线程是伪多线程,那么为什么对下载模块与存储模块加速明显?
- 为什么要说 Python 的多线程是伪多线程?
具体的解释在下一小节 《二、深入剖析Python解释器GIL》 进行深入地探讨与学习,这也是 Python 多线程的局限性。
二、深入剖析Python解释器GIL
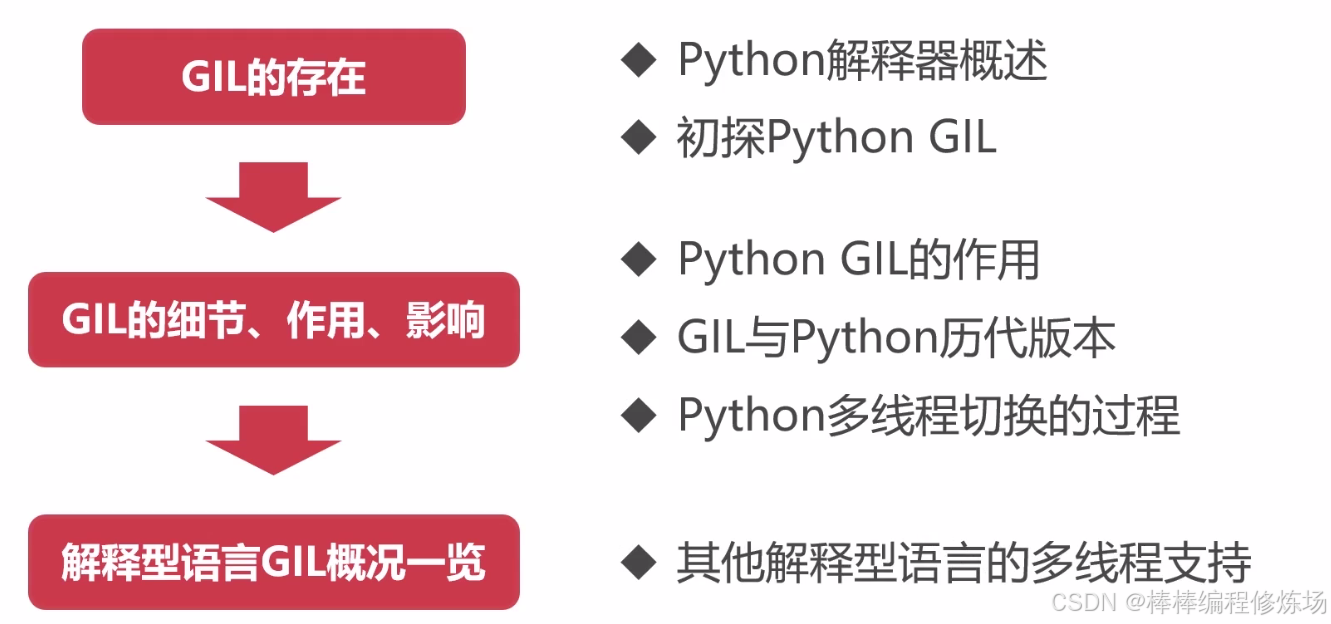
本小节学习路线:
2.1 GIL的存在
2.1.1 Python解释器概述
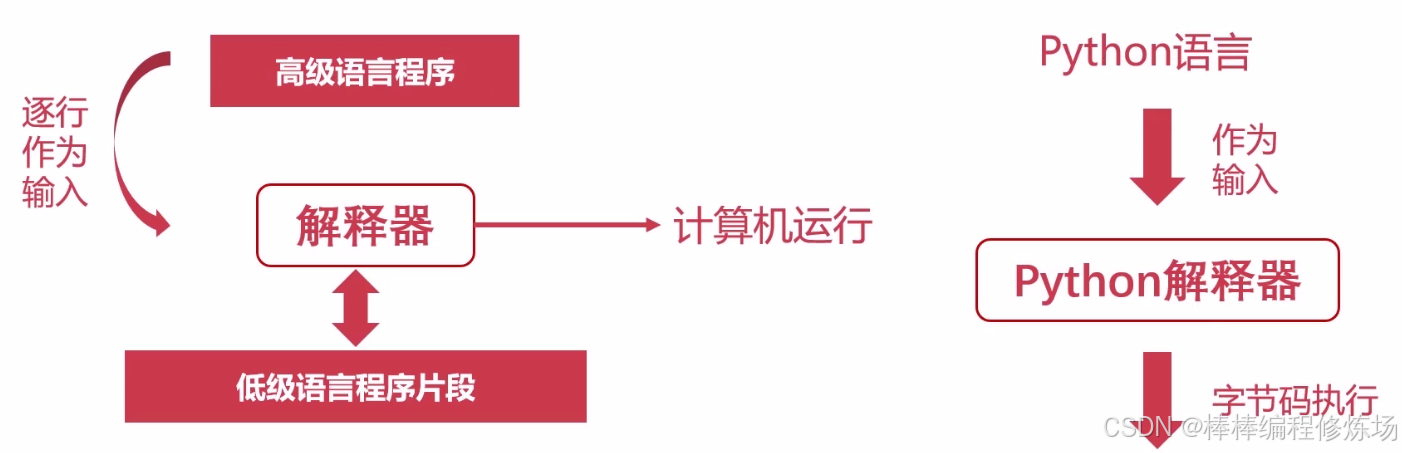
前置知识了解编译型语言与解释型语言的区别:参考 《100天精通Python——基础篇 2025 第19天:并发编程启蒙——理解CPU、线程与进程的那些事》 一文中的 《1.4 计算机的层次与编程语言》 小节。
Python 解释器:
Python 解释器的实现参考 《100天精通Python——基础篇 2025 第1天:从编程语言到计算机基础,开启你的学习之旅》 一文中的 《十、Python解释器这么多,初学者该如何选择?》 小节
2.1.2 初探Python GIL
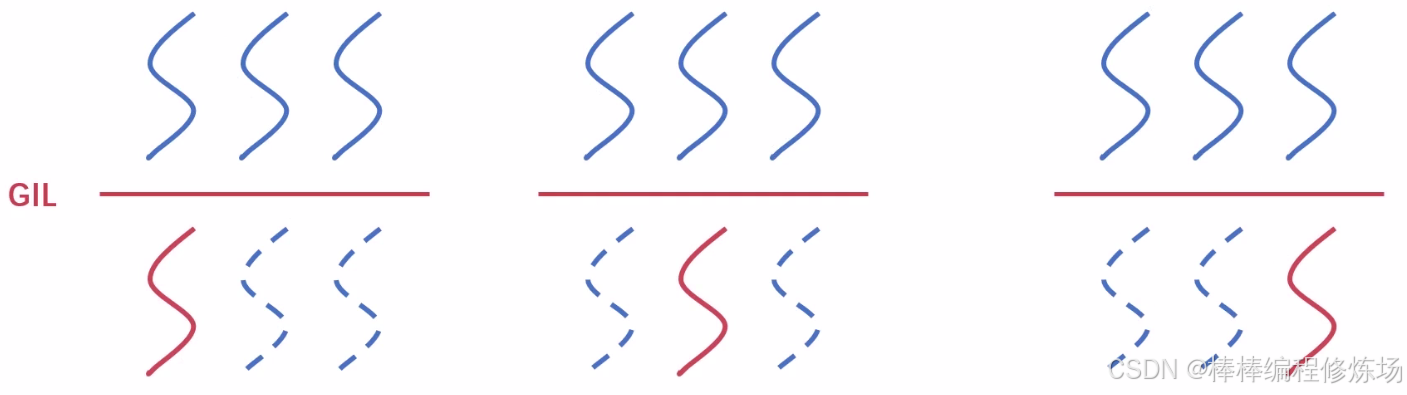
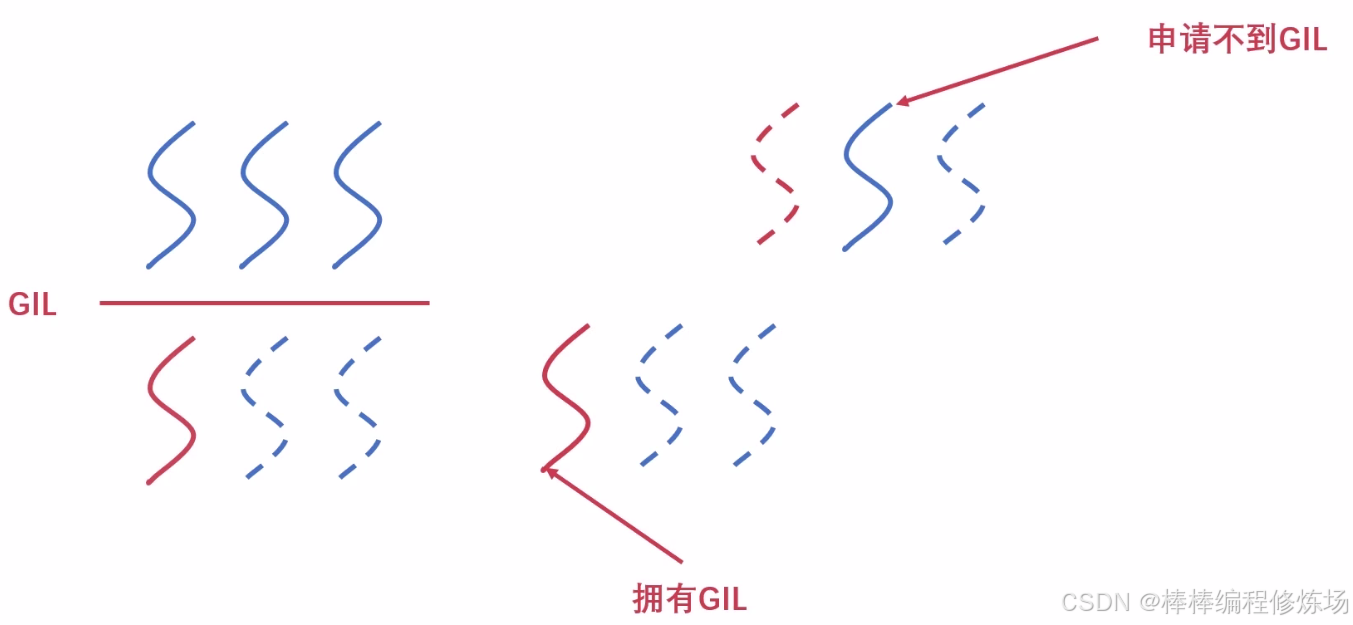
临界资源: 临界资源指的是一些虽作为共享资源却又无法同时被多个线程共同访问的共享资源。当有进程在使用临界资源时,其他进程必须依据操作系统的同步机制等待占用进程释放该共享资源才可重新竞争使用共享资源。
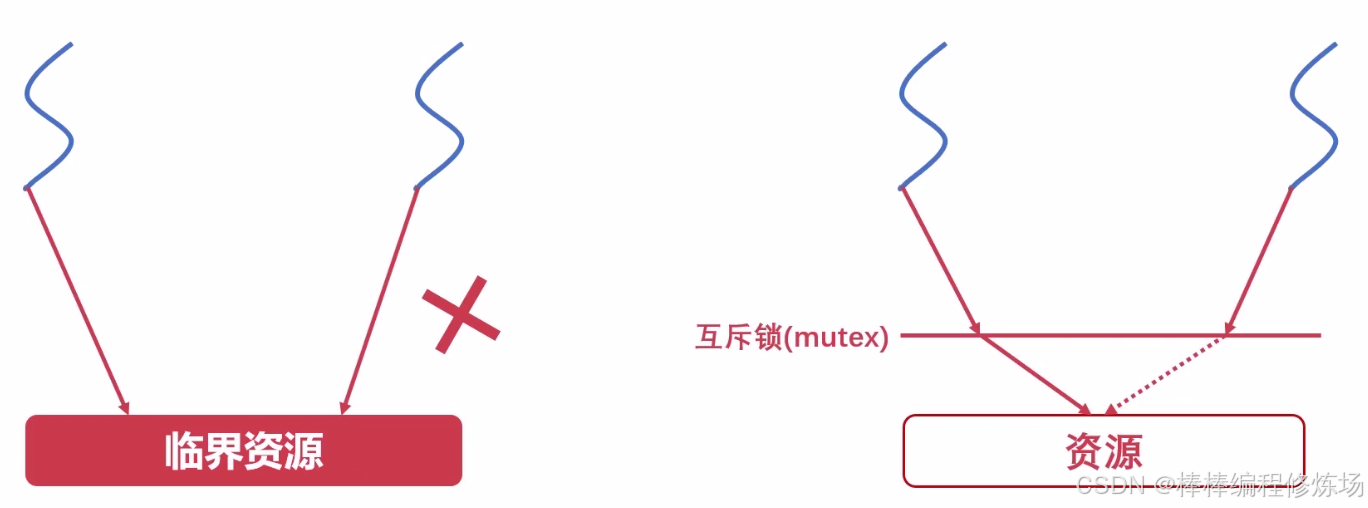
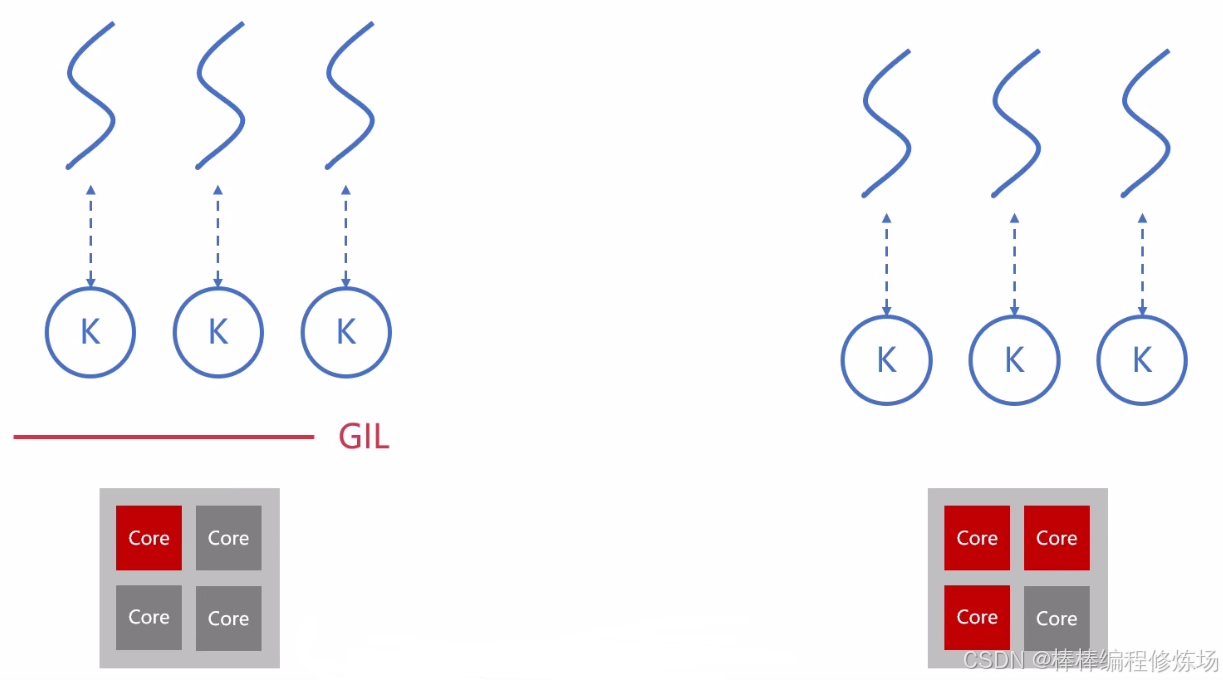
CPython 在解释器进程级别有一把锁,叫做 GIL(Global Interpreter Lock),即全局解释器锁。GIL 保证 CPython 进程中,只有一个线程执行字节码。甚至是在多核 CPU 的情况下,也只允许同时只能有一个 CPU 核心上运行该进程的一个线程。

Cpython 解释器是开源的,可以在 https://github.com/python/cpython/blob/main/Python/ 查看,其中在 ceval_gil.c 文件中定义了 GIL 锁:
static void _gil_initialize(struct _gil_runtime_state *gil)
{gil->locked = -1;gil->interval = DEFAULT_INTERVAL;
}static int gil_created(struct _gil_runtime_state *gil)
{if (gil == NULL) {return 0;}return (_Py_atomic_load_int_acquire(&gil->locked) >= 0);
}static void create_gil(struct _gil_runtime_state *gil)
{MUTEX_INIT(gil->mutex);
#ifdef FORCE_SWITCHINGMUTEX_INIT(gil->switch_mutex);
#endifCOND_INIT(gil->cond);
#ifdef FORCE_SWITCHINGCOND_INIT(gil->switch_cond);
#endif_Py_atomic_store_ptr_relaxed(&gil->last_holder, 0);_Py_ANNOTATE_RWLOCK_CREATE(&gil->locked);_Py_atomic_store_int_release(&gil->locked, 0);
}
体验 GIL,示例代码1:
# -*- coding: utf-8 -*-
# @Time    : 2025-05-27 7:44
# @Author  : bb_bcxlc
# @File    : gil_demo1.py
# @Software: PyCharm
# @Blog: https://blog.csdn.net/xw1680import threadingcnt = 1000000000def count_down(n):while n > 0:n -= 1if __name__ == '__main__':# 单线程运行# count_down(cnt)# 多线程运行t1 = threading.Thread(target=count_down, args=(cnt,))t2 = threading.Thread(target=count_down, args=(cnt,))t1.start()t2.start()
程序运行结果如下:
# windows下:
# 单线程执行时间: 31.397101879119873
# 多线程执行时间: 59.35982632637024# linxu下:
[root@VM-16-6-centos download_server]# time python3 gil_demo1.py
real	0m48.620s
user	0m48.552s
sys	0m0.014s
[root@VM-16-6-centos download_server]# time python3 gil_demo1.py
real	1m38.002s
user	1m38.060s
sys	0m0.204s# 可以发现多线程消耗的时间比单线程多,说明了GIL锁的存在,程序无法真正地并行运行,由于线程间的切换等开销,消耗的时间反而更多
示例代码2:
# -*- coding: utf-8 -*-
# @Time    : 2025-05-27 7:54
# @Author  : bb_bcxlc
# @File    : gil_demo2.py
# @Software: PyCharm
# @Blog: https://blog.csdn.net/xw1680
import threadingcnt = 0def consumer():global cntwhile True:cnt -= 1def producer():global cntwhile True:cnt += 1if __name__ == '__main__':t1 = threading.Thread(target=producer)t2 = threading.Thread(target=producer)t1.start()t2.start()
运行 python 程序之后,使用 sysstat 工具对比前后结果:
[root@VM-16-6-centos pythonCode]# sar -u 1 100
Linux 3.10.0-1160.119.1.el7.x86_64 (VM-16-6-centos) 	05/27/2025 	_x86_64_	(2 CPU)07:58:21 AM     CPU     %user     %nice   %system   %iowait    %steal     %idle
07:58:22 AM     all      0.50      0.00      0.50      0.00      0.00     99.00
07:58:23 AM     all      0.50      0.00      0.50      0.00      0.00     98.99
07:58:24 AM     all      1.00      0.00      2.00      0.00      0.00     97.00
07:58:25 AM     all      0.00      0.00      0.00      0.50      0.00     99.50
07:58:26 AM     all      1.00      0.00      1.49      0.00      0.00     97.51
07:58:27 AM     all      1.01      0.00      2.01      0.00      0.00     96.98
07:58:28 AM     all      0.00      0.00      0.50      0.00      0.00     99.50
07:58:29 AM     all      0.50      0.00      0.00      0.00      0.00     99.50
07:58:30 AM     all      0.51      0.00      0.51      0.00      0.00     98.99
07:58:31 AM     all     24.38      0.00      1.00      0.00      0.00     74.63
07:58:32 AM     all     50.51      0.00      0.00      0.00      0.00     49.49
07:58:33 AM     all     50.50      0.00      0.50      0.50      0.00     48.50
07:58:34 AM     all     51.00      0.00      0.50      0.00      0.00     48.50
07:58:35 AM     all     50.75      0.00      0.50      1.01      0.00     47.74
07:58:36 AM     all     50.50      0.00      1.50      0.00      0.00     48.00
07:58:37 AM     all     51.50      0.00      1.50      0.00      0.00     47.00
07:58:38 AM     all     50.25      0.00      0.00      0.00      0.00     49.75
07:58:39 AM     all     50.00      0.00      0.51      0.00      0.00     49.49
07:58:40 AM     all     50.50      0.00      1.00      0.00      0.00     48.50
07:58:41 AM     all     50.50      0.00      0.50      0.00      0.00     49.00
07:58:42 AM     all     50.25      0.00      0.50      0.50      0.00     48.76
07:58:43 AM     all     50.25      0.00      1.01      0.00      0.00     48.74
07:58:44 AM     all     50.75      0.00      0.50      0.00      0.00     48.74
07:58:45 AM     all     50.50      0.00      0.50      1.50      0.00     47.50
07:58:46 AM     all     50.75      0.00      1.01      0.00      0.00     48.24
07:58:47 AM     all     51.26      0.00      2.51      0.00      0.00     46.23
07:58:48 AM     all     50.25      0.00      0.50      0.00      0.00     49.25
使用 C++ 程序改写示例代码2,代码如下:
// 编译命令: g++ -Wl,--no-as-needed --std=c++11 -pthread gil.cpp -o main
// ./main 执行
#include <iostream>
#include <thread>
using namespace std;int cnt = 0;
void producer() {while (true) {cnt += 1;}
}void consumer() {while (true) {cnt -= 1;}
}int main()
{std::thread t1(producer);std::thread t2(consumer);t1.join();t2.join();std::cout << cnt << std::endl;
}
运行 C++ 程序之后,使用 sysstat 工具对比前后结果:
[root@VM-16-6-centos pythonCode]# sar -u 1 100
Linux 3.10.0-1160.119.1.el7.x86_64 (VM-16-6-centos) 	05/27/2025 	_x86_64_	(2 CPU)08:08:33 AM     CPU     %user     %nice   %system   %iowait    %steal     %idle
08:08:34 AM     all      0.50      0.00      1.00      0.00      0.00     98.51
08:08:35 AM     all      0.00      0.00      0.50      0.50      0.00     98.99
08:08:36 AM     all      0.50      0.00      1.01      0.00      0.00     98.49
08:08:37 AM     all      0.50      0.00      0.50      0.00      0.00     99.00
08:08:38 AM     all     27.00      0.00      1.50      0.00      0.00     71.50
08:08:39 AM     all    100.00      0.00      0.00      0.00      0.00      0.00
08:08:40 AM     all     99.50      0.00      0.50      0.00      0.00      0.00
08:08:41 AM     all    100.00      0.00      0.00      0.00      0.00      0.00
08:08:42 AM     all    100.00      0.00      0.00      0.00      0.00      0.00
08:08:43 AM     all     99.50      0.00      0.50      0.00      0.00      0.00
08:08:44 AM     all    100.00      0.00      0.00      0.00      0.00      0.00
08:08:45 AM     all    100.00      0.00      0.00      0.00      0.00      0.00
08:08:46 AM     all     98.51      0.00      1.49      0.00      0.00      0.00
08:08:47 AM     all    100.00      0.00      0.00      0.00      0.00      0.00
08:08:48 AM     all     99.01      0.00      0.99      0.00      0.00      0.00
08:08:49 AM     all    100.00      0.00      0.00      0.00      0.00      0.00
count_down 时间与生产者-消费者 CPU 占用率都说明了,Python 的多线程是伪多线程,不管使用单线程还是多线程,都只能使用 CPU 一个核的资源,在一些场景下,还会因为上下文的切换带来额外的损耗。

2.2 GIL的细节、作用、影响
2.2.1 Python GIL的作用
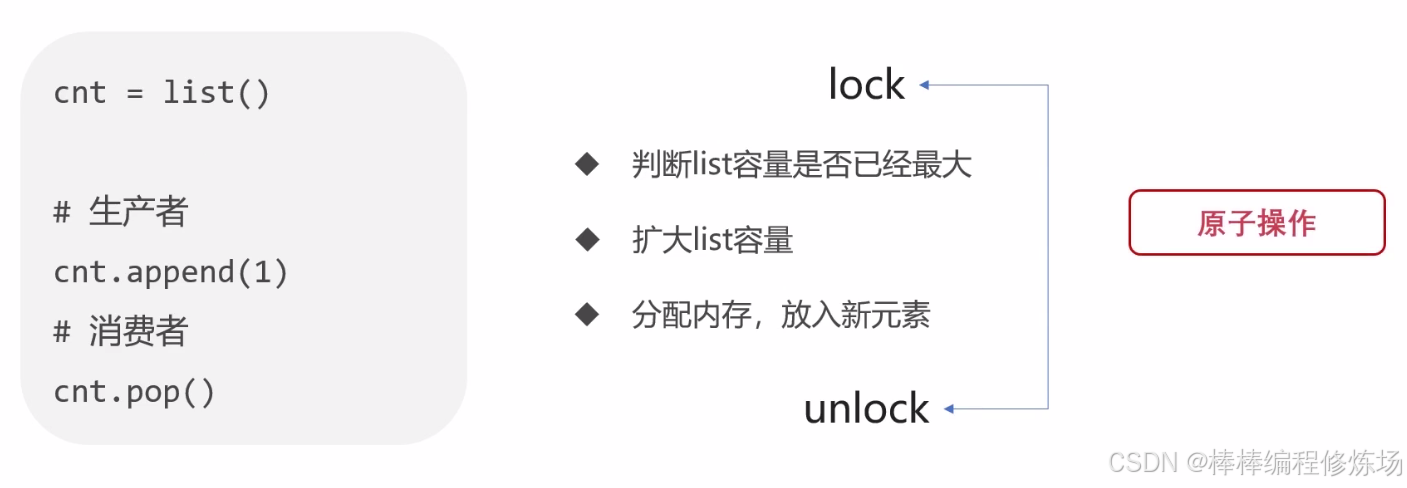
之前在阐述编译型与解释型语言的时候,我们已经说过,Python 源代码是由更偏底层的语言实现的解释器来进行解释执行的,所以我们在 Python 源代码中所看到的一行代码的操作,对应解释器底层解释过来的代码可能就不止一行了,那涉及到临界资源的时候单线程串行执行是没有问题的,但是涉及多线程就可能会出现临界资源数据错乱的问题,这个和我们之前讲的线程锁是一个道理,所以为了保护容器临界资源的问题,就应该把所有涉及容器操作的方法,比如:append、clear、count index 等都加上锁的操作,除了列表还有其他容器:tuple、dict,在拓展到 Python 语言别的层面,其实所有涉及到内存操作的逻辑,我们在 Python 底层的解释器都需要加上锁的操作,以保证这些容器内存在多线程运行的时候可以保证数据的准确,总的来说:Python 解释器大部分逻辑都需要加锁。
Python 中绝大多数内置数据结构的读、写操作都是原子操作。由于 GIL 的存在,Python 的内置数据类型在多线程编程的时候就变成了安全的了,但是实际上它们本身不是线程安全类型。
那么 Python 是怎么搞的呢?
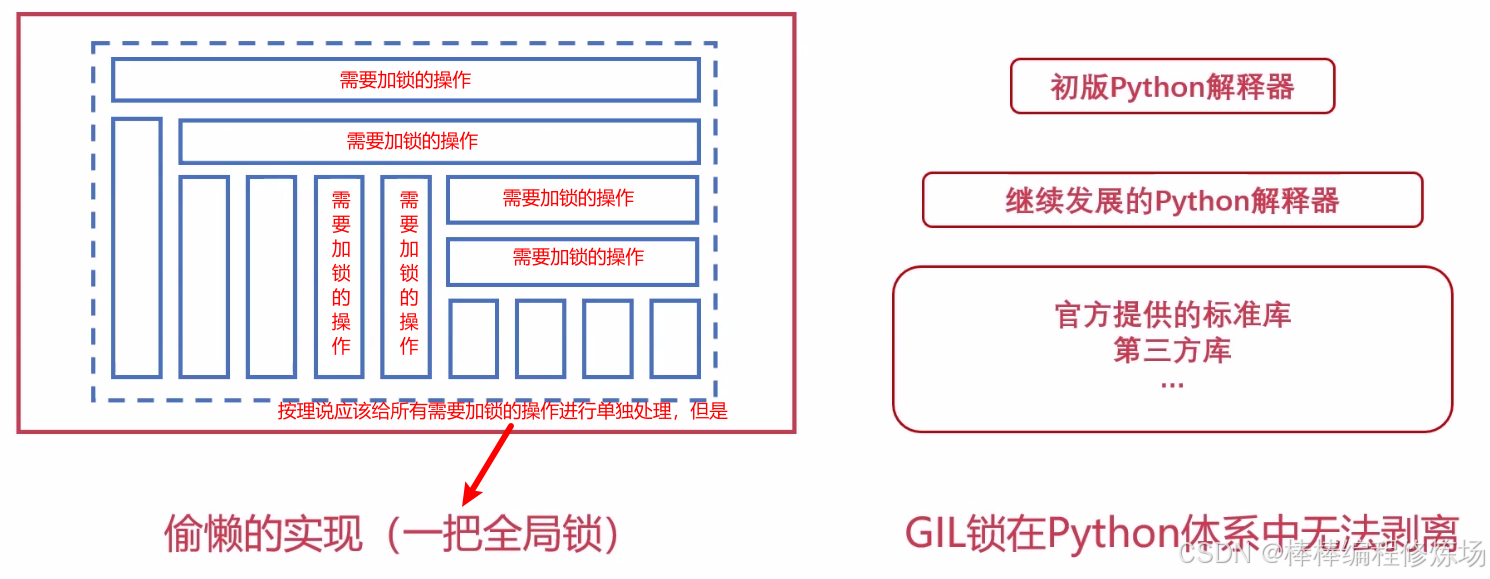
GIL 锁显然并不是一个优雅的设计,是一个简单粗暴的全局锁。保留 GIL 的原因:
# 1.GIL 锁保证了 Python 解释器的正确运行
# 2.GvR坚持的简单哲学,对于初学者门槛低,不需要高深的系统知识也能安全、简单的使用Python
# GIL简单粗暴的设计使得Python语言茁壮成长,
# 由于GIL锁,Python语言在实现层面就变得非常简单,无需考虑多线程的一个并发问题,符合GvR坚持的简单哲学
# 3.大量第三方模块与工具参考了GIL的理念,使得现在无法剥离
2.2.2 GIL与Python历代版本
本小节是对 《2.2.1 Python GIL的作用》 小节内容的补充。Python 各版本中 GIL 的演进历史
-
Python 1.x: GIL 初现:GIL 在最早期的 CPython 就存在。Python 早期未关注多线程并发问题,因此 GIL 的引入是为了保护解释器内部状态。早期:移除 GIL 锁后,会降低 CPython 单线程的执行效率,python1.5 版本测试 ⇒ 降低了50%,并未合并该分支,想想我们之前的那张图,那么多框,都需要加更小粒度的锁,肯定会影响性能
-
Python 2.x 系列: GIL 保持不变:GIL 一直是单线程的核心限制。出现绕过方案:通过 multiprocessing 模块实现
"多进程并行"来绕开 GIL。C 扩展中可以释放 GIL(如 NumPy 的底层 C 实现)。python2.7 版本性能改进:issue#8299 -
Python 3.2(2011): 重大 GIL 行为改进:GIL 在多线程下的行为被重写,使其更适合多核系统(特别是 CPU-bound 多线程任务不再卡顿严重)。引入时间片(Time-based)切换机制:线程之间的切换改为基于时间片(默认 5ms),减少线程饥饿现象。这个改进由 David Beazley(著名 Python 专家)推动。
-
Python 3.9+: GIL 的机制相对稳定,对性能做了很多优化,比如提高上下文切换效率,但 GIL 本身仍然存在。
-
Python 3.12(2023): 引入
"Per-interpreter GIL"实验性支持(PEP 684):每个解释器子实例(sub-interpreter)有自己的 GIL。支持一种新的并发模型 —— 通过 interpreters 模块运行隔离的 Python 实例。虽然仍非真正意义的"无 GIL",但这为后续多核并行铺平道路。 -
Python 3.13(2024,计划中): 官方已合并无 GIL 的构建分支:来自 Sam Gross 提出的 nogil 分支(后续成为 PEP 703)。引入一个可选的
"无 GIL 模式":你可以编译 Python 时开启无 GIL 模式。这标志着 CPython 历史上首次官方支持"无 GIL 模式"的构建版本!
总的来说新版 CPython 一直在努力优化 GIL 的问题,但不是移除。总结:
| 版本 | 年份 | GIL 状况与进展 |
|---|---|---|
| Python 1.x | 1991-2000 | 引入 GIL 以保障线程安全 |
| Python 2.x | 2000-2010 | GIL 保持不变,multiprocessing 成为替代方案 |
| Python 3.2 | 2011 | 改善多线程行为,避免饥饿,采用时间片机制 |
| Python 3.9+ | 2020+ | 性能持续优化,但 GIL 仍存在 |
| Python 3.12 | 2023 | PEP 684:子解释器支持各自 GIL,迈出多核并行第一步 |
| Python 3.13 | 2024(开发中) | PEP 703:可选无 GIL 构建首次合并进官方主线 |
从 CPU 发展来看:
-
2005年前:单核为主,GIL 影响不明显。在 2005 年以前,大多数个人计算机采用的是 单核 CPU(如 Intel 奔腾4、AMD Athlon)。在这种架构下:即使你使用多线程,操作系统也只会在一个核心上轮流调度线程。所以 GIL 的存在不会造成多大资源浪费,因为即使你没有 GIL,也无法实现真正的并行计算。多线程主要用于 IO密集型任务(如网络爬虫、磁盘读写),GIL 会在阻塞 IO 时自动释放,性能表现仍可接受。
-
2005年后:多核普及,GIL 成为瓶颈。2005年,Intel 发布奔腾D 系列、后续酷睿双核(Core Duo),AMD 推出双核 Athlon X2,桌面计算开始进入多核时代。多核 CPU 能够真正实现并行执行多个线程,理论上性能应有大幅提升。但在 CPython 中,由于 GIL:无论多少个线程,依然只有一个线程可以执行 Python 字节码。多核 CPU 的并行能力 被 GIL 严重限制。对 CPU 密集型任务(如图像处理、科学计算、深度学习前处理)而言,无法充分利用多核优势。

2.2.3 Python多线程切换的过程
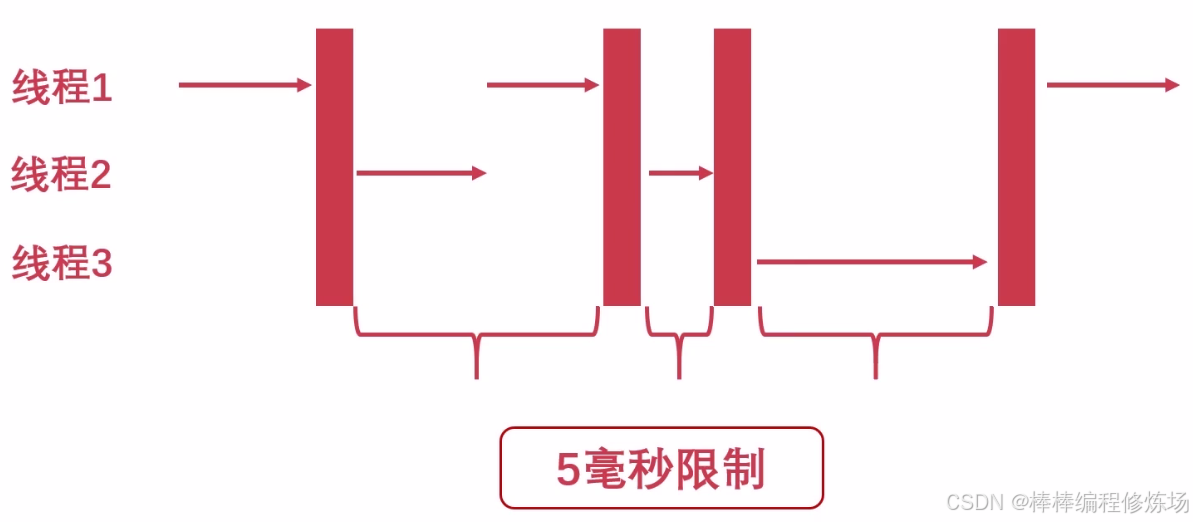
如果 GIL 锁一直不释放,其他线程获取不到,会出问题,那么 Python 解释器怎么做的呢?Tick:字节码片段,Python 虚拟机指令,100 ticks 将进行一次检查,然后满了就切换
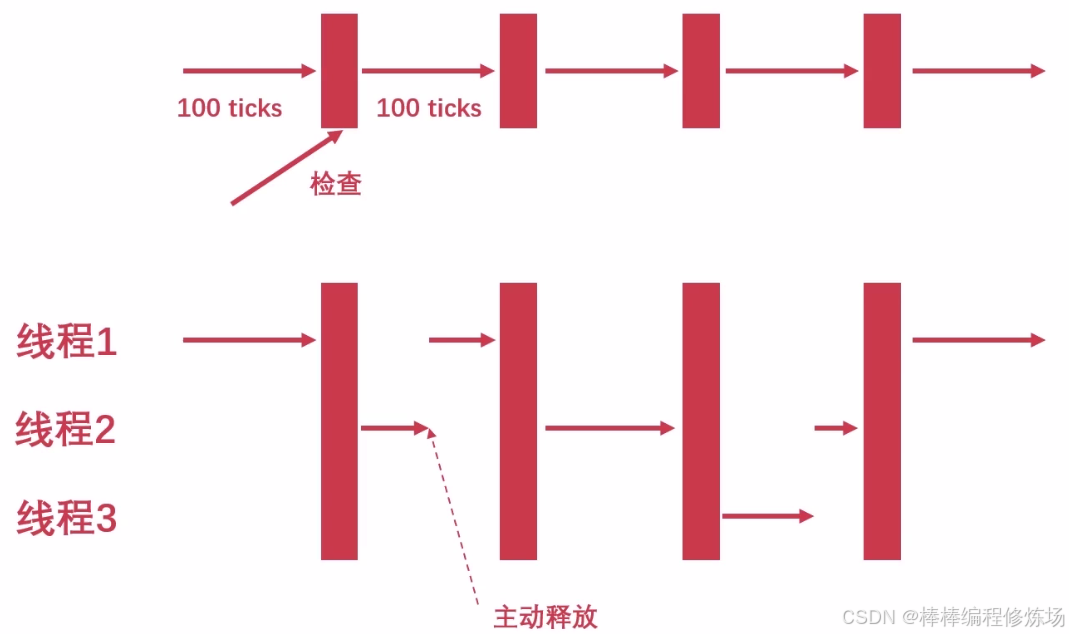
但是每个字节码片段执行的时间,不一致,执行时间过长同样会导致其他线程一直在等待,所以改为时间片,默认为 5 毫秒,如下:
I/O 过程也会释放 GIL:
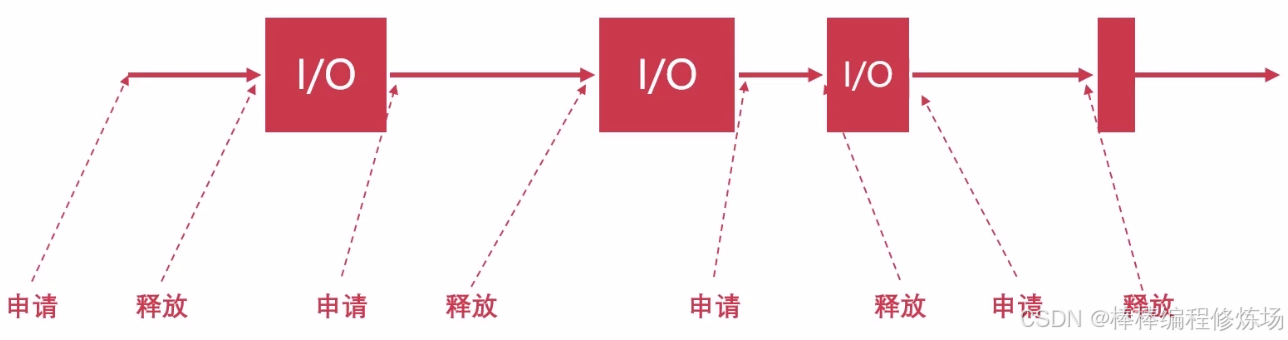
小结:
- 多线程运行需要竞争申请 GIL
- Python 虚拟机强制释放 GIL
- IO 密集型,某个线程阻塞,GIL 会释放,就会调度其他就绪线程,CPU 密集型,当前线程可能会连续的获得 GIL,导致其它线程几乎无法使用 CPU,在 CPython 中由于有 GIL 存在,IO 密集型,使用多线程较为合算;CPU 密集型,使用多进程,要绕开 GIL----后续我们学习多进程之后,还会用例子来佐证。如果在意多线程的效率问题,请绕行,选择其它语言 Erlang、Go 等。
在举一个简单的例子:
# -*- coding: utf-8 -*-
# @Time    : 2025-05-27 9:52
# @Author  : bb_bcxlc
# @File    : gil_demo3.py
# @Software: PyCharm
# @Blog: https://blog.csdn.net/xw1680import logging
import datetime
import threadinglogging.basicConfig(level=logging.INFO, format="%(thread)s %(message)s")
start = datetime.datetime.now()# 计算
def calc():result = 0for i in range(1000000000):  # 10亿result += i# 程序1 start
calc()
calc()
calc()
calc()# delta = (datetime.datetime.now() - start).total_seconds()
# 串行执行 # 24788 151.499956
# logging.info(delta)
# end 程序1# 程序2 start
t1 = threading.Thread(target=calc)
t2 = threading.Thread(target=calc)
t3 = threading.Thread(target=calc)
t4 = threading.Thread(target=calc)
t1.start()
t2.start()
t3.start()
t4.start()
t1.join()
t2.join()
t3.join()
t4.join()
delta = (datetime.datetime.now() - start).total_seconds()
# 22888 304.476693
logging.info(delta)
# end 程序2
注意,不要在代码中出现 print 等访问 IO 的语句。访问 IO,线程阻塞,会释放 GIL 锁,其他线程被调度。程序1是单线程程序,所有 calc() 依次执行,根本就不是并发。在主线程内,函数串行执行。程序2是多线程程序,calc() 执行在不同的线程中,但是由于 GIL 的存在,线程的执行变成了假并发。但是这些线程可以被调度到不同的 CPU 核心上执行,只不过 GIL 让同一时间该进程只有一个线程被执行。从两段程序测试的结果来看,CPython 中多线程根本没有任何优势,甚至由于线程的上下文切换消耗,比一个线程执行时间还长。因为 GIL 的存在,尤其是像上面的计算密集型程序,和单线程串行效果相当甚至更差。这样,实际上就没有用上 CPU 多核心的优势。
2.3 解释型语言GIL概况一览
本小节来说说其他解释型语言的多线程支持。
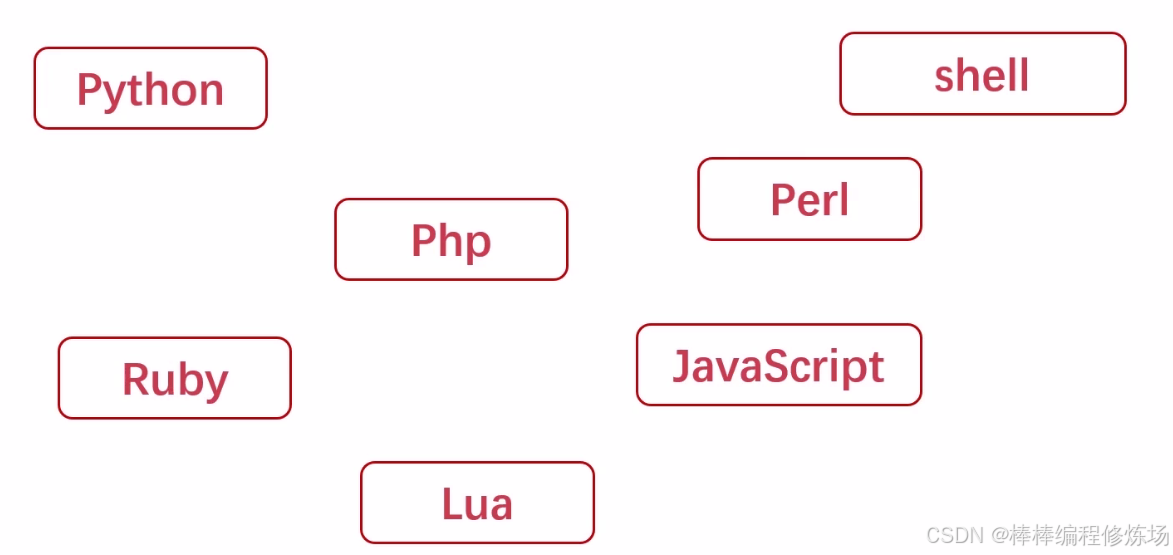
Ruby 解释器拥有和 Python 类似的 GIL,Php 默认不支持多线程,但是有一个黑科技,安装额外 C 扩展以支持多线程,Lua 只支持单线程,但是可以使用多进程来进行优化,Perl 多线程在 Linux 是通过多个 Process 实现的,Shell 没有线程的概念,JavaScript 是单线程的,JavaScript 的异步接口是很成熟的,通过异步来进行网络资源的加载,在 JavaScript 里面也有很多和 Python 协程类似的关键字,比如说 async 和 await。总的来说,每一种解释型语言的特性或者是说多线程的支持情况都不相同,和编译型语言呢也有很大的区别,在编译型语言里面几乎是所有的线程都支持并行的,但是在上述的这些解释型语言里面很少能看到真正并行的情况,这也和解释型语言脚本的功能或者是说应用场景有关系,一般而言,这些脚本语言都专注于某一个领域,比如 shell 脚本专注于 linux 里面一些自动化过程的编程,JavaScript 专注于浏览器网页的开发。
至此今天的学习就到此结束了,笔者在这里声明,笔者写文章只是为了学习交流,以及让更多学习Python语言的读者少走一些弯路,节省时间,并不用做其他用途,如有侵权,联系博主删除即可。感谢您阅读本篇博文,希望本文能成为您编程路上的领航者。祝您阅读愉快!

好书不厌读百回,熟读课思子自知。而我想要成为全场最靓的仔,就必须坚持通过学习来获取更多知识,用知识改变命运,用博客见证成长,用行动证明我在努力。
如果我的博客对你有帮助、如果你喜欢我的博客内容,请点赞、评论、收藏一键三连哦!听说点赞的人运气不会太差,每一天都会元气满满呦!如果实在要白嫖的话,那祝你开心每一天,欢迎常来我博客看看。
编码不易,大家的支持就是我坚持下去的动力。点赞后不要忘了关注我哦!