03.three官方示例+编辑器+AI快速学习webgl_animation_multiple
本实例主要讲解内容
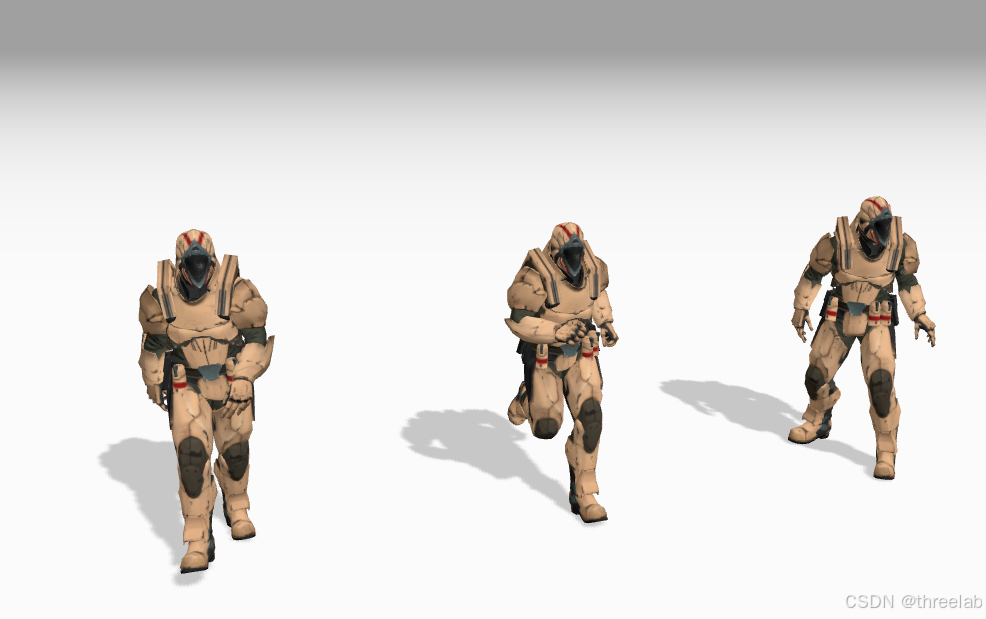
这个示例展示了Three.js中骨骼动画的高级应用技巧,重点演示了如何使用SkeletonUtils.clone()方法复制模型,并展示了两种不同的骨骼动画管理方式:
- 独立骨骼模式:每个模型拥有独立的骨骼结构,可播放不同动画
- 共享骨骼模式:多个模型共享同一骨骼结构,同步播放相同动画
通过对比这两种模式,展示了它们各自的特点和适用场景,以及如何在Three.js中实现这些技术。
完整代码注释
<!DOCTYPE html>
<html lang="en"><head><title>Multiple animated skinned meshes</title><meta charset="utf-8"><meta content="width=device-width, user-scalable=no, minimum-scale=1.0, maximum-scale=1.0" name="viewport"><link type="text/css" rel="stylesheet" href="main.css"></head><body><!-- 信息面板,显示示例说明和模型来源 --><div id="info">This demo shows the usage of <strong>SkeletonUtils.clone()</strong> and how to setup a shared skeleton.<br/>Soldier model from <a href="https://www.mixamo.com" target="_blank" rel="noopener">https://www.mixamo.com</a>.</div><!-- 导入映射,指定模块导入路径 --><script type="importmap">{"imports": {"three": "../build/three.module.js","three/addons/": "./jsm/"}}</script><script type="module">// 导入Three.js核心库和辅助工具import * as THREE from 'three';import { GLTFLoader } from 'three/addons/loaders/GLTFLoader.js';  // GLTF模型加载器import * as SkeletonUtils from 'three/addons/utils/SkeletonUtils.js';  // 骨骼工具集import { GUI } from 'three/addons/libs/lil-gui.module.min.js';  // GUI控制面板// 全局变量定义let camera, scene, renderer, clock;  // 相机、场景、渲染器和时钟let model, animations;  // 原始模型和动画// 存储动画混合器和场景对象的数组const mixers = [], objects = [];// 控制面板参数const params = {sharedSkeleton: false  // 是否使用共享骨骼模式};// 初始化函数init();function init() {// 创建透视相机,设置位置和朝向camera = new THREE.PerspectiveCamera( 45, window.innerWidth / window.innerHeight, 1, 1000 );camera.position.set( 2, 3, - 6 );camera.lookAt( 0, 1, 0 );// 创建时钟,用于计算动画时间增量clock = new THREE.Clock();// 创建场景并设置背景和雾scene = new THREE.Scene();scene.background = new THREE.Color( 0xa0a0a0 );scene.fog = new THREE.Fog( 0xa0a0a0, 10, 50 );// 添加半球光,提供自然光照效果const hemiLight = new THREE.HemisphereLight( 0xffffff, 0x8d8d8d, 3 );hemiLight.position.set( 0, 20, 0 );scene.add( hemiLight );// 添加方向光,用于产生阴影const dirLight = new THREE.DirectionalLight( 0xffffff, 3 );dirLight.position.set( - 3, 10, - 10 );dirLight.castShadow = true;// 设置阴影相机参数,控制阴影范围和精度dirLight.shadow.camera.top = 4;dirLight.shadow.camera.bottom = - 4;dirLight.shadow.camera.left = - 4;dirLight.shadow.camera.right = 4;dirLight.shadow.camera.near = 0.1;dirLight.shadow.camera.far = 40;scene.add( dirLight );// 可选:显示阴影相机辅助线,用于调试阴影// scene.add( new THREE.CameraHelper( dirLight.shadow.camera ) );// 创建地面平面const mesh = new THREE.Mesh( new THREE.PlaneGeometry( 200, 200 ), new THREE.MeshPhongMaterial( { color: 0xcbcbcb, depthWrite: false } ) );mesh.rotation.x = - Math.PI / 2;  // 旋转平面使其水平mesh.receiveShadow = true;  // 地面接收阴影scene.add( mesh );// 加载GLTF格式模型const loader = new GLTFLoader();loader.load( 'models/gltf/Soldier.glb', function ( gltf ) {model = gltf.scene;  // 获取模型场景对象animations = gltf.animations;  // 获取模型动画// 遍历模型的所有对象,设置可投射阴影model.traverse( function ( object ) {if ( object.isMesh ) object.castShadow = true;} );// 设置默认场景(独立骨骼模式)setupDefaultScene();} );// 初始化WebGL渲染器renderer = new THREE.WebGLRenderer( { antialias: true } );renderer.setPixelRatio( window.devicePixelRatio );  // 设置像素比,适配高DPI屏幕renderer.setSize( window.innerWidth, window.innerHeight );  // 设置渲染尺寸renderer.setAnimationLoop( animate );  // 设置动画循环renderer.shadowMap.enabled = true;  // 启用阴影渲染document.body.appendChild( renderer.domElement );  // 将渲染器DOM元素添加到页面// 添加窗口大小变化事件监听,调整相机和渲染器window.addEventListener( 'resize', onWindowResize );// 创建GUI控制面板const gui = new GUI();// 添加共享骨骼模式切换按钮,并绑定事件处理函数gui.add( params, 'sharedSkeleton' ).onChange( function () {clearScene();  // 清空当前场景if ( params.sharedSkeleton === true ) {setupSharedSkeletonScene();  // 设置共享骨骼场景} else {setupDefaultScene();  // 设置默认场景(独立骨骼)}} );gui.open();  // 默认打开控制面板}// 清空场景的函数function clearScene() {// 停止所有动画混合器的动作for ( const mixer of mixers ) {mixer.stopAllAction();}// 清空混合器数组mixers.length = 0;// 从场景中移除所有对象,并释放骨骼资源for ( const object of objects ) {scene.remove( object );scene.traverse( function ( child ) {if ( child.isSkinnedMesh ) child.skeleton.dispose();  // 释放骨骼资源} );}// 清空对象数组objects.length = 0;}// 设置默认场景(独立骨骼模式)function setupDefaultScene() {// 三个克隆模型,每个拥有独立的骨骼结构// 每个模型可以有自己独立的动画状态const model1 = SkeletonUtils.clone( model );  // 克隆第一个模型const model2 = SkeletonUtils.clone( model );  // 克隆第二个模型const model3 = SkeletonUtils.clone( model );  // 克隆第三个模型// 设置模型位置model1.position.x = - 2;model2.position.x = 0;model3.position.x = 2;// 为每个模型创建独立的动画混合器const mixer1 = new THREE.AnimationMixer( model1 );const mixer2 = new THREE.AnimationMixer( model2 );const mixer3 = new THREE.AnimationMixer( model3 );// 为每个模型播放不同的动画mixer1.clipAction( animations[ 0 ] ).play(); // idle - 站立动画mixer2.clipAction( animations[ 1 ] ).play(); // run - 跑步动画mixer3.clipAction( animations[ 3 ] ).play(); // walk - 行走动画// 将模型添加到场景scene.add( model1, model2, model3 );// 将模型和混合器添加到管理数组objects.push( model1, model2, model3 );mixers.push( mixer1, mixer2, mixer3 );}// 设置共享骨骼场景function setupSharedSkeletonScene() {// 三个克隆模型,共享同一个骨骼结构// 所有模型共享相同的动画状态// 克隆原始模型作为共享模型基础const sharedModel = SkeletonUtils.clone( model );// 获取共享的蒙皮网格对象(假设名为'vanguard_Mesh')const shareSkinnedMesh = sharedModel.getObjectByName( 'vanguard_Mesh' );// 获取共享骨骼const sharedSkeleton = shareSkinnedMesh.skeleton;// 获取共享的根骨骼(假设名为'mixamorigHips')const sharedParentBone = sharedModel.getObjectByName( 'mixamorigHips' );// 将根骨骼添加到场景,骨骼需要在场景中才能使动画生效scene.add( sharedParentBone );// 克隆蒙皮网格创建三个实例const model1 = shareSkinnedMesh.clone();const model2 = shareSkinnedMesh.clone();const model3 = shareSkinnedMesh.clone();// 设置绑定模式为分离模式,允许使用外部骨骼model1.bindMode = THREE.DetachedBindMode;model2.bindMode = THREE.DetachedBindMode;model3.bindMode = THREE.DetachedBindMode;// 创建单位矩阵const identity = new THREE.Matrix4();// 使用共享骨骼绑定每个模型实例model1.bind( sharedSkeleton, identity );model2.bind( sharedSkeleton, identity );model3.bind( sharedSkeleton, identity );// 设置模型位置model1.position.x = - 2;model2.position.x = 0;model3.position.x = 2;// 应用从GLTF资产中获取的变换model1.scale.setScalar( 0.01 );model1.rotation.x = - Math.PI * 0.5;model2.scale.setScalar( 0.01 );model2.rotation.x = - Math.PI * 0.5;model3.scale.setScalar( 0.01 );model3.rotation.x = - Math.PI * 0.5;// 创建单个动画混合器,控制共享骨骼const mixer = new THREE.AnimationMixer( sharedParentBone );mixer.clipAction( animations[ 1 ] ).play(); // 播放跑步动画// 将共享骨骼和模型实例添加到场景scene.add( sharedParentBone, model1, model2, model3 );// 将对象和混合器添加到管理数组objects.push( sharedParentBone, model1, model2, model3 );mixers.push( mixer );}// 窗口大小变化事件处理函数function onWindowResize() {camera.aspect = window.innerWidth / window.innerHeight;  // 更新相机宽高比camera.updateProjectionMatrix();  // 更新相机投影矩阵renderer.setSize( window.innerWidth, window.innerHeight );  // 更新渲染器尺寸}// 动画循环函数,每一帧都会被调用function animate() {const delta = clock.getDelta();  // 获取自上一帧以来的时间增量// 更新所有动画混合器for ( const mixer of mixers ) mixer.update( delta );// 渲染场景renderer.render( scene, camera );}</script></body></html>
整体总结
这个Three.js示例展示了骨骼动画的高级应用技巧,主要内容包括:
-
两种骨骼管理模式:
- 独立骨骼模式:每个模型拥有独立的骨骼结构和动画状态,可播放不同动画,占用更多资源,但灵活性高
- 共享骨骼模式:多个模型共享同一骨骼结构,必须同步播放相同动画,节省资源,但动画一致性要求高
-
核心技术实现:
- 使用
SkeletonUtils.clone()方法复制模型及其层次结构 - 独立模式直接克隆整个模型并为每个模型创建独立混合器
- 共享模式提取共享骨骼,设置
DetachedBindMode,并使用单个混合器控制所有模型
- 使用
-
性能与应用场景:
- 独立模式适合需要不同动画状态的角色(如游戏中不同行为的NPC)
- 共享模式适合需要大量相同动画的场景(如群众演员、军队等),可显著降低GPU和CPU负担
这个示例对于需要高效管理大量骨骼动画的应用场景非常有价值,展示了Three.js在处理复杂动画需求时的强大能力和灵活性。